Community project
ESP32 Web Home Automation
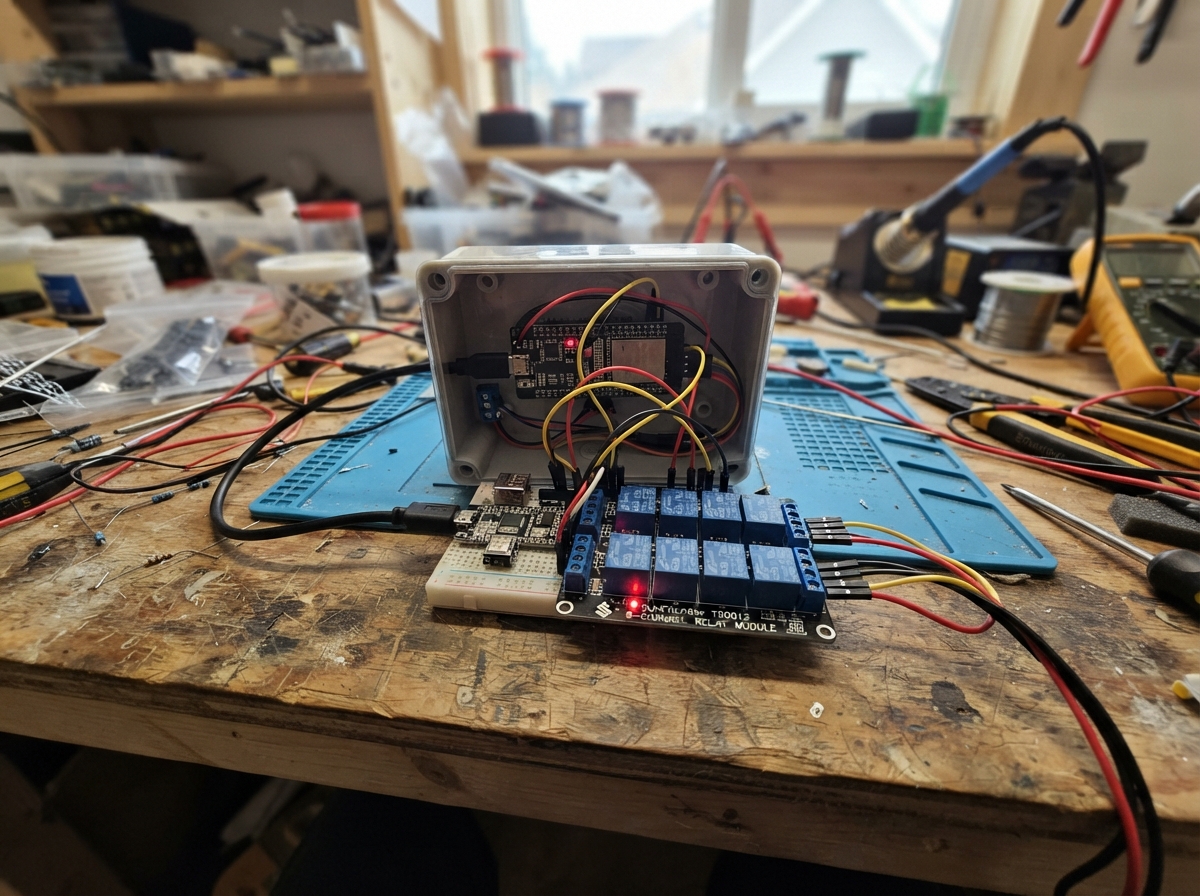
Build a web-based home automation system that controls up to eight high-power appliances and lights from any browser on the local network. This project pairs an ESP32 microcontroller with a SunFounder TS0012 8-channel relay module to switch mains-powered devices safely and reliably. The relay board handles the high-voltage switching while the ESP32 manages WiFi connectivity and serves an interactive web interface.
This guide provides a complete wiring diagram, parts list, and pre-written Arduino firmware with pattern modes (chase, alternate, blink) and individual relay control. Assembly steps emphasize safe separation of mains wiring from low-voltage control circuits, with testing procedures to verify each relay before connecting live appliances.
Wiring diagram

Gather all the parts
Assemble it in 5 steps
1. Keep mains wiring separate
Place the ESP32 and relay board in a non-metal enclosure or on a clear work surface. Do not connect any household appliance or wall-power wire while you are making the low-voltage control wiring.
- Test the web page with only the relay board connected first; the clicking sound shows each channel is responding.
- Household mains voltage can seriously injure or kill you and can start a fire. If you are not trained to make mains connections, have a qualified electrician wire the relay screw terminals and use suitable enclosed, fused hardware.
2. Power the relay board
With the ESP32 unplugged, run a wire from the relay board VCC pin to the ESP32 VIN or 5V pin (power), and run a second wire from relay board GND to an ESP32 GND pin (ground). Use a stable 5 V USB supply; an eight-relay board may need more current than a small computer USB port provides.
- VCC is the positive 5 V connection; GND is the negative/return connection. Both boards must share the same GND wire so the control signals have a common reference.
- Make sure VCC and GND are not swapped — swapped power can damage the relay board or ESP32. Do not power the relay coils from the ESP32 3V3 pin.
3. Connect the eight control wires
Connect relay IN1 to ESP32 GPIO4 (signal), IN2 to GPIO13 (signal), IN3 to GPIO14 (signal), IN4 to GPIO16 (signal), IN5 to GPIO17 (signal), IN6 to GPIO18 (signal), IN7 to GPIO19 (signal), and IN8 to GPIO23 (signal). These are the wires that tell each relay to switch.
- Use eight different wire colors or label the wires 1 through 8. This prevents a light or fan appearing under the wrong button on the web page.
- Do not connect a relay IN pin to 5 V directly; it must go only to its listed ESP32 signal pin. The ESP32 output is 3.3 V, so confirm your relay module reliably recognizes 3.3 V control signals before connecting mains loads.
4. Test each relay before connecting appliances
Plug the ESP32 into USB power. On your phone or computer, join the Wi-Fi network named ESP32-Home-Control using password change-me-123, then open http://192.168.4.1 in a web browser. Press each matching button and listen for one relay click at a time.
- Change the Wi-Fi password in the firmware before regular use. The relays deliberately return to OFF after a restart or power cut.
- Keep fingers, loose wires, and all mains-powered appliances away from the relay terminals during this low-voltage test.
5. Have appliance wiring completed safely
After the low-voltage test works, have a qualified electrician connect each appliance's switched live wire through the correct relay COM and NO terminal, with proper mains-rated enclosure, fuse or breaker, strain relief, and earthing. Label the relay channels to match the web page names.
- Use the normally-open (NO) terminal when you want an appliance to be off after a restart. Fans and lights may draw a large startup current, so ensure the relay contact rating suits the real load.
- Never put household mains voltage onto ESP32 pins, the relay IN header, or the breadboard. Do not use this small relay module for loads beyond its contact rating, heaters without independent safety control, or any critical safety equipment.
Review all connections
1. Connections between "relay8_1" and "ESP32"
Deploy the firmware
#include <Arduino.h>
#include <WiFi.h>
#include <WebServer.h>


enum PatternMode { PATTERN_NONE, PATTERN_CHASE, PATTERN_ALTERNATE, PATTERN_BLINK };

// Forward declarations
void applyRelay(uint8_t channel);
String pageHtml();
void handleHome();
void handleToggle();
void handleAll();
void handlePattern();
void handleSpeed();
void setRelay(uint8_t channel, bool state);
void stopPattern();
void startPattern(const String &name);
void updatePattern();

const char *WIFI_SSID = "ROBOTICS 0222";
const char *WIFI_PASSWORD = "835R!6b7";

// This fallback network appears only if the home Wi-Fi connection fails.
const char *FALLBACK_AP_SSID = "ESP32-Home-Control";
const char *FALLBACK_AP_PASSWORD = "change-me-123";

const uint8_t RELAY1_PIN = 4;
const uint8_t RELAY2_PIN = 13;
const uint8_t RELAY3_PIN = 14;
const uint8_t RELAY4_PIN = 16;
const uint8_t RELAY5_PIN = 17;
const uint8_t RELAY6_PIN = 18;
const uint8_t RELAY7_PIN = 19;
const uint8_t RELAY8_PIN = 23;

const uint8_t relayPins[8] = {RELAY1_PIN, RELAY2_PIN, RELAY3_PIN, RELAY4_PIN, RELAY5_PIN, RELAY6_PIN, RELAY7_PIN, RELAY8_PIN};
const char *relayNames[8] = {"Light 1", "Light 2", "Fan 1", "Fan 2", "Appliance 1", "Appliance 2", "Appliance 3", "Appliance 4"};
bool relayOn[8] = {false, false, false, false, false, false, false, false};

// Most 8-channel boards are low-level triggered: LOW turns a relay on.
const uint8_t RELAY_ON_LEVEL = LOW;
const uint8_t RELAY_OFF_LEVEL = HIGH;
// Mechanical relays need a short pause between changes to avoid a large inrush all at once.
const unsigned long RELAY_SEQUENCE_DELAY_MS = 250;
const unsigned long PATTERN_STEP_DELAY_MS = 180;
const unsigned long MIN_PATTERN_STEP_DELAY_MS = 50;
const unsigned long MAX_PATTERN_STEP_DELAY_MS = 2000;
unsigned long patternStepDelayMs = PATTERN_STEP_DELAY_MS;

PatternMode activePattern = PATTERN_NONE;
uint8_t patternStep = 0;
unsigned long patternChangedAt = 0;
WebServer server(80);

void applyRelay(uint8_t channel) {
  digitalWrite(relayPins[channel], relayOn[channel] ? RELAY_ON_LEVEL : RELAY_OFF_LEVEL);
  Serial.printf("Relay %u %s\\n", channel + 1, relayOn[channel] ? "ON" : "OFF");
}

void setRelay(uint8_t channel, bool state) {
  if (relayOn[channel] != state) {
    relayOn[channel] = state;
    applyRelay(channel);
  }
}

void stopPattern() {
  if (activePattern != PATTERN_NONE) {
    activePattern = PATTERN_NONE;
    Serial.println("Pattern stopped");
  }
}

void startPattern(const String &name) {
  if (name == "chase") activePattern = PATTERN_CHASE;
  else if (name == "alternate") activePattern = PATTERN_ALTERNATE;
  else if (name == "blink") activePattern = PATTERN_BLINK;
  else return;

  patternStep = 0;
  patternChangedAt = 0;  // Make the first visible change immediately.
  Serial.printf("Continuous pattern started: %s\n", name.c_str());
}

// Run one pattern step at a time, so the web page stays responsive.
void updatePattern() {
  if (activePattern == PATTERN_NONE) return;
  const unsigned long interval = activePattern == PATTERN_CHASE ? patternStepDelayMs : patternStepDelayMs * 2;
  if (millis() - patternChangedAt < interval) return;
  patternChangedAt = millis();

  if (activePattern == PATTERN_CHASE) {
    for (uint8_t i = 0; i < 8; i++) setRelay(i, i == patternStep);
    patternStep = (patternStep + 1) % 8;
  } else if (activePattern == PATTERN_ALTERNATE) {
    const bool oddChannelsOn = (patternStep % 2) == 0;
    for (uint8_t i = 0; i < 8; i++) setRelay(i, ((i % 2) == 0) == oddChannelsOn);
    patternStep = (patternStep + 1) % 2;
  } else if (activePattern == PATTERN_BLINK) {
    const bool allOn = (patternStep % 2) == 0;
    for (uint8_t i = 0; i < 8; i++) setRelay(i, allOn);
    patternStep = (patternStep + 1) % 2;
  }
}

String pageHtml() {
  String page = F("<!doctype html><html><head><meta name='viewport' content='width=device-width,initial-scale=1'>"
                  "<title>ESP32 Home Control</title><style>body{font-family:Arial,sans-serif;background:#101827;color:#eef2ff;margin:0;padding:18px;text-align:center}h1{margin:4px 0}p{color:#bac6dc}.grid{display:grid;grid-template-columns:repeat(auto-fit,minmax(145px,1fr));gap:12px;max-width:720px;margin:20px auto}.card{background:#1f2a40;border-radius:14px;padding:16px}.state{font-weight:bold;margin:12px 0}.on{color:#4ade80}.off{color:#fca5a5}button{width:100%;border:0;border-radius:9px;padding:12px;font-size:16px;font-weight:bold;color:#fff;background:#2563eb;cursor:pointer}button.stop{background:#dc2626}.all{max-width:720px;margin:auto;display:flex;gap:12px}.all a{flex:1}footer{font-size:12px;margin-top:24px;color:#94a3b8}</style></head><body><h1>Home Control</h1><p>ESP32 home control page</p><div class='grid'>");
  for (uint8_t i = 0; i < 8; i++) {
    const String stateClass = relayOn[i] ? "on" : "off";
    const String stateText = relayOn[i] ? "ON" : "OFF";
    const String buttonClass = relayOn[i] ? "stop" : "";
    const String buttonText = relayOn[i] ? "Turn OFF" : "Turn ON";
    page += "<div class='card'><strong>" + String(relayNames[i]) + "</strong><div class='state " + stateClass + "'>" + stateText + "</div><a href='/toggle?ch=" + String(i + 1) + "'><button class='" + buttonClass + "'>" + buttonText + "</button></a></div>";
  }
  page += F("</div><div class='all'><a href='/all?state=on'><button>Turn all ON</button></a><a href='/all?state=off'><button class='stop'>Turn all OFF</button></a></div><h2>Continuous patterns</h2><div class='all'><a href='/pattern?name=chase'><button>Chase</button></a><a href='/pattern?name=alternate'><button>Alternate</button></a><a href='/pattern?name=blink'><button>Blink</button></a></div><div class='card' style='max-width:720px;margin:12px auto'><strong>Pattern speed: ");
  page += String(patternStepDelayMs);
  page += F(" ms</strong><input style='width:100%;margin-top:12px' type='range' min='50' max='2000' step='10' value='");
  page += String(patternStepDelayMs);
  page += F("' oninput='this.previousElementSibling.textContent=\"Pattern speed: \"+this.value+\" ms\"' onchange='location=\"/speed?ms=\"+this.value'></div><div class='all' style='margin-top:12px'><a href='/pattern?name=stop'><button class='stop'>Stop pattern</button></a></div><footer>Move the speed slider: a smaller number makes patterns faster. Patterns keep repeating until you press Stop pattern, choose another pattern, or operate a relay. For safety, relays start OFF whenever power is restored.</footer></body></html>");
  return page;
}

void handleHome() { server.send(200, "text/html", pageHtml()); }

void handleToggle() {
  if (!server.hasArg("ch")) { server.send(400, "text/plain", "Missing channel"); return; }
  int channel = server.arg("ch").toInt() - 1;
  if (channel < 0 || channel > 7) { server.send(400, "text/plain", "Invalid channel"); return; }
  stopPattern();
  relayOn[channel] = !relayOn[channel];
  applyRelay(channel);
  server.sendHeader("Location", "/");
  server.send(303);
}

void handlePattern() {
  if (!server.hasArg("name")) { server.send(400, "text/plain", "Missing pattern name"); return; }
  const String name = server.arg("name");
  if (name == "stop") stopPattern();
  else if (name == "chase" || name == "alternate" || name == "blink") startPattern(name);
  else { server.send(400, "text/plain", "Invalid pattern name"); return; }
  server.sendHeader("Location", "/");
  server.send(303);
}

void handleSpeed() {
  if (!server.hasArg("ms")) { server.send(400, "text/plain", "Missing speed"); return; }
  const long requestedMs = server.arg("ms").toInt();
  patternStepDelayMs = constrain(requestedMs, (long)MIN_PATTERN_STEP_DELAY_MS, (long)MAX_PATTERN_STEP_DELAY_MS);
  Serial.printf("Pattern speed set to %lu ms\\n", patternStepDelayMs);
  server.sendHeader("Location", "/");
  server.send(303);
}

void handleAll() {
  if (!server.hasArg("state")) { server.send(400, "text/plain", "Missing state"); return; }
  const bool state = server.arg("state") == "on";

  stopPattern();

  if (state) {
    // Turn ON only the relays that are currently OFF, in relay-number order.
    for (uint8_t i = 0; i < 8; i++) {
      if (!relayOn[i]) {
        relayOn[i] = true;
        applyRelay(i);
        delay(RELAY_SEQUENCE_DELAY_MS);
      }
    }
  } else {
    // Turn OFF only the relays that are currently ON, in reverse relay-number order.
    for (int i = 7; i >= 0; i--) {
      if (relayOn[i]) {
        relayOn[i] = false;
        applyRelay(i);
        delay(RELAY_SEQUENCE_DELAY_MS);
      }
    }
  }

  server.sendHeader("Location", "/");
  server.send(303);
}

void setup() {
  Serial.begin(115200);
  delay(200);
  Serial.println("Home control starting");
  for (uint8_t i = 0; i < 8; i++) {
    pinMode(relayPins[i], OUTPUT);
    relayOn[i] = false;
    applyRelay(i);
  }
  WiFi.mode(WIFI_STA);
  WiFi.begin(WIFI_SSID, WIFI_PASSWORD);
  Serial.printf("Connecting to Wi-Fi: %s\\n", WIFI_SSID);

  const unsigned long connectTimeoutMs = 15000;
  const unsigned long connectStartedAt = millis();
  while (WiFi.status() != WL_CONNECTED && millis() - connectStartedAt < connectTimeoutMs) {
    delay(250);
  }

  if (WiFi.status() == WL_CONNECTED) {
    Serial.printf("Wi-Fi connected. Open http://%s\\n", WiFi.localIP().toString().c_str());
  } else {
    WiFi.mode(WIFI_AP);
    const bool apStarted = WiFi.softAP(FALLBACK_AP_SSID, FALLBACK_AP_PASSWORD);
    Serial.printf("Wi-Fi failed; fallback access point %s at http://%s\\n", apStarted ? "started" : "failed", WiFi.softAPIP().toString().c_str());
  }

  server.on("/", HTTP_GET, handleHome);
  server.on("/toggle", HTTP_GET, handleToggle);
  server.on("/all", HTTP_GET, handleAll);
  server.on("/pattern", HTTP_GET, handlePattern);
  server.on("/speed", HTTP_GET, handleSpeed);
  server.begin();
  Serial.println("HTTP server started");
}

void loop() {
  server.handleClient();
  updatePattern();
}
Remix this project
Make it yours in one click
Open a full copy of this project in your own Schematik workspace — diagram, code, parts, and assembly steps included. Swap the sensor, add features, or redesign the whole thing with AI. The author's original stays untouched.