Community project
UNIHIKER K10 Blinky
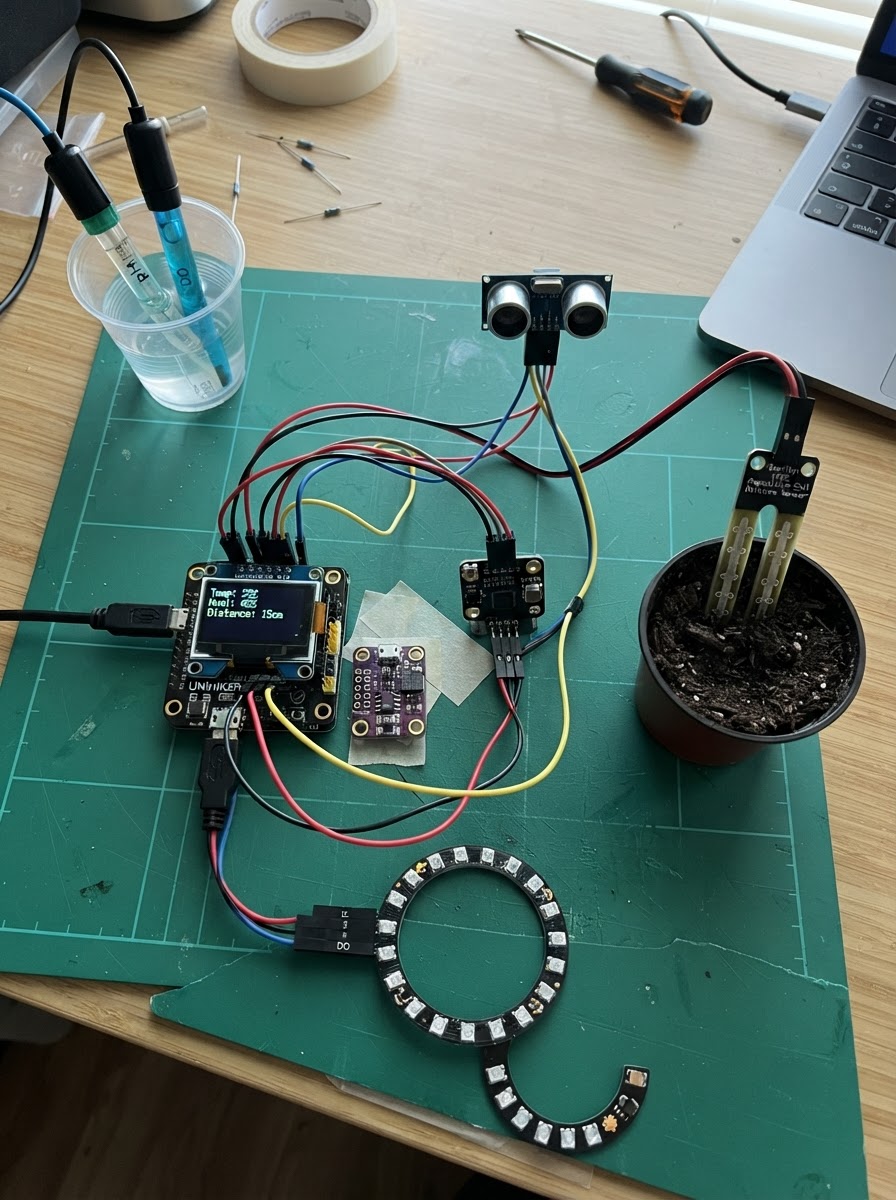
The UNIHIKER K10 Blinky project transforms the DFRobot UNIHIKER K10 into a multi-sensor environmental monitoring station with real-time visual feedback. By combining the board's built-in TFT display, camera, and onboard sensors with external environmental and presence-detection breakouts, this guide shows how to wire and program a complete IoT sensor dashboard that reads air quality, temperature, humidity, soil moisture, water chemistry, distance, and presence detection.
This guide provides a complete parts list, wiring diagram, and step-by-step assembly instructions for connecting the ENS160+BME280 environmental sensor, mmWave presence detector, soil moisture and pH probes, ultrasonic distance sensor, and addressable LED ring to the UNIHIKER K10's GPIO and I2C ports. You'll also receive the Arduino firmware that reads all sensors, displays live data on the TFT screen, and drives the 24-pixel RGB LED ring to visualize sensor states.
Wiring diagram

Gather all the parts
Assemble it in 8 steps
1. Understand what's already built in
Your UNIHIKER K10 already has TFT display (ILI9341), 2MP GC2145 camera, AHT20 temperature/humidity, LTR303ALS light sensor, SC7A20H 3-axis accelerometer, 3× WS2812 RGB LEDs, dual MEMS microphones, a speaker, two buttons (A/B), and a microSD slot — all built in. No wiring needed for any of these.
- The camera is on the back of the board
- Insert a microSD card if you want to use the snapshot (Button A) feature
2. Connect I2C sensors to the Gravity 4-pin port
The K10's Gravity 4-pin connector (SDA=GPIO47, SCL=GPIO48) is an I2C bus shared by up to four external sensors. Use a Gravity I2C hub or daisy-chain with short JST-PH 4-pin cables. Connect: BME680 air quality, ENS160+BME280 combo, SCD40 CO2, SGP30 TVOC, and APDS-9960 gesture/RGB sensor. All are 3.3 V and share the same SDA/SCL lines.
- Each sensor has a different I2C address so they coexist — BME680 at 0x76, ENS160 at 0x53, BME280 at 0x77, SCD40 at 0x62, SGP30 at 0x58, APDS9960 at 0x39
- A DFRobot Gravity I2C Hub (SEN0293) makes wiring easier — plug it into the 4-pin port and connect each sensor module
- Do not pull SDA/SCL higher than 3.3 V — the K10's GPIO is 3.3 V logic
3. Connect APDS-9960 interrupt pin
Run a wire from the APDS-9960 INT pin to GPIO 6 (P15 on the edge connector). This allows gesture detection interrupts. The firmware enables the internal pull-up.
- If your APDS-9960 module does not expose an INT pin, leave it unconnected — gesture polling still works
4. Connect the mmWave presence sensor (SEN0691) via UART
The C4002 mmWave sensor has a UART interface. Wire its TX pin to GPIO 2 (P1 edge pad) on the K10, and its RX pin to GPIO 1 (P0 edge pad). Power it with 3.3 V and GND from the Gravity 3-pin connector or edge connector power pads.
- GPIO 1 and 2 on the K10 are the large edge pads P0 and P1 — not the tiny I2C pads
- The sensor's TX goes to the board's GPIO 2 (RX), and sensor's RX goes to board GPIO 1 (TX)
5. Connect analog sensors to edge-pad GPIOs
Three analog sensors each use one ADC-capable GPIO via a Gravity 3-pin connector: - Soil moisture sensor (IP65): AOUT → GPIO 3 (P2) - pH probe analog board: PO → GPIO 11 (P6) - Dissolved oxygen probe: PO → GPIO 5 (P14) All three run from 3.3 V.
- The Gravity 3-pin connectors are labelled A0/A1/A2 near the edge pads — match the GPIO numbers in the pin table
6. Connect the HC-SR04P ultrasonic distance sensor
Wire the HC-SR04P: TRIG → GPIO 14 (P3), ECHO → GPIO 13 (P4). Power it at 3.3 V (the HC-SR04P supports 3–5.5 V; use the K10's 3.3 V rail so the ECHO signal is already at 3.3 V logic — no level shifter needed).
- Keep the ultrasonic sensor facing a clear open area for best results
7. Connect the 24-pixel WS2812 LED ring
Wire the LED ring's DIN to GPIO 4 (P13 edge connector). Power its VCC from the 5 V pin on the K10's edge connector (labelled +5V) and its GND to GND. At full brightness, 24 NeoPixels can draw up to ~1.4 A, so limit brightness in firmware (already set to 80/255) and avoid USB hubs.
- The 24-pixel ring draws significant current at full brightness — keep the firmware brightness limit at 80 or lower when powered from USB
- Ensure GND of the ring shares ground with the K10
8. Power on and verify
Connect the K10 to your PC via USB-C. The TFT will show the sensor dashboard. Press Button B to toggle between Page A (environmental: temperature, humidity, CO2, TVOC, gas resistance) and Page B (physical: pH, soil moisture, dissolved O2, distance, mmWave presence, accelerometer). Press Button A to save a camera snapshot to the microSD card (must be inserted first).
- Serial monitor at 115200 baud shows a full single-line log of all sensors every 100 ms
- The 24-pixel ring cycles green/orange/red based on CO2 level
- The 3 onboard RGB LEDs go solid red when the mmWave sensor detects a person, and cycle colours otherwise
Review all connections
1. Connections between "ens160_bme280" and "ESP32"
2. Connections between "mmwave" and "ESP32"
3. Connections between "soil" and "ESP32"
4. Connections between "ph_sensor" and "ESP32"
5. Connections between "do_sensor" and "ESP32"
6. Connections between "ultrasonic" and "ESP32"
7. Connections between "led_ring" and "ESP32"
Deploy the firmware
#include <Arduino.h>
// ─────────────────────────────────────────────────────────────────
//  UNIHIKER K10 — DFRobot Sensor Dashboard
//  Onboard:  TFT display, 2MP camera, AHT20, LTR303ALS light,
//            SC7A20H accelerometer, 3× WS2812 RGB LEDs, MEMS mics,
//            speaker, A/B buttons, microSD slot
//  External: ENS160+BME280 (I2C), SEN0691 mmWave (UART),
//            Soil moisture (ADC), pH probe (ADC), DO probe (ADC),
//            HC-SR04P ultrasonic, 24-px WS2812 LED ring
// ─────────────────────────────────────────────────────────────────

#include "unihiker_k10.h"
#include <Wire.h>
#include <DFRobot_ENS160.h>
#include "DFRobot_BME280.h"
#include <DFRobot_C4002.h>
#include <Adafruit_NeoPixel.h>

// ── Pin constants ─────────────────────────────────────────────────
#define SOIL_PIN    3    // Gravity analog soil moisture
#define PH_PIN      11   // Gravity pH probe analog out
#define DO_PIN      5    // Gravity dissolved O2 analog out
#define TRIG_PIN    14   // HC-SR04P trigger
#define ECHO_PIN    13   // HC-SR04P echo
#define RING_PIN    4    // 24-pixel WS2812 ring DIN
#define MMWAVE_TX   1    // Board TX → sensor RX
#define MMWAVE_RX   2    // Board RX ← sensor TX

// mmWave baud rate
#define MMWAVE_BAUD 9600

// ── Colour constants for canvasText ──────────────────────────────
#define RED     0xFF0000
#define GREEN   0x00FF00
#define BLUE    0x0000FF
#define CYAN    0x00FFFF
#define MAGENTA 0xFF00FF
#define YELLOW  0xFFFF00
#define WHITE   0xFFFFFF

// ── Sensor objects ────────────────────────────────────────────────

typedef DFRobot_BME280_IIC BME;


// Forward declarations
float readSoilPct();
float readPhValue();
float readDOmgL();
float measureDistance_cm();
void spinRing(uint32_t colour);
void showPage(float bmeT, float bmeH, float bmeP, uint16_t tvoc, uint16_t eco2, uint8_t aqi, float ph, float soil, float doMg, float dist_cm, bool presence, float ax, float ay, float az, uint16_t als);

UNIHIKER_K10 k10;

// ENS160 + BME280 (DFRobot libs — no Adafruit Unified Sensor dependency)
DFRobot_ENS160_I2C ens160(&Wire, 0x53);

BME bme(&Wire, 0x76);

// mmWave UART — constructor requires HardwareSerial*, baud, rxpin, txpin
DFRobot_C4002 mmwave(&Serial1, MMWAVE_BAUD, MMWAVE_RX, MMWAVE_TX);

// 24-pixel external LED ring
Adafruit_NeoPixel ring(24, RING_PIN, NEO_GRB + NEO_KHZ800);

// ── Display page ──────────────────────────────────────────────────
static uint8_t displayPage = 0;

// ── Helpers ───────────────────────────────────────────────────────
float readSoilPct()  { return (float)map(analogRead(SOIL_PIN), 0, 4095, 0, 100); }
float readPhValue()  { return analogRead(PH_PIN)  * (3.3f / 4095.0f) * 3.5f; }
float readDOmgL()    { return analogRead(DO_PIN)  * (3.3f / 4095.0f) / 0.57f; }

float measureDistance_cm() {
  digitalWrite(TRIG_PIN, LOW);  delayMicroseconds(2);
  digitalWrite(TRIG_PIN, HIGH); delayMicroseconds(10);
  digitalWrite(TRIG_PIN, LOW);
  long dur = pulseIn(ECHO_PIN, HIGH, 30000UL);
  return dur * 0.0343f / 2.0f;
}

// Animate 24-px ring with rolling colour
void spinRing(uint32_t colour) {
  uint8_t offset = (millis() / 50) % 24;
  for (int i = 0; i < 24; i++) {
    ring.setPixelColor((i + offset) % 24, (i == 0) ? colour : 0);
  }
  ring.show();
}

// TFT dashboard — two pages
void showPage(float bmeT, float bmeH, float bmeP,
              uint16_t tvoc, uint16_t eco2, uint8_t aqi,
              float ph, float soil, float doMg,
              float dist_cm, bool presence,
              float ax, float ay, float az,
              uint16_t als) {
  k10.canvas->canvasClear();
  if (displayPage == 0) {
    k10.canvas->canvasText("=== ENV  PAGE A ===", 1, RED);
    k10.canvas->canvasText(("BME T:" + String(bmeT,1) + "C H:" + String(bmeH,0) + "%").c_str(), 2, CYAN);
    k10.canvas->canvasText(("BME P:" + String(bmeP/100.0f,0) + "hPa").c_str(), 3, CYAN);
    k10.canvas->canvasText(("TVOC:" + String(tvoc) + "ppb").c_str(), 4, MAGENTA);
    k10.canvas->canvasText(("eCO2:" + String(eco2) + "ppm").c_str(), 5, MAGENTA);
    k10.canvas->canvasText(("AQI: " + String(aqi)).c_str(), 6, GREEN);
    k10.canvas->canvasText(("Light:" + String(als)).c_str(), 7, YELLOW);
    k10.canvas->canvasText(("Acc X:" + String(ax,1) + " Y:" + String(ay,1)).c_str(), 8, WHITE);
  } else {
    k10.canvas->canvasText("=== PHY  PAGE B ===", 1, RED);
    k10.canvas->canvasText(("pH:   " + String(ph,2)).c_str(), 2, GREEN);
    k10.canvas->canvasText(("Soil: " + String(soil,0) + "%").c_str(), 3, GREEN);
    k10.canvas->canvasText(("DO:   " + String(doMg,1) + "mg/L").c_str(), 4, CYAN);
    k10.canvas->canvasText(("Dist: " + String(dist_cm,1) + "cm").c_str(), 5, YELLOW);
    k10.canvas->canvasText(("mmWave:" + String(presence ? "PRESENT" : "NONE")).c_str(), 6, presence ? RED : WHITE);
    k10.canvas->canvasText(("Acc Z: " + String(az,1)).c_str(), 7, WHITE);
    k10.canvas->canvasText("(B=flip page)", 8, YELLOW);
  }
  k10.canvas->updateCanvas();
}

// ── Setup ─────────────────────────────────────────────────────────
void setup() {
  Serial.begin(115200);

  // K10 framework
  k10.begin();
  k10.initScreen(2);
  k10.creatCanvas();
  k10.rgb->brightness(60);

  // Button B → flip display page
  k10.buttonB->setPressedCallback([]() {
    displayPage = (displayPage + 1) % 2;
  });

  // Button A → save camera snapshot
  k10.buttonA->setPressedCallback([]() {
    k10.photoSaveToTFCard("/snapshot.jpg");
  });

  k10.initBgCamerImage();
  k10.setBgCamerImage(true);
  k10.initSDFile();

  // External I2C bus
  Wire.begin(47, 48);

  // ENS160
  if (ens160.begin() != NO_ERR) {
    Serial.println("[warn] ENS160 not found");
  } else {
    ens160.setPWRMode(ENS160_STANDARD_MODE);
  }

  // BME280
  bme.reset();
  if (bme.begin() != BME::eStatusOK) {
    Serial.println("[warn] BME280 not found");
  }

  // Ultrasonic
  pinMode(TRIG_PIN, OUTPUT);
  pinMode(ECHO_PIN, INPUT);

  // External LED ring
  ring.begin();
  ring.setBrightness(80);
  ring.clear();
  ring.show();

  // mmWave — Serial1 already configured via constructor, just call begin()
  mmwave.begin();

  Serial.println("K10 DFRobot Sensor Dashboard ready.");
}

// ── Loop ──────────────────────────────────────────────────────────
void loop() {
  static uint32_t lastDisplay = 0;

  // ── Onboard sensors ──────────────────────────────────────────────
  uint16_t als = k10.readALS();
  float ax = k10.getAccelerometerX();
  float ay = k10.getAccelerometerY();
  float az = k10.getAccelerometerZ();

  // ── BME280 ───────────────────────────────────────────────────────
  float bmeT = bme.getTemperature();
  float bmeH = bme.getHumidity();
  float bmeP = bme.getPressure();   // Pa

  // ── ENS160 ───────────────────────────────────────────────────────
  // Compensate with temp/humidity for best accuracy
  ens160.setTempAndHum(bmeT, bmeH);
  uint8_t  aqi  = ens160.getAQI();
  uint16_t tvoc = ens160.getTVOC();
  uint16_t eco2 = ens160.getECO2();

  // ── Analog sensors ───────────────────────────────────────────────
  float ph   = readPhValue();
  float soil = readSoilPct();
  float doMg = readDOmgL();

  // ── Ultrasonic ───────────────────────────────────────────────────
  float dist = measureDistance_cm();

  // ── mmWave — use getPresenceGateIndex(); presence if index > 0 ───
  bool presence = (mmwave.getPresenceGateIndex() > 0);

  // ── Onboard RGB LEDs — presence indicator ────────────────────────
  if (presence) {
    k10.rgb->write(-1, 255, 0, 0);     // all red
  } else {
    int hue = (millis() / 20) % 256;
    k10.rgb->write(0,  hue,          0,   255 - hue);
    k10.rgb->write(1,  0,    255 - hue,   hue);
    k10.rgb->write(2,  255 - hue, hue,    0);
  }

  // ── External ring — colour by eCO2 level ─────────────────────────
  uint32_t ringCol = (eco2 > 1500) ? ring.Color(255, 0, 0)
                   : (eco2 > 800)  ? ring.Color(255, 120, 0)
                                   : ring.Color(0, 200, 80);
  spinRing(ringCol);

  // ── TFT update every 500 ms ──────────────────────────────────────
  if (millis() - lastDisplay > 500) {
    lastDisplay = millis();
    showPage(bmeT, bmeH, bmeP,
             tvoc, eco2, aqi,
             ph, soil, doMg,
             dist, presence,
             ax, ay, az, als);
  }

  // ── Serial log ───────────────────────────────────────────────────
  Serial.printf(
    "BME:T=%.1f H=%.0f%% P=%.0fhPa | ENS:AQI=%u TVOC=%u eCO2=%u | "
    "pH=%.2f Soil=%.0f%% DO=%.1fmg/L | Dist=%.1fcm | Pres=%s | "
    "Acc:%.1f,%.1f,%.1f ALS=%u\n",
    bmeT, bmeH, bmeP / 100.0f,
    aqi, tvoc, eco2,
    ph, soil, doMg,
    dist, presence ? "YES" : "NO",
    ax, ay, az, als
  );

  delay(100);
}
Remix this project
Make it yours in one click
Open a full copy of this project in your own Schematik workspace — diagram, code, parts, and assembly steps included. Swap the sensor, add features, or redesign the whole thing with AI. The author's original stays untouched.