Community project
ESP32 LoRa Communication Module
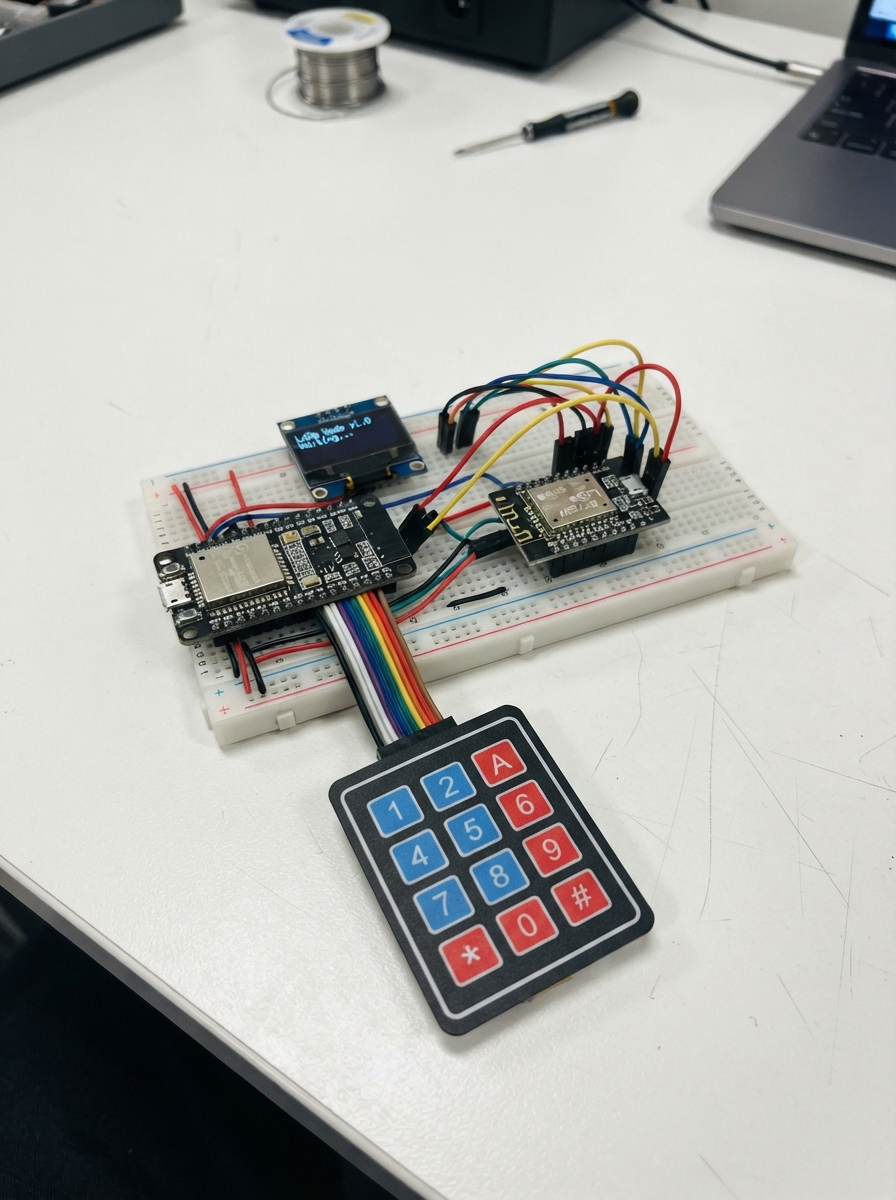
Build a wireless text messaging system using two ESP32 boards equipped with LoRa radios. This project creates a long-range chat device that operates independently of WiFi or cellular networks, making it ideal for field communication, events, or areas with limited connectivity.
The guide provides a complete parts list, wiring diagram showing connections between the RFM95W LoRa transceiver, SSD1306 OLED display, and 3×4 membrane keypad, plus the full firmware implementation. Builders will assemble two identical units, configure the LoRa radio parameters, and test bidirectional message transmission using multitap keypad input similar to classic mobile phones.
Wiring diagram
Gather all the parts
Assemble it in 5 steps
1. Prepare two identical chat units
Buy and build two copies of the same parts: one ESP32 DevKit V1, one 868 MHz SX1276/RFM95W LoRa breakout, one 0.96-inch 128×64 I2C OLED, one 3 × 4 membrane keypad, and one 868 MHz antenna per unit. The two units use the same firmware, so either one can start a conversation.
- Mark the two completed units with small labels such as A and B so you can test them easily.
- Use an antenna intended for 868 MHz, not a Wi-Fi antenna; using the wrong antenna gives poor range and can stress the radio while it sends.
2. Connect the LoRa radio
With the ESP32 unplugged, connect the radio VCC to the ESP32 3V3 pin (power), radio GND to ESP32 GND (ground), MOSI to GPIO23 (radio data), MISO to GPIO19 (radio reply), SCK to GPIO18 (timing), NSS/CS to GPIO4 (radio select), RESET to GPIO27 (restart signal), and DIO0 to GPIO26 (new-message signal). Attach the 868 MHz antenna to the radio ANT connector before power is applied.
- Use short jumper wires for the radio connections, especially the three wires labelled MOSI, MISO, and SCK.
- Never connect the radio VCC pin to 5V or VIN — excess voltage can permanently damage the radio.
- Never power the radio without its antenna attached — sending without an antenna can damage the radio.
3. Connect the small screen
Connect OLED VCC to ESP32 3V3 (power), OLED GND to ESP32 GND (ground), OLED SDA to GPIO21 (data), and OLED SCL to GPIO22 (clock). Keep VCC and GND in the correct order printed on your screen module.
- Most 0.96-inch OLED modules print GND, VCC, SCL, SDA beside the four pins; follow the printed labels rather than the left-to-right order of another seller’s photograph.
- Make sure VCC and GND are not swapped — swapped power can damage the screen.
4. Connect the message keypad
Plug the keypad’s seven-wire ribbon into female jumper wires. Connect keypad R1 to GPIO13 (first key row), R2 to GPIO14 (second key row), R3 to GPIO25 (third key row), R4 to GPIO32 (bottom key row), C1 to GPIO16 (first key column), C2 to GPIO17 (second key column), and C3 to GPIO33 (third key column). The keypad does not need separate VCC or GND wires.
- The ribbon order is normally R1, R2, R3, R4, C1, C2, C3, but check the seller’s keypad label if it has one. If key labels appear wrong, recheck the ribbon order before changing any other wiring.
- Do not force the thin ribbon connector into a breadboard hole; use female jumper leads or a keypad adapter so the metal tracks do not tear.
5. Test the two chat units
Place the two assembled units a few metres apart, then power each ESP32 from its own USB cable. After deploying the same project to both units, press a number key repeatedly to choose its letter, wait about one second before beginning the next letter, use star to erase one character, and press hash to send the message. The other unit shows the received message on its screen.
- For example, press 4 twice for H, wait briefly, press 4 three times for I, then press # to send “HI”.
- Keep both antennas upright and away from the ESP32 USB cable when checking range.
- Do not test a radio message while the antenna is disconnected — the radio can be damaged when it transmits.
Review all connections
1. Connections between "lora_radio_1" and "ESP32"
2. Connections between "oled_1" and "ESP32"
3. Connections between "keypad_1" and "ESP32"
Deploy the firmware
#include <Arduino.h>
#include <SPI.h>
#include <Wire.h>
#include <LoRa.h>
#include <Keypad.h>
#include <Adafruit_GFX.h>
#include <Adafruit_SSD1306.h>


// Forward declarations
String shortNodeId();
String cropText(const String &text, uint8_t maxLength);
void drawComposer();
void commitPendingLetter();
String lettersForKey(char key);
void sendDraft();
void handleKey(char key);
void receiveMessages();

constexpr int LORA_SCK = 18;
constexpr int LORA_MISO = 19;
constexpr int LORA_MOSI = 23;
constexpr int LORA_NSS = 4;
constexpr int LORA_RESET = 27;
constexpr int LORA_DIO0 = 26;
constexpr int OLED_SDA = 21;
constexpr int OLED_SCL = 22;
constexpr int KEYPAD_R1 = 13;
constexpr int KEYPAD_R2 = 14;
constexpr int KEYPAD_R3 = 25;
constexpr int KEYPAD_R4 = 32;
constexpr int KEYPAD_C1 = 16;
constexpr int KEYPAD_C2 = 17;
constexpr int KEYPAD_C3 = 33;
constexpr long LORA_FREQUENCY_HZ = 865700000L;
constexpr uint8_t OLED_ADDRESS = 0x3C;
constexpr unsigned long MULTITAP_PAUSE_MS = 800UL;
constexpr uint8_t MESSAGE_LIMIT = 48;

Adafruit_SSD1306 display(128, 64, &Wire, -1);
const byte ROWS = 4;
const byte COLS = 3;
char keyMap[ROWS][COLS] = {
  {'1', '2', '3'},
  {'4', '5', '6'},
  {'7', '8', '9'},
  {'*', '0', '#'}
};
byte rowPins[ROWS] = {KEYPAD_R1, KEYPAD_R2, KEYPAD_R3, KEYPAD_R4};
byte colPins[COLS] = {KEYPAD_C1, KEYPAD_C2, KEYPAD_C3};
Keypad keypad = Keypad(makeKeymap(keyMap), rowPins, colPins, ROWS, COLS);

String draft;
String lastReceived = "No messages yet";
String statusText = "Type a message";
String pendingLetters;
char pendingKey = 0;
uint8_t pendingIndex = 0;
unsigned long lastKeyMs = 0;
uint32_t nodeId = 0;
bool screenDirty = true;

String shortNodeId() {
  return String(nodeId & 0xFFFF, HEX);
}

String cropText(const String &text, uint8_t maxLength) {
  if (text.length() <= maxLength) return text;
  return text.substring(text.length() - maxLength);
}

void drawComposer() {
  display.clearDisplay();
  display.setTextColor(SSD1306_WHITE);
  display.setTextSize(1);
  display.setCursor(0, 0);
  display.print("LoRa Chat  me:");
  display.println(shortNodeId());
  display.drawFastHLine(0, 10, 128, SSD1306_WHITE);
  display.setCursor(0, 15);
  display.print("Peer: ");
  display.println(cropText(lastReceived, 17));
  display.setCursor(0, 30);
  display.print("Write: ");
  display.println(cropText(draft, 18));
  display.setCursor(0, 45);
  display.println(statusText);
  display.setCursor(0, 56);
  display.print("*=erase  #=send");
  display.display();
  screenDirty = false;
}

void commitPendingLetter() {
  pendingKey = 0;
  pendingLetters = "";
  pendingIndex = 0;
}

String lettersForKey(char key) {
  switch (key) {
    case '1': return "1.,?";
    case '2': return "ABC2";
    case '3': return "DEF3";
    case '4': return "GHI4";
    case '5': return "JKL5";
    case '6': return "MNO6";
    case '7': return "PQRS7";
    case '8': return "TUV8";
    case '9': return "WXYZ9";
    case '0': return " 0";
    default: return "";
  }
}

void sendDraft() {
  commitPendingLetter();
  if (draft.length() == 0) {
    statusText = "Write something first";
    screenDirty = true;
    return;
  }

  String packet = "CHAT|" + shortNodeId() + "|" + draft;
  LoRa.beginPacket();
  LoRa.print(packet);
  int result = LoRa.endPacket();
  statusText = result == 1 ? "Sent" : "Send failed";
  draft = "";
  screenDirty = true;
}

void handleKey(char key) {
  if (key == '#') {
    sendDraft();
    return;
  }
  if (key == '*') {
    commitPendingLetter();
    if (draft.length() > 0) draft.remove(draft.length() - 1);
    statusText = "Erased";
    screenDirty = true;
    return;
  }

  String letters = lettersForKey(key);
  if (letters.length() == 0) return;
  unsigned long now = millis();
  if (key == pendingKey && now - lastKeyMs < MULTITAP_PAUSE_MS) {
    pendingIndex = (pendingIndex + 1) % letters.length();
    draft.setCharAt(draft.length() - 1, letters[pendingIndex]);
  } else {
    commitPendingLetter();
    if (draft.length() >= MESSAGE_LIMIT) {
      statusText = "Message is full";
      screenDirty = true;
      return;
    }
    pendingKey = key;
    pendingLetters = letters;
    pendingIndex = 0;
    draft += letters[0];
  }
  lastKeyMs = now;
  statusText = "Press again for letter";
  screenDirty = true;
}

void receiveMessages() {
  int packetSize = LoRa.parsePacket();
  if (packetSize == 0) return;

  String packet;
  while (LoRa.available()) packet += static_cast<char>(LoRa.read());
  if (!packet.startsWith("CHAT|")) return;

  int divider = packet.indexOf('|', 5);
  if (divider < 0) return;
  String sender = packet.substring(5, divider);
  String message = packet.substring(divider + 1);
  lastReceived = sender + ": " + message;
  statusText = "New message " + String(LoRa.packetRssi()) + "dBm";
  screenDirty = true;
}

void setup() {
  nodeId = static_cast<uint32_t>(ESP.getEfuseMac());
  Wire.begin(OLED_SDA, OLED_SCL);
  display.begin(SSD1306_SWITCHCAPVCC, OLED_ADDRESS);
  drawComposer();

  SPI.begin(LORA_SCK, LORA_MISO, LORA_MOSI, LORA_NSS);
  LoRa.setPins(LORA_NSS, LORA_RESET, LORA_DIO0);
  if (!LoRa.begin(LORA_FREQUENCY_HZ)) {
    display.clearDisplay();
    display.setTextColor(SSD1306_WHITE);
    display.setTextSize(1);
    display.setCursor(0, 0);
    display.println("Radio not found");
    display.println("Check 3V3/GND and");
    display.println("radio signal wires");
    display.display();
    while (true) delay(1000);
  }
  LoRa.setTxPower(14);
  statusText = "Ready - type below";
  screenDirty = true;
}

void loop() {
  char key = keypad.getKey();
  if (key) handleKey(key);
  if (pendingKey && millis() - lastKeyMs >= MULTITAP_PAUSE_MS) commitPendingLetter();
  receiveMessages();
  if (screenDirty) drawComposer();
}
Remix this project
Make it yours in one click
Open a full copy of this project in your own Schematik workspace — diagram, code, parts, and assembly steps included. Swap the sensor, add features, or redesign the whole thing with AI. The author's original stays untouched.