Community project
Arduino Mini Game
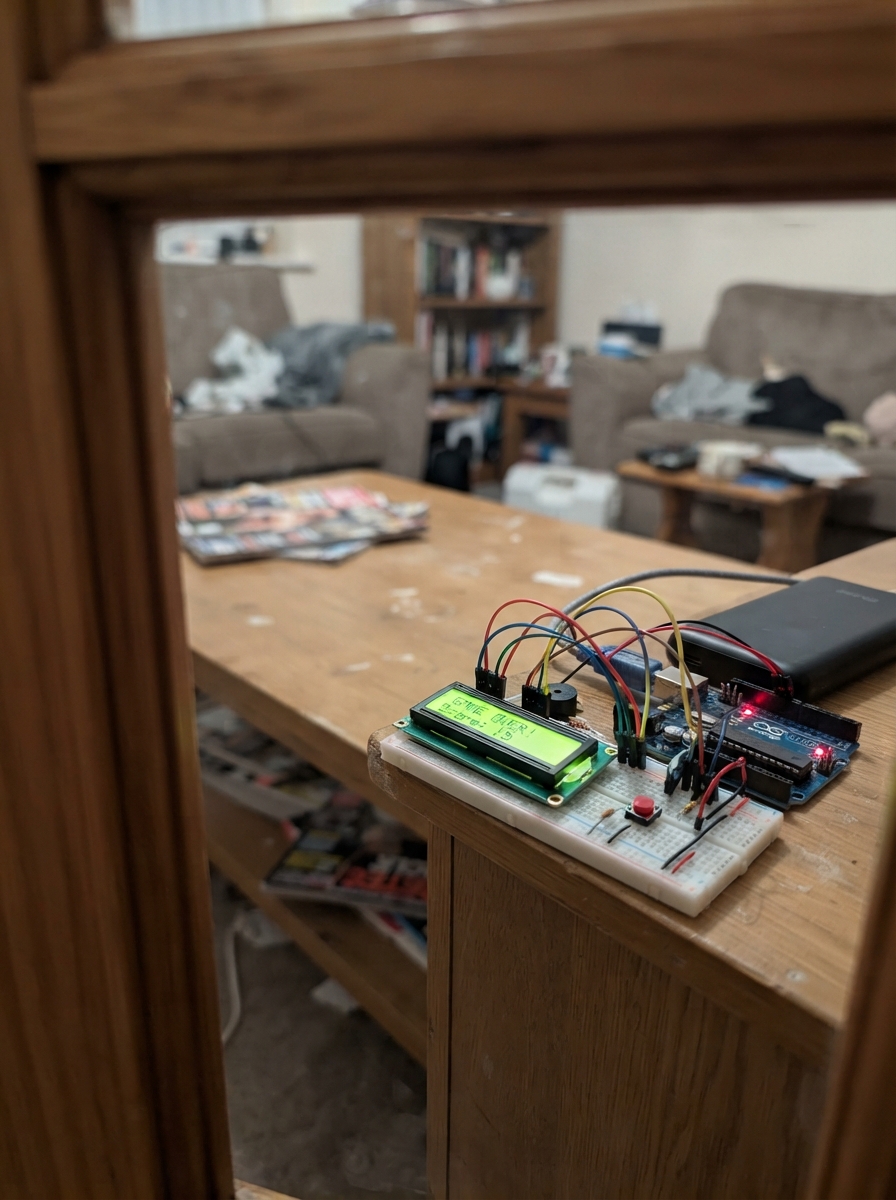
Build a simple side-scrolling game on an Arduino Uno where a character must jump over obstacles displayed on an LCD screen. Press a button to make the runner jump, avoid rocks, and rack up points as long as you can survive. The game provides audio feedback through a buzzer and visual feedback with an LED.
This guide includes a complete wiring diagram, parts list, and step-by-step assembly instructions for connecting the push button, LCD display, LED, and buzzer to your Arduino. Upload the provided firmware to get started playing immediately, then customize the game difficulty, sounds, and graphics to make it your own.
Wiring diagram

Gather all the parts
Assemble it in 5 steps
1. Prepare a protoboard sem energia
Retire o cabo USB do Arduino. Coloque o botão, o LED, o resistor, o buzzer e o LCD na protoboard. Ligue um dos pinos GND do Arduino a uma linha comprida da protoboard com um fio preto: essa linha será o terra partilhado.
- Deixe as pernas de cada peça em filas separadas para não ligar duas pernas por engano.
- Não ligue fios enquanto o USB estiver conectado: um fio colocado no lugar errado pode danificar uma peça.
2. Ligue o ecrã
No LCD, ligue VCC → 5V (alimentação), GND → GND (terra), SDA → A4 (dados) e SCL → A5 (relógio dos dados). No Arduino Uno, os pinos A4 e A5 também podem estar marcados como SDA e SCL perto do conector USB.
- Use quatro fios de cores diferentes; isso torna muito mais fácil encontrar uma ligação trocada.
- Não troque VCC e GND: energia invertida pode danificar o ecrã.
3. Ligue o botão de salto
Ligue uma perna do botão a D2 (sinal) e uma perna do lado oposto ao GND (terra). O programa usa a resistência interna do Arduino, por isso não precisa de resistor extra no botão.
- Num botão de quatro pernas, escolha uma perna de cada lado físico do botão; duas pernas do mesmo lado já estão ligadas entre si.
- Se o jogo saltar sozinho, desligue o USB e confirme que as duas ligações não estão na mesma fila da protoboard.
4. Ligue a luz e o som
Ligue D8 → resistor de 220 Ω → perna longa do LED (luz); ligue a perna curta do LED → GND (terra). No buzzer, ligue o terminal + → D9 (som) e o terminal − → GND (terra).
- A perna longa do LED é o lado positivo. O LED fica aceso durante a corrida e pisca quando a partida termina.
- O resistor de 220 Ω é obrigatório: sem ele o LED pode queimar. Se o buzzer tiver sinais + e −, não os troque.
5. Teste o jogo
Confira: LCD VCC → 5V (alimentação), LCD GND → GND (terra), LCD SDA → A4 (dados), LCD SCL → A5 (relógio); botão → D2 e GND; LED → D8 através do resistor e GND; buzzer + → D9 e − → GND. Conecte o USB. No ecrã, aperte o botão para começar; aperte novamente para o robô saltar por cima das pedras.
- Cada pedra ultrapassada vale um ponto. Depois de bater numa pedra, aperte o botão para uma nova partida.
Review all connections
1. Connections between "button_1" and "Arduino"
2. Connections between "resistor_1" and "Arduino"
3. Connections between "led_1" and "Arduino"
4. Connections between "buzzer_1" and "Arduino"
5. Connections between "lcd_1" and "Arduino"
Deploy the firmware
#include <Arduino.h>
#include <Wire.h>
#include <LiquidCrystal_I2C.h>

const byte BUTTON_PIN = 2;
const byte LED_PIN = 8;
const byte BUZZER_PIN = 9;
const byte LCD_ADDRESS = 0x27;
const unsigned long DEBOUNCE_MS = 30;
const unsigned long FRAME_MS = 110;
const unsigned long JUMP_MS = 520;

LiquidCrystal_I2C lcd(LCD_ADDRESS, 16, 2);

byte runnerChar[] = {B01110, B11111, B00100, B01110, B10101, B00100, B01010, B10001};
byte rockChar[] = {B00000, B00000, B00100, B01110, B11111, B11111, B11111, B11111};

bool lastRawButton = HIGH;
bool stableButton = HIGH;
unsigned long lastChangeMs = 0;
unsigned long lastFrameMs = 0;
unsigned long jumpUntilMs = 0;
unsigned long lastLedMs = 0;
int obstacleColumn = 15;
unsigned int score = 0;
unsigned int highScore = 0;
bool playing = false;
bool gameOver = false;

bool buttonPressedOnce() {
  bool raw = digitalRead(BUTTON_PIN);
  unsigned long now = millis();
  if (raw != lastRawButton) {
    lastRawButton = raw;
    lastChangeMs = now;
  }
  if (now - lastChangeMs >= DEBOUNCE_MS && raw != stableButton) {
    stableButton = raw;
    return stableButton == LOW;
  }
  return false;
}

void chirp(unsigned int frequency, unsigned int duration) {
  tone(BUZZER_PIN, frequency, duration);
}

void drawStartScreen() {
  lcd.clear();
  lcd.setCursor(0, 0);
  lcd.print(F("  CORRE, ROBO!"));
  lcd.setCursor(0, 1);
  lcd.print(F("APERTE P/ JOGAR"));
}

void drawGameScreen() {
  bool jumping = millis() < jumpUntilMs;
  char topLine[17] = "                ";
  char bottomLine[17] = "                ";
  if (jumping) topLine[0] = 0;
  else bottomLine[0] = 0;
  if (obstacleColumn >= 0 && obstacleColumn < 16) bottomLine[obstacleColumn] = 1;
  lcd.setCursor(0, 0);
  lcd.print(topLine);
  lcd.setCursor(0, 1);
  lcd.print(bottomLine);
  lcd.setCursor(10, 0);
  lcd.print(score);
}

void startGame() {
  score = 0;
  obstacleColumn = 15;
  jumpUntilMs = 0;
  lastFrameMs = millis();
  playing = true;
  gameOver = false;
  digitalWrite(LED_PIN, HIGH);
  chirp(1300, 70);
  drawGameScreen();
}

void endGame() {
  playing = false;
  gameOver = true;
  digitalWrite(LED_PIN, LOW);
  chirp(180, 350);
  if (score > highScore) highScore = score;
  lcd.clear();
  lcd.setCursor(0, 0);
  lcd.print(F("FIM! PONTOS: "));
  lcd.print(score);
  lcd.setCursor(0, 1);
  lcd.print(F("REC "));
  lcd.print(highScore);
  lcd.print(F("  TOQUE P/ +"));
}

void updateGame() {
  unsigned long now = millis();
  if (now - lastFrameMs < FRAME_MS) return;
  lastFrameMs = now;
  bool jumping = now < jumpUntilMs;
  obstacleColumn--;
  if (obstacleColumn == 0 && !jumping) {
    endGame();
    return;
  }
  if (obstacleColumn < 0) {
    score++;
    obstacleColumn = 15;
    chirp(1700, 30);
  }
  drawGameScreen();
}

void updateIdleLed() {
  if (gameOver && millis() - lastLedMs >= 350) {
    lastLedMs = millis();
    digitalWrite(LED_PIN, !digitalRead(LED_PIN));
  }
}

void setup() {
  pinMode(BUTTON_PIN, INPUT_PULLUP);
  pinMode(LED_PIN, OUTPUT);
  pinMode(BUZZER_PIN, OUTPUT);
  digitalWrite(LED_PIN, LOW);
  lcd.init();
  lcd.backlight();
  lcd.createChar(0, runnerChar);
  lcd.createChar(1, rockChar);
  drawStartScreen();
}

void loop() {
  bool pressed = buttonPressedOnce();
  if (!playing) {
    updateIdleLed();
    if (pressed) startGame();
    return;
  }
  if (pressed && millis() >= jumpUntilMs) {
    jumpUntilMs = millis() + JUMP_MS;
    chirp(2100, 55);
  }
  updateGame();
}
Remix this project
Make it yours in one click
Open a full copy of this project in your own Schematik workspace — diagram, code, parts, and assembly steps included. Swap the sensor, add features, or redesign the whole thing with AI. The author's original stays untouched.