Community project
Webhook Gong Trigger
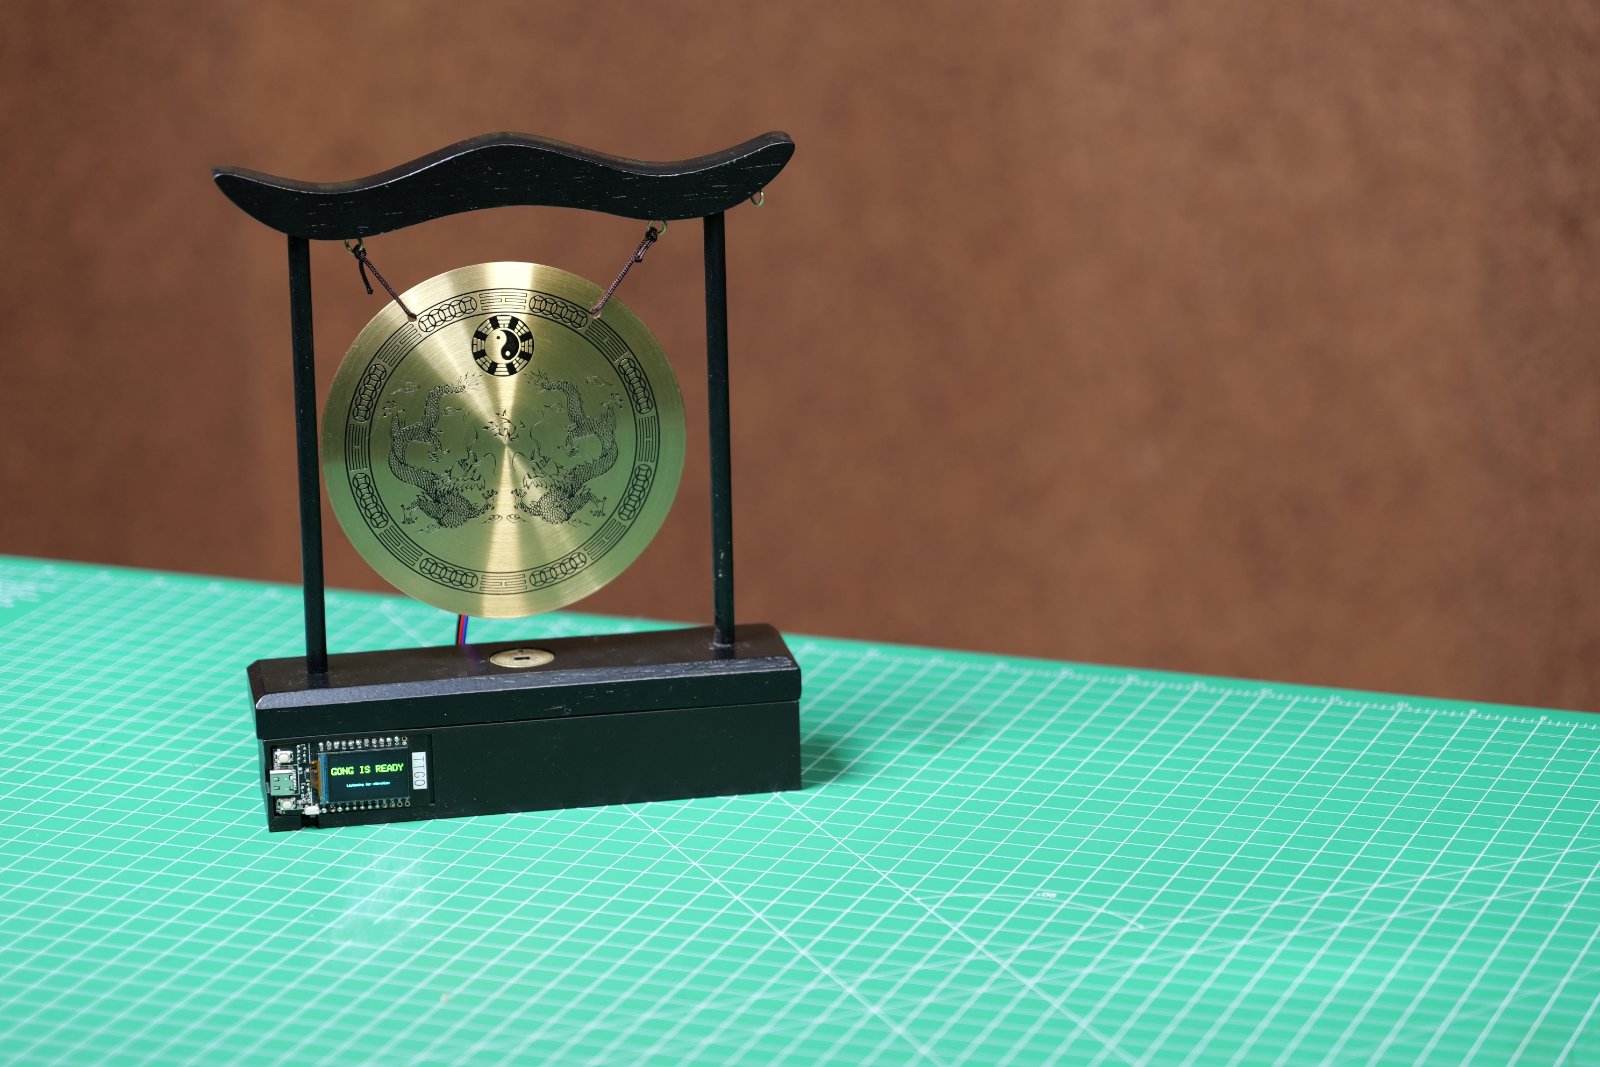
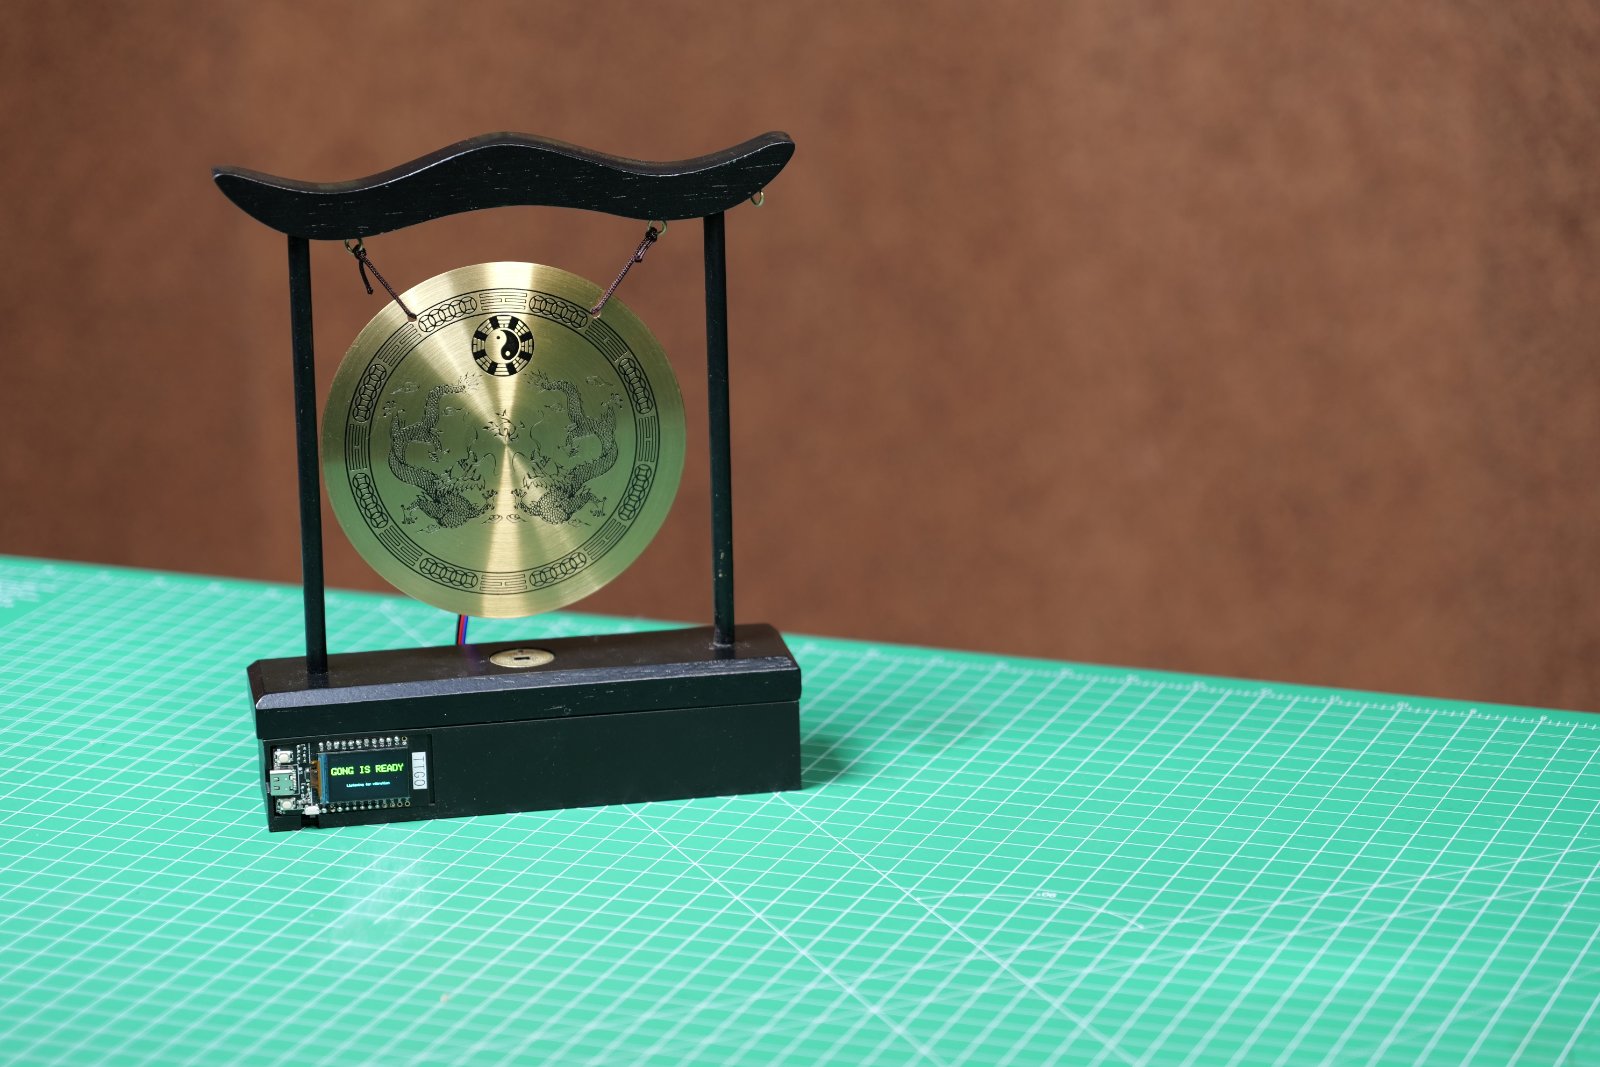
The Webhook Gong Trigger is an ESP32-based device that detects vibrations or impacts using a DFRobot Gravity Digital Vibration Sensor and sends webhook notifications to a remote server. When the sensor detects a hit, the device connects to WiFi and posts to a configured webhook URL, making it useful for alerting systems, event logging, or triggering automation workflows.
This guide provides a complete parts list, wiring diagram, and step-by-step assembly instructions for building and configuring the device. The included firmware handles WiFi setup via a captive portal, displays status on an integrated screen, and manages sensor sensitivity. Builders will learn how to mount the vibration sensor, configure network settings, and deploy the device for reliable webhook triggering.
Wiring diagram

Gather all the parts
Assemble it in 7 steps
1. Mount the vibration sensor
Use foam tape or strong double-sided tape to fasten vibration_sensor to the back of the gong near its rim, where the metal moves when struck. Keep the board and its wires away from the mallet’s path.
- The sensor detects shaking, so it must be attached firmly to the gong rather than hanging from its wires.
- Do not place the sensor where the mallet can hit it — a direct hit can crack the small board.
2. Connect the three sensor wires
With the T-Display unplugged, connect vibration_sensor VCC to the T-Display 3V3 pin (power), vibration_sensor GND to a T-Display GND pin (ground), and vibration_sensor SIG to GPIO27 (gong-hit signal).
- Use red for 3V3, black for GND, and yellow or white for SIG so the wires are easy to trace.
- Make sure VCC goes to 3V3, not 5V — connecting it to 5V can make the sensor signal unsafe for the TTGO board.
3. Charge and power the device
Insert the USB plug gently into the T-Display’s USB socket. It only fits in one direction: if it does not slide in easily, turn the plug over rather than forcing it. When charging is working, the small blue charging light should be on. If that blue light is not showing, the device is not charging — check that the plug is fully inserted, turned the right way around, and connected to a powered USB supply.
- Use a normal powered USB charger or computer USB port. The blue light is the quickest way to confirm that charging has started.
- Do not force the USB plug — forcing it the wrong way can damage the socket.
4. Use the setup screen
On first power-up, scan the QR code on the built-in screen with your phone. Join the Gong-Setup Wi-Fi network using password gongsetup. The setup page should open automatically; if it does not, open gong.setup in your phone browser. Enter the Wi-Fi name, password, webhook address, and gong sensitivity, then save.
- If the gong cannot join its saved Wi-Fi within 30 seconds, its screen tells you to press either built-in button. Press either button to return to this setup screen.
- Keep the T-Display’s built-in screen uncovered; it is already wired inside the board, so do not add wires to display pins.
5. Put it into shipping sleep
Before packing, hold both built-in T-Display buttons down together for three seconds. The screen briefly says “SHIPPING SLEEP,” then turns completely off and Wi-Fi stops. You can also choose “Put device into shipping sleep” on the phone setup page.
- This mode uses only a tiny standby current, so a charged battery lasts much longer during shipping.
- The gong cannot detect a hit or call the webhook while asleep — press either built-in button after delivery to wake it.
6. Check the ready message
After delivery, press either built-in button once to wake the T-Display. After it joins your Wi-Fi network, the whole screen says “GONG IS READY.” Strike the gong to make it say “GONG HIT, CALLING WEBHOOK” while it sends the event.
- Start with Sensitive in the phone setup page. Choose Very sensitive for light taps; if ordinary handling triggers it, choose Normal or Less sensitive instead.
7. Keep the board steady and dry
Place the T-Display where it will not shake with the gong and secure the three sensor wires so they cannot pull loose as the gong moves. Keep the USB connector and sensor dry.
- Moisture can short the electronics. Do not pack the device with the power switch or either button held down.
Review all connections
1. Connections between "vibration_sensor" and "ESP32"
Deploy the firmware
#include <WiFi.h>
#include <WebServer.h>
#include <DNSServer.h>
#include <HTTPClient.h>
#include <Preferences.h>
#include <SPI.h>
#include <Adafruit_GFX.h>
#include <Adafruit_ST7789.h>
#include <qrcode.h>
constexpr int GONG_SENSOR_PIN = 27;
constexpr int TFT_CS_PIN = 5;
constexpr int TFT_DC_PIN = 16;
constexpr int TFT_RST_PIN = 23;
constexpr int TFT_BACKLIGHT_PIN = 4;
constexpr int BUTTON_1_PIN = 0;
constexpr int BUTTON_2_PIN = 35;
constexpr unsigned long WIFI_CONNECT_WINDOW_MS = 30000;
constexpr unsigned long HIT_MESSAGE_MS = 1600;
constexpr unsigned long SHIPPING_HOLD_MS = 3000;
WebServer server(80);
DNSServer dnsServer;
Preferences preferences;
Adafruit_ST7789 tft(TFT_CS_PIN, TFT_DC_PIN, TFT_RST_PIN);
String wifiSsid, wifiPassword, webhookUrl;
bool setupMode = false, waitingForWifi = false, readyDrawn = false, hitDrawn = false, savePending = false, serverStarted = false;
unsigned long wifiStartedAt = 0, hitShownAt = 0, lastHitAt = 0, sensorLowAt = 0, lastButtonAt = 0, bothButtonsAt = 0, lastSensorLogAt = 0;
int sensitivity = 8;
int lastSensorState = HIGH;
String htmlEscape(const String &input) { String out; for (char c : input) { if (c == '&') out += "&"; else if (c == '<') out += "<"; else if (c == '>') out += ">"; else if (c == '\"') out += """; else out += c; } return out; }
void centered(const String &s, int y, uint16_t c, uint8_t z) { tft.setTextSize(z); tft.setTextColor(c); tft.setTextWrap(false); int16_t x1,y1; uint16_t w,h; tft.getTextBounds(s,0,0,&x1,&y1,&w,&h); tft.setCursor((240-w)/2,y); tft.print(s); }
void initDisplay() { pinMode(TFT_BACKLIGHT_PIN, OUTPUT); digitalWrite(TFT_BACKLIGHT_PIN,HIGH); SPI.begin(18,-1,19,TFT_CS_PIN); tft.init(135,240); tft.setRotation(1); tft.fillScreen(ST77XX_BLACK); }
void waitingScreen() { tft.fillScreen(ST77XX_BLACK); centered("CONNECTING TO WI-FI",30,ST77XX_YELLOW,2); centered("Please wait up to 30 seconds",72,ST77XX_WHITE,1); centered("or press either button",92,ST77XX_CYAN,1); centered("for setup",108,ST77XX_CYAN,1); }
void noWifiScreen() { tft.fillScreen(ST77XX_BLACK); centered("WI-FI NOT CONNECTED",28,ST77XX_RED,2); centered("Press either button",70,ST77XX_WHITE,2); centered("to enter setup mode",98,ST77XX_CYAN,1); readyDrawn=false; hitDrawn=false; }
void readyScreen() { tft.fillScreen(ST77XX_BLACK); centered("GONG IS READY",38,ST77XX_GREEN,3); centered("Listening for vibration",92,ST77XX_CYAN,1); readyDrawn=true; hitDrawn=false; }
void hitScreen() { tft.fillScreen(ST77XX_BLACK); centered("GONG HIT",26,ST77XX_YELLOW,3); centered("CALLING WEBHOOK",78,ST77XX_WHITE,2); hitDrawn=true; readyDrawn=false; }
void setupScreen() { tft.fillScreen(ST77XX_BLACK); const char *text="WIFI:T:WPA;S:Gong-Setup;P:gongsetup;;"; uint8_t data[qrcode_getBufferSize(3)]; QRCode q; qrcode_initText(&q,data,3,ECC_LOW,text); for(uint8_t y=0;y<q.size;y++) for(uint8_t x=0;x<q.size;x++) if(qrcode_getModule(&q,x,y)) tft.fillRect(8+x*3,18+y*3,3,3,ST77XX_WHITE); tft.drawRect(6,16,q.size*3+4,q.size*3+4,ST77XX_CYAN); tft.setTextSize(2); tft.setTextColor(ST77XX_CYAN); tft.setCursor(108,18); tft.print("SETUP"); tft.setTextSize(1); tft.setTextColor(ST77XX_WHITE); tft.setCursor(108,48); tft.print("Scan to join Wi-Fi:"); tft.setTextColor(ST77XX_YELLOW); tft.setCursor(108,68); tft.print("Gong-Setup"); tft.setTextColor(ST77XX_WHITE); tft.setCursor(108,88); tft.print("Setup page opens"); tft.setCursor(108,102); tft.print("automatically"); tft.setTextColor(ST77XX_CYAN); tft.setCursor(108,120); tft.print("or visit gong.setup"); readyDrawn=false; hitDrawn=false; }
void startWebServer() { if (!serverStarted) { server.begin(); serverStarted = true; } }
void shippingSleep() { tft.fillScreen(ST77XX_BLACK); centered("SHIPPING SLEEP",46,ST77XX_CYAN,2); centered("Press the GPIO0 button",82,ST77XX_WHITE,1); centered("to wake",98,ST77XX_WHITE,1); delay(1200); tft.fillScreen(ST77XX_BLACK); digitalWrite(TFT_BACKLIGHT_PIN,LOW); WiFi.disconnect(true); WiFi.mode(WIFI_OFF); esp_sleep_enable_ext0_wakeup((gpio_num_t)BUTTON_1_PIN, LOW); esp_deep_sleep_start(); }
void captiveRedirect() { server.sendHeader("Location", String("http://") + WiFi.softAPIP().toString() + "/", true); server.send(302, "text/plain", ""); }
void startSetup() { if(setupMode) return; WiFi.mode(WIFI_OFF); delay(100); WiFi.mode(WIFI_AP); delay(100); WiFi.softAP("Gong-Setup","gongsetup"); dnsServer.start(53, "*", WiFi.softAPIP()); startWebServer(); setupMode=true; waitingForWifi=false; setupScreen(); }
void beginWiFi() { if(wifiSsid.isEmpty() || webhookUrl.isEmpty()) { startSetup(); return; } dnsServer.stop(); WiFi.mode(WIFI_STA); WiFi.begin(wifiSsid.c_str(),wifiPassword.c_str()); wifiStartedAt=millis(); waitingForWifi=true; setupMode=false; waitingScreen(); }
void sendWebhook() { if(WiFi.status()!=WL_CONNECTED || webhookUrl.isEmpty()) return; HTTPClient http; http.setTimeout(5000); if(http.begin(webhookUrl)){ http.addHeader("Content-Type","application/json"); http.POST("{\"event\":\"gong_struck\",\"uptime_ms\":"+String(millis())+"}"); http.end(); } }
unsigned long lowTimeNeeded(){ return sensitivity >= 8 ? 0 : (8-sensitivity)*2; }
void handleRoot() { String p=R"HTML(<!doctype html><meta charset="utf-8"><meta name="viewport" content="width=device-width,initial-scale=1"><style>body{font-family:system-ui;max-width:38rem;margin:2rem auto;padding:0 1rem}input,select,button{font:inherit;padding:.55rem;width:100%;box-sizing:border-box;margin-top:.25rem}label{display:block;margin-top:1rem}button{background:#087f23;color:#fff;border:0;border-radius:.35rem;margin-top:1.4rem}</style><h1>Gong setup</h1><form method="post" action="/save"><label>Wi-Fi name<input name="ssid" required value=")HTML"+htmlEscape(wifiSsid)+R"HTML("></label><label>Wi-Fi password<input name="password" type="password" value=")HTML"+htmlEscape(wifiPassword)+R"HTML("></label><label>Webhook URL<input name="webhook" type="url" required value=")HTML"+htmlEscape(webhookUrl)+R"HTML("></label><p><a href="/shipping" style="display:block;text-align:center;background:#334;color:#fff;padding:.7rem;border-radius:.35rem;text-decoration:none">Put device into shipping sleep</a></p><label>Gong sensitivity<select name="sensitivity"><option value="10")HTML"+String(sensitivity==10?" selected":"")+R"HTML(>Very sensitive - light taps</option><option value="8")HTML"+String(sensitivity==8?" selected":"")+R"HTML(>Sensitive - recommended</option><option value="5")HTML"+String(sensitivity==5?" selected":"")+R"HTML(>Normal</option><option value="2")HTML"+String(sensitivity==2?" selected":"")+R"HTML(>Less sensitive - strong strikes</option></select></label><p><small>Secure mounting near the rim has the biggest effect.</small></p><button>Save and connect</button></form>)HTML"; server.send(200,"text/html",p); }
void handleShipping() { server.send(200,"text/html","<!doctype html><meta charset='utf-8'><meta name='viewport' content='width=device-width'><h1>Shipping sleep enabled</h1><p>The screen will turn off. Press the GPIO0 board button to wake it after delivery.</p>"); delay(500); shippingSleep(); }
void handleSave() { wifiSsid=server.arg("ssid"); wifiPassword=server.arg("password"); webhookUrl=server.arg("webhook"); sensitivity=constrain(server.arg("sensitivity").toInt(),1,10); preferences.putString("ssid",wifiSsid); preferences.putString("password",wifiPassword); preferences.putString("webhook",webhookUrl); preferences.putInt("sensitivity",sensitivity); server.send(200,"text/html","<!doctype html><meta charset='utf-8'><meta name='viewport' content='width=device-width'><h1>Saved</h1><p>The display will say GONG IS READY when connected.</p>"); savePending=true; }
void setup() { Serial.begin(115200); pinMode(GONG_SENSOR_PIN,INPUT_PULLUP); pinMode(BUTTON_1_PIN,INPUT_PULLUP); pinMode(BUTTON_2_PIN,INPUT); initDisplay(); preferences.begin("gong",false); wifiSsid=preferences.getString("ssid",""); wifiPassword=preferences.getString("password",""); webhookUrl=preferences.getString("webhook",""); sensitivity=constrain(preferences.getInt("sensitivity",8),1,10); server.on("/",HTTP_GET,handleRoot); server.on("/save",HTTP_POST,handleSave); server.on("/shipping",HTTP_GET,handleShipping); server.onNotFound(captiveRedirect); beginWiFi(); }
void loop() { if (setupMode) dnsServer.processNextRequest(); if (serverStarted) server.handleClient(); bool button1 = digitalRead(BUTTON_1_PIN)==LOW; bool button2 = digitalRead(BUTTON_2_PIN)==LOW; if(button1 && button2){ if(bothButtonsAt==0) bothButtonsAt=millis(); if(millis()-bothButtonsAt>=SHIPPING_HOLD_MS) shippingSleep(); } else { bothButtonsAt=0; } if((button1 || button2) && millis()-lastButtonAt>300){lastButtonAt=millis();startSetup();} if(savePending){savePending=false;dnsServer.stop();WiFi.softAPdisconnect(true);delay(100);beginWiFi();} if(waitingForWifi && WiFi.status()==WL_CONNECTED){waitingForWifi=false;readyScreen();} if(waitingForWifi && millis()-wifiStartedAt>=WIFI_CONNECT_WINDOW_MS){waitingForWifi=false;noWifiScreen();} if(hitDrawn && millis()-hitShownAt>=HIT_MESSAGE_MS){if(WiFi.status()==WL_CONNECTED)readyScreen();else if(!setupMode)noWifiScreen();} int state=digitalRead(GONG_SENSOR_PIN); bool fallingEdge=(lastSensorState==HIGH && state==LOW); if(state==LOW){ if(sensorLowAt==0) sensorLowAt=millis(); if((fallingEdge || millis()-sensorLowAt>=lowTimeNeeded()) && millis()-lastHitAt>=600){ lastHitAt=millis(); sensorLowAt=0; hitShownAt=millis(); hitScreen(); sendWebhook(); } } else { sensorLowAt=0; } lastSensorState=state; }Remix this project
Make it yours in one click
Open a full copy of this project in your own Schematik workspace — diagram, code, parts, and assembly steps included. Swap the sensor, add features, or redesign the whole thing with AI. The author's original stays untouched.