On this page
The Schematik Starter Kit has two small black buzzers that look like twins. Give the first one 5V and it beeps. The second one stays silent until your board sends it a note.
The active buzzer brings its own beat. The passive buzzer can play any note you ask for.
The short answer
An active buzzer has a tiny oscillator inside, a circuit that switches the sound on and off by itself about 2,300 times a second. Give it power and you get one fixed beep.
A passive buzzer has no oscillator. It works like a tiny speaker. It only makes sound when your board switches a pin on and off for it, and how many on-and-off cycles happen each second sets the note.
| Active buzzer | Passive buzzer | |
|---|---|---|
| Sound on plain power | Yes, one tone | No |
| Plays different notes | No | Yes |
| Code you need | None on 5V, or a pin and a transistor | Send a tone at a frequency |
| Kit part rating | 5V, under 25mA | 3V to 12V AC, 16Ω, about 2kHz |
| Good for | Alarms, timers, "done" beeps | Melodies, game sounds, doorbell tunes |
How to tell them apart
The 2 buzzers in the kit differ in ways you can measure with a ruler:
- Height: the active buzzer is 9.6mm tall, the passive one is 8.2mm without its legs.
- Leg spacing: 7.6mm on the active buzzer, 6.6mm on the passive one.
Wiring both to the ESP32-S3
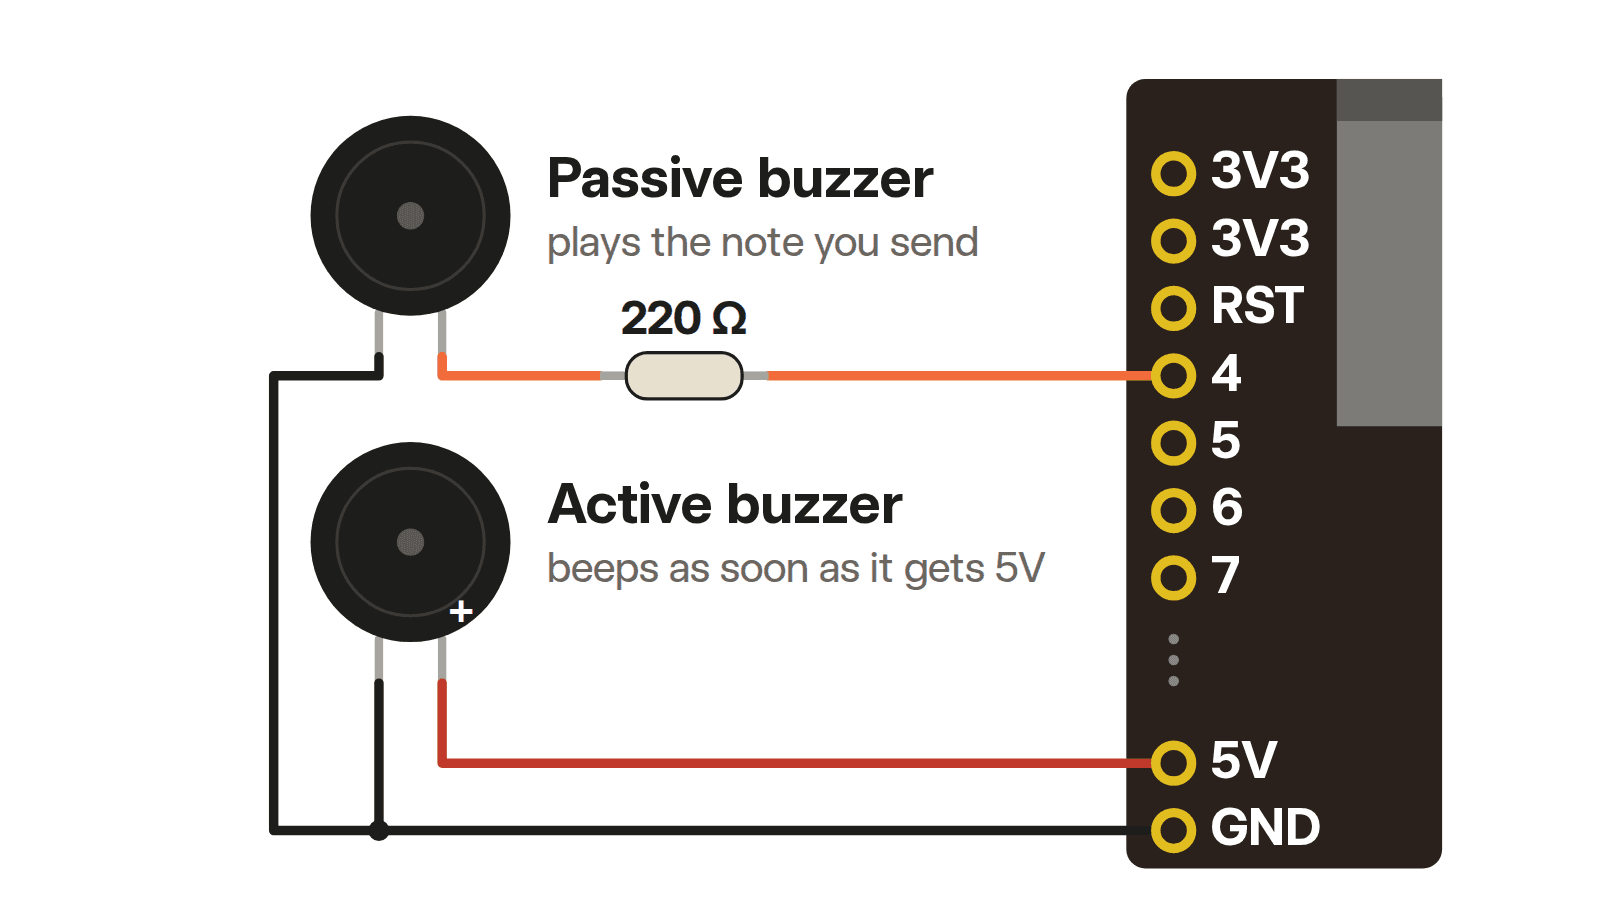
The diagram at the top shows both buzzers on the kit ESP32-S3 board, with the pin labels printed on the board. GND (ground) is the return path for the current, and both buzzers share it.
Passive buzzer: put the 220Ω resistor from the kit between pin 4 and one leg, and connect the other leg to GND. It's listed at 16Ω, so a 3.3V pin wired straight to it would try to push about 200mA. The ESP32-S3 datasheet lists 40mA for a pin at its strongest setting, and the seller warns that without a resistor the board's output pin can be damaged. With the 220Ω resistor in line, the current drops to about 14mA:
3.3V ÷ (220Ω + 16Ω) ≈ 14mA
That keeps the pin safe, but it costs volume. Only about 0.22V of the 3.3V lands on the buzzer itself (14mA × 16Ω), well under the 3V the seller lists as its lowest input, so don't expect the volume the buzzer is rated for.
Active buzzer: its + leg goes to the 5V pin and the other leg goes to GND. It's rated for 5V and draws under 25mA. The 5V pin carries the power from the USB cable, so the buzzer beeps as soon as the board is plugged in, with no code at all.
Code for the passive buzzer
This sketch works with the ESP32-S3 Arduino core, version 2 or 3.
The passive buzzer needs tone(). The number is how many on-and-off cycles happen each second. The first note, 440, is the A an orchestra tunes to, then C and E make a little rising chime:
#include <Arduino.h>

const int BUZZER = 4;

void setup() {
  tone(BUZZER, 440, 300);
  delay(350);
  tone(BUZZER, 523, 300);
  delay(350);
  tone(BUZZER, 659, 600);
  delay(650);
}

void loop() {
  tone(BUZZER, 2000, 100);
  delay(2000);
}
The loop plays a short 2,000Hz chirp every 2 seconds. That's the passive buzzer's resonant frequency, the note where it's loudest.
To beep the active buzzer from code, a pin has to switch its 5V power. An ESP32-S3 pin only gives 3.3V, below the 3.5V the seller lists as the buzzer's lowest supply, so the usual fix is a small NPN transistor (not in the kit) that the pin turns on and off. A transistor is an electronic switch with 3 legs: a small current into the base lets a bigger current flow from the collector to the emitter. Which leg is which depends on the part, so check its datasheet. Wire it like this:
- Buzzer + leg to
5V, its other leg to the transistor's collector. - The transistor's emitter to GND.
- A 1kΩ resistor from the kit between the pin and the transistor's base. Without it, the base acts almost like a short to GND and the pin pushes far more current than it should. With it, the base gets about (3.3V − 0.7V) ÷ 1kΩ ≈ 2.6mA, enough for a small NPN to switch the buzzer's 25mA or less.
In code, pinMode(pin, OUTPUT) in setup() makes the pin drive the transistor. Then digitalWrite(pin, HIGH) beeps and digitalWrite(pin, LOW) stops.
Which one should I use?
Use the active buzzer when you need a signal that something happened: a timer finished, a door opened, a sensor saw motion. It makes its own tone, so the code only switches it on and off.
Use the passive buzzer when you want it to sound like something: a game, a jingle, a pet that chirps back at you.
Build it in Schematik
Open Schematik and describe what you want. It picks the parts, wires them and writes the code. Try one of these with the kit:
- "Play a short tune on a passive buzzer when the PIR sensor sees someone walk past."
- "Chirp a passive buzzer faster as my hand gets closer to the HC-SR04."
- "A reaction game: an LED lights up, I press the button as fast as I can and a passive buzzer plays a win or lose sound."
FAQ
Does a passive buzzer need a resistor on an ESP32? Yes. At 16Ω it would pull far more current than a pin is rated for. The kit's 220Ω resistor keeps it to about 14mA.
Does an active buzzer need a resistor? No. It's built for 5V and draws under 25mA, so it goes straight onto the 5V pin.
Why is my passive buzzer silent? It needs a changing signal. digitalWrite(BUZZER, HIGH) holds the pin steady, so nothing inside moves. Use tone().
Can I wire an active buzzer backwards? No. Its + leg must go to 5V.
Keep building from here
Jump into a step-by-step build, or open Schematik and turn your own idea into code, wiring, and assembly instructions.
Related posts
New to Hardware? A Beginner ESP32 Guide for Your First Build
A beginner ESP32 hardware guide: what to buy first, how breadboards work, what pin labels mean, and what to check before powering your first build.
Most-used parts in Schematik projects
We counted the parts in all 902 published Schematik projects. A push button beat every screen and sensor, and one project in six adds no parts at all.
Related builds
How to Build a Laser Tripwire Alarm Demo with Arduino
Build a classroom-safe Arduino beam-break alarm demo using a low-power laser, LDR photoresistor, 10k resistor, and piezo buzzer.
How to Build a Rocket Launch Alarm Clock with ESP32
Create an ESP32 rocket-launch alarm clock with DS3231 RTC, WS2812 LEDs, and buzzer. Alarm triggers a 10-second countdown with liftoff sequence.
How to Build an Arcade Reaction Tower with ESP32
Build an ESP32 arcade reaction game with WS2812 LED ring, arcade button, buzzer, and OLED score display. Tests reflexes with random light cues.