On this page
The board is out of its bag, the USB cable is in and a little power LED is glowing. Then you open the Arduino IDE, and there's no port to pick.
That gap between "it has power" and "my computer can talk to it" is where most first ESP32 evenings go. Here's how to close it, one check at a time, and then get your first sketch onto the board from the Arduino IDE, from a terminal or straight from the browser.
New to ESP32, or want the board running tonight? Flash from the browser with Schematik's Deploy and skip the Arduino IDE and esptool steps. You'll need Chrome or Edge, and the port and driver checks below still apply, since Deploy uses the same port.
Plug in and check your computer sees the board
Your computer talks to the ESP32 through a serial port, a numbered doorway the operating system creates when a board plugs in. If a new one appears, your computer sees the board, and you can pick a way to flash it below. If nothing appears, follow the left side of this chart.
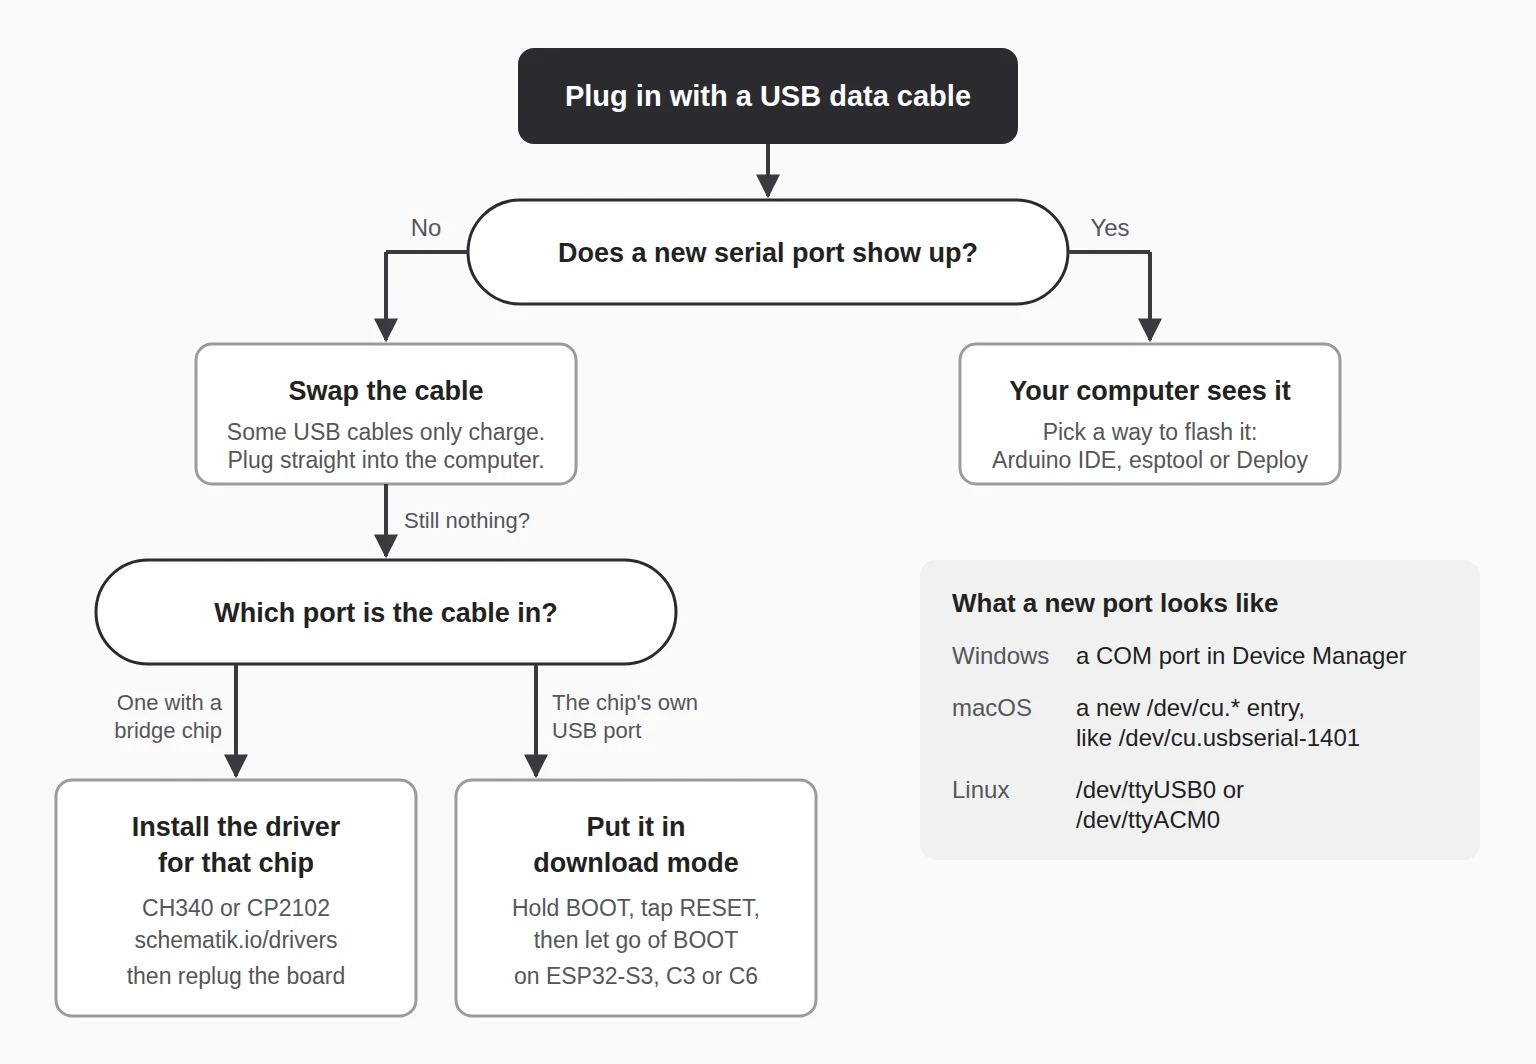
Here's where to look on each computer, with the board unplugged first and then plugged in:
| Computer | Where to look |
|---|---|
| Windows | Device Manager, under Ports (COM & LPT). A new port looks like COM3. |
| macOS | Run ls /dev/cu.* in Terminal. A new port looks like /dev/cu.usbserial-1401. |
| Linux | Run ls /dev/ttyUSB* /dev/ttyACM*. A new port looks like /dev/ttyUSB0 or /dev/ttyACM0. |
The cable is the first suspect. Plenty of USB cables carry power and no data, so the board lights up and the computer never hears from it. Try a cable you've synced a phone with, and plug straight into the computer instead of a hub.
Find the USB chip on your board
The ESP32 chip speaks UART, 2 wires (TX and RX) that send data one bit at a time. Your computer speaks USB. On most boards a small bridge chip sits between them and translates, and that bridge chip is what needs a driver.
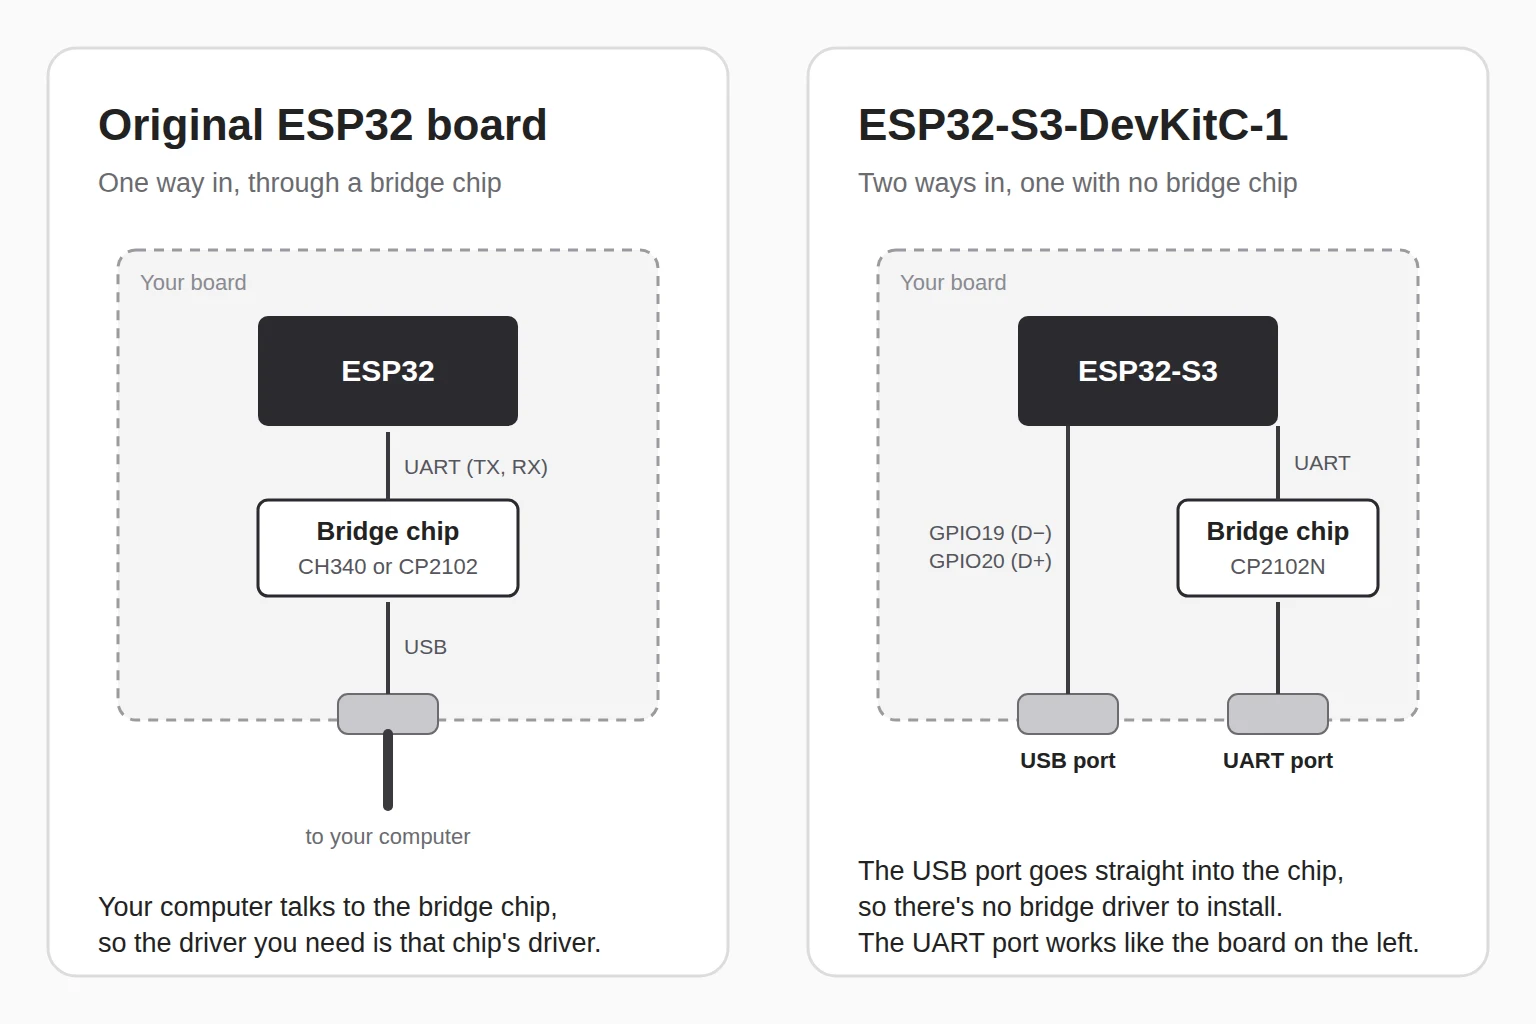
Look at the tiny print on the chip closest to the USB port. These are the ones you'll meet most:
| Printed on the chip | What it is | Driver |
|---|---|---|
CH340G, CH340C, CH340K | WCH USB-to-serial bridge, common on low-cost boards | CH340 driver |
CP2102, CP2102N, CP2104 | Silicon Labs USB-to-UART bridge, on Espressif DevKits | CP2102 driver |
| No bridge chip, port goes straight to the ESP32 | The chip's own USB, on ESP32-S3, ESP32-C3 and ESP32-C6 | None |
On Linux, lsusb names the bridge for you: 1a86:7523 QinHeng Electronics CH340 serial converter or 10c4:ea60 Silicon Labs CP210x UART Bridge.
The ESP32-S3, ESP32-C3 and ESP32-C6 have USB built into the chip, so a port wired straight to it shows up with no bridge driver at all. The ESP32-S3-DevKitC-1 gives you both: the port labeled USB goes to the chip, and the one labeled UART goes through a CP2102N bridge. Either works for flashing.
Many computers already have the bridge driver, so try plugging in before you install anything. If the port still doesn't appear, the USB driver page has the CH340 and CP2102 install steps for Windows, macOS and Linux.
Install ESP32 support in the Arduino IDE
The Arduino IDE doesn't know about ESP32 boards until you add Espressif's board package, a bundle of the compiler, tools and board definitions. It takes 1 URL and 1 install.
-
Open File > Preferences on Windows or Linux, or Arduino IDE > Settings on macOS.
-
Find Additional boards manager URLs near the bottom and paste this URL, then press OK:
https://espressif.github.io/arduino-esp32/package_esp32_index.json -
Open Tools > Board > Boards Manager. Search for
esp32and install esp32 by Espressif Systems. -
Pick your board under Tools > Board > esp32. For a DevKit, that's
ESP32 Dev Module,ESP32S3 Dev Module,ESP32C3 Dev ModuleorESP32C6 Dev Module. -
Using the chip's own USB port? Set Tools > USB CDC On Boot to Enabled. Without it,
Serial.printgoes to the UART pins, and the Serial Monitor on your USB port stays quiet. -
Pick the new port under Tools > Port, paste this sketch into a new file and press Upload:
void setup() { Serial.begin(115200); } void loop() { Serial.println("Hello from my ESP32"); delay(1000); } -
Open Tools > Serial Monitor and set it to 115200 baud. A new hello scrolls in every second.
The stock Blink example needs LED_BUILTIN, and ESP32 Dev Module doesn't define it, so Blink won't even compile there. A hello over serial works on every ESP32 board.
Flash from a terminal with esptool
esptool is Espressif's own flashing tool, and the Arduino IDE runs it for you behind the Upload button. It's worth having on its own when you want to check a board or flash a .bin file without opening a sketch.
python3 -m venv esptoolenv
source esptoolenv/bin/activate
pip install esptool
esptool --port COM4 flash-id
esptool needs Python 3.10 or newer. On Windows, create the environment with python -m venv esptoolenv, then activate it with esptoolenv\Scripts\activate instead of the source line. flash-id connects, names the chip and prints the flash size, so it's a good first test. Swap COM4 for your port from the table above, like /dev/ttyUSB0 on Linux or /dev/cu.usbserial-1401 on macOS. If you leave --port out, esptool tries each serial port until it finds an ESP32.
A few commands you'll use most:
| Command | What it does |
|---|---|
esptool --port COM4 read-mac | Prints the board's MAC address, a quick "can you hear me?" check |
esptool --port COM4 flash-id | Prints the chip type and flash size |
esptool --port COM4 write-flash 0x1000 my_app-0x01000.bin | Writes a .bin file at the flash address it belongs at |
esptool --port COM4 erase-flash | Wipes the whole flash chip, including your sketch and saved settings |
Each .bin file belongs at its own address, so copy the address that comes with your firmware instead of reusing 0x1000. Older tutorials write these commands with underscores, like esptool.py write_flash. Since esptool v5 they use hyphens.
On Linux, a "Permission denied" error usually means your user can't open serial ports yet. Run ls -l /dev/ttyUSB0 to see which group owns the port, often dialout. Add yourself with sudo usermod -a -G dialout $USER, then log out and back in.
Skip the IDE: flash from the browser with Deploy
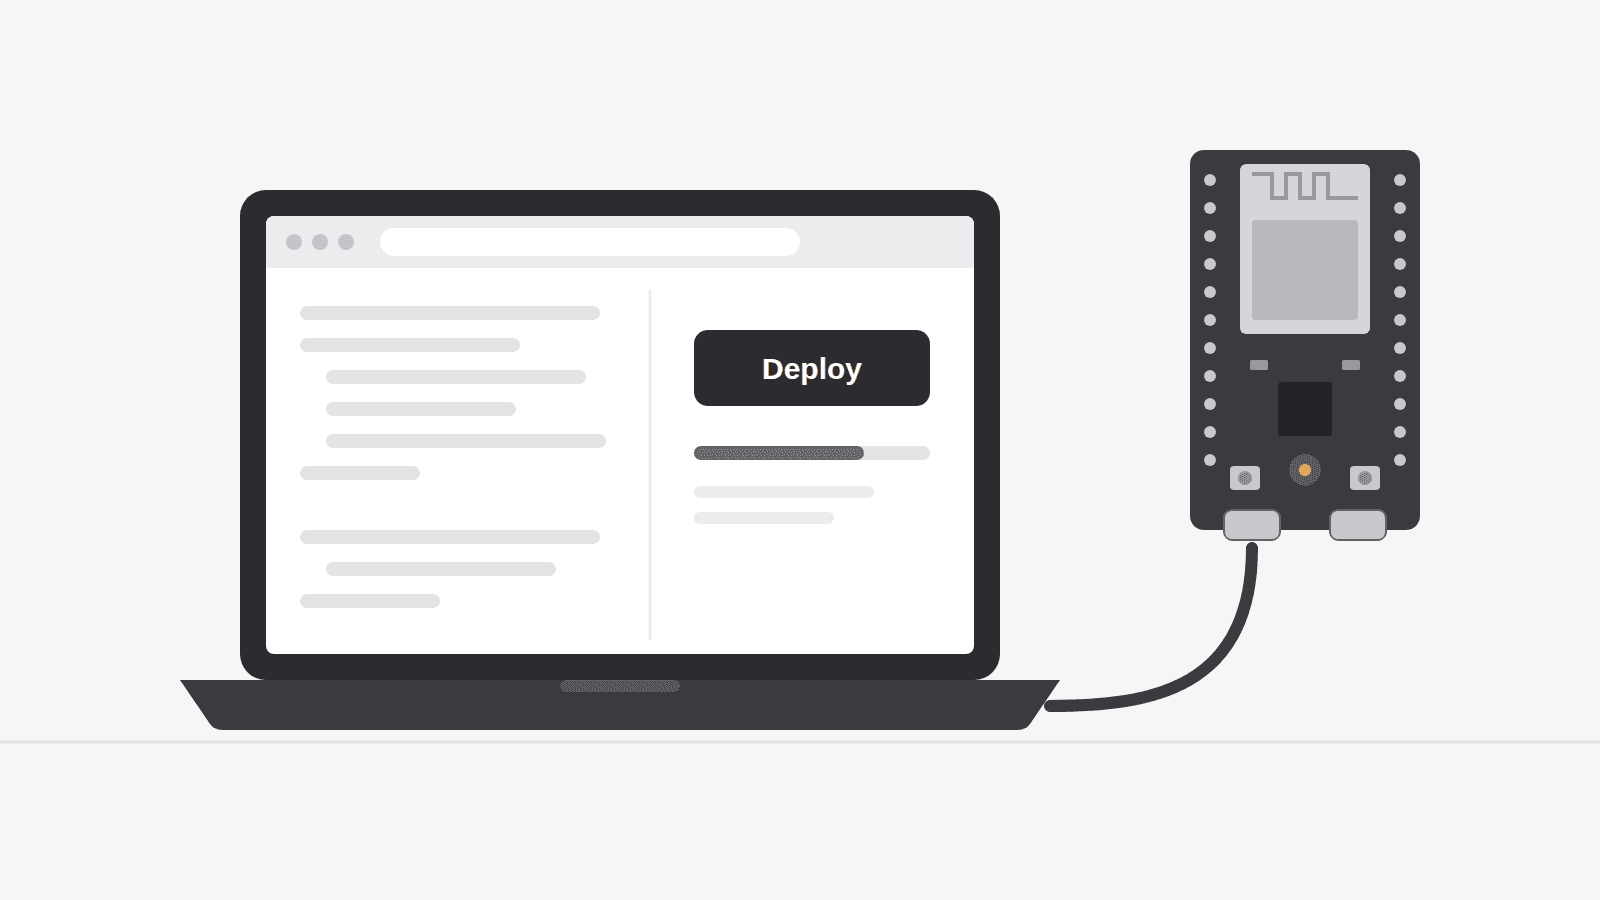
In Schematik, you describe the build, Schematik writes the code, and Deploy compiles it and flashes it from the browser. There's no Arduino IDE, board package or Python to install.
- Open a project in Schematik, or start from a build like the ESP32 weather station.
- Plug in the board and press Deploy.
- Pick your board's port from the browser's list, and Deploy writes the firmware.
Deploy talks to your board through Web Serial, the browser's way of reaching a USB device. Open Schematik in Chrome or Edge to flash. Safari doesn't support Web Serial. The same port rules apply here: if the browser's list is empty, check the cable and the driver from the steps above. If you'd rather flash with esptool, the download icon next to Deploy saves the built firmware instead. When it saves a firmware.zip, the FLASH-OFFSETS.txt inside lists the address for each file.
When the upload times out
The error most people meet first looks like this:
A fatal error occurred: Failed to connect to ESP32: No serial data received.
Older versions of esptool word the same failure as Timed out waiting for packet header.
It means the computer found the port, and the ESP32 never answered. Work down this list:
- Use a USB data cable, and plug straight into the computer.
- Unplug anything wired to the
TXandRXpins while you flash. - Hold
BOOTwhile you press Upload, and let go once the log saysWriting at. - On a native USB port, hold
BOOT, tapRESET, then let go ofBOOT. The board waits in download mode, sometimes on a new port, so pick the port again before you flash. If your sketch doesn't start afterward, pressRESET.
Not sure which button is BOOT? The ESP32-S3-DevKitC-1 pinout shows both buttons and what each one does.
Once your ESP32 says hello, give it a screen to say it on. The ESP32 weather station tells you what to wear before you leave, and it flashes the same way.
Keep building from here
Jump into a step-by-step build, or open Schematik and turn your own idea into code, wiring, and assembly instructions.