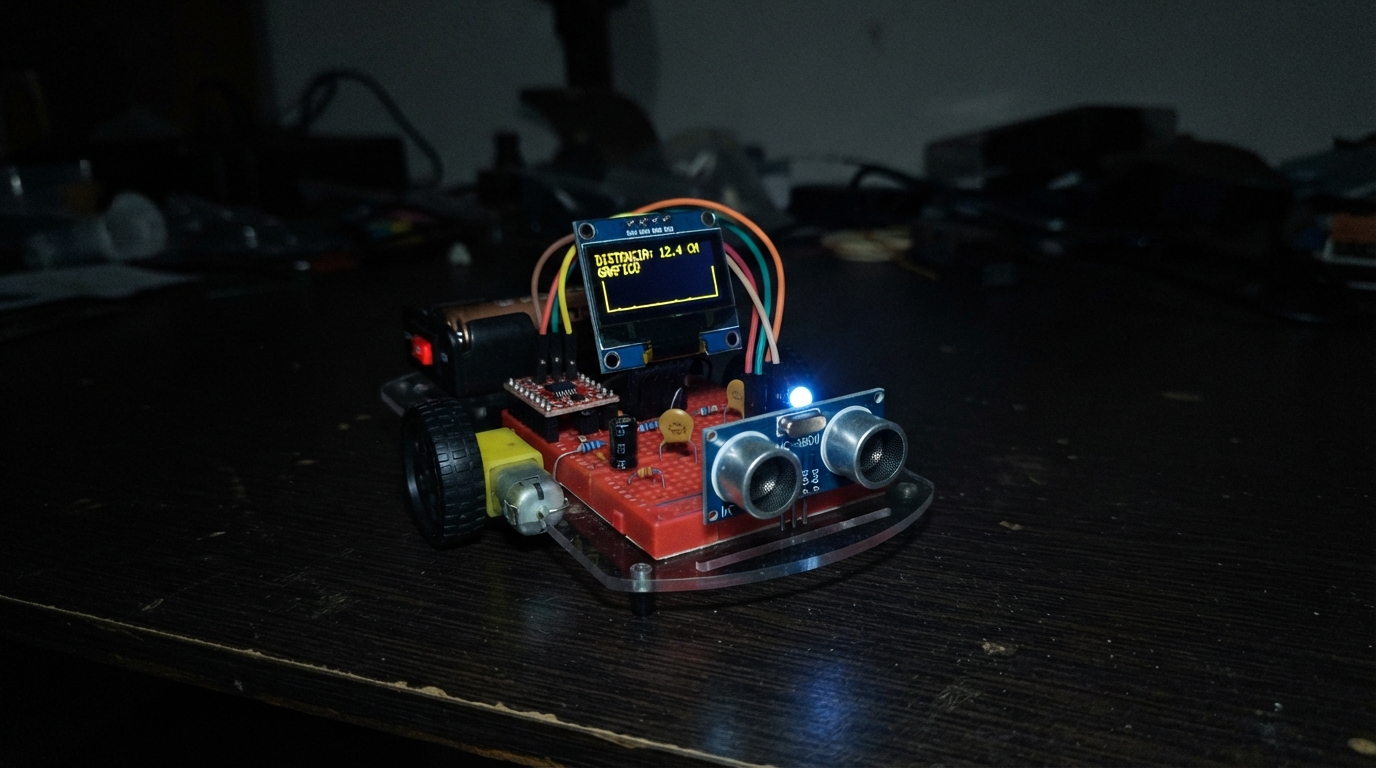
This distance-tracking robot combines an ESP32 microcontroller with an HC-SR04 ultrasonic sensor and dual N20 micro motors to create a mobile platform that measures and graphs distance over time. The robot advances until it detects an obstacle within 25 cm, then stops and displays a real-time chart of its movement via a web interface.
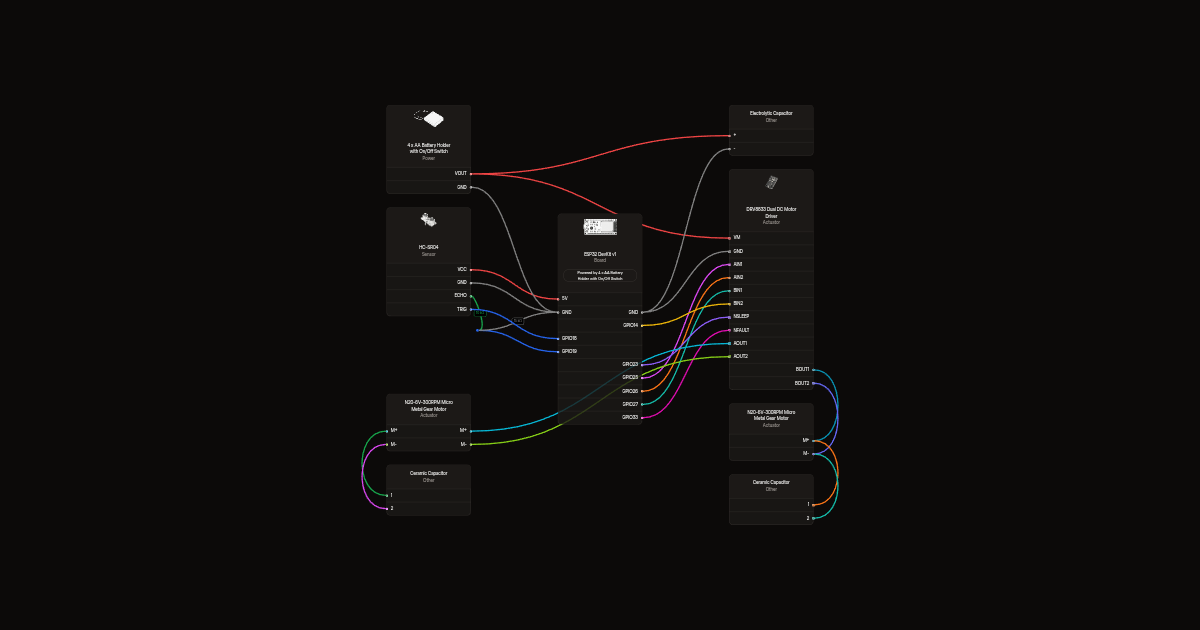
The guide provides a complete wiring diagram showing how to connect the motor driver, sensor with voltage protection, battery holder, and filtering capacitors to the ESP32. Assembly steps cover building the chassis, isolating motor power supplies, and testing with suspended wheels before deployment. You'll also receive the full firmware with web server functionality and motor control logic.
Wiring diagram
Gather all the parts
Assemble it in 5 steps
1. Monte a base do carrinho
Prenda os dois motores N20 em uma base leve com rodas compatíveis e uma roda livre de apoio. Fixe o sensor na frente, horizontal e sem nada cobrindo os dois círculos.
2. Ligue os motores e filtre o ruído
Com tudo desligado, ligue AOUT1/AOUT2 ao motor esquerdo e BOUT1/BOUT2 ao direito. Coloque um capacitor cerâmico de 100 nF entre os terminais de cada motor. Ligue AIN1 ao GPIO25, AIN2 ao GPIO26, BIN1 ao GPIO27 e BIN2 ao GPIO14 (comandos dos motores); nSLEEP ao GPIO23 (habilitação) e nFAULT ao GPIO33 (aviso de falha).
- Nunca ligue os motores diretamente ao ESP32. Escolha motores cuja corrente de bloqueio seja compatível com o módulo DRV8833; não mantenha rodas travadas.
3. Separe a energia dos motores
Use quatro pilhas AA no suporte. Vermelho VOUT vai ao VM do driver; negativo vai ao GND do driver e ao GND do ESP32. Coloque o capacitor de 470 µF próximo ao driver: positivo em VM e negativo em GND. O ESP32 recebe 5 V pela sua entrada USB, de uma bateria externa USB para uso móvel.
- Não ligue os 6 V das pilhas aos pinos 5V ou 3V3 do ESP32. Respeite a polaridade do capacitor. Desligue o suporte antes de alterar fios. A autonomia depende das pilhas e da carga.
4. Ligue o sensor com proteção de tensão
VCC do sensor vai ao 5V do ESP32 e GND ao GND comum. TRIG vai ao GPIO18 (disparo). ECHO vai a uma ponta do resistor de 10 kΩ; a outra ponta vai ao GPIO19 (leitura) e ao resistor de 15 kΩ. A ponta livre do resistor de 15 kΩ vai ao GND. Esse divisor reduz o sinal de 5 V para cerca de 3 V.
- Não ligue ECHO diretamente ao ESP32.
5. Teste com as rodas suspensas
Mantenha as rodas fora do chão no primeiro teste. Verifique se ambas giram para a frente; se uma estiver invertida, desligue as fontes e troque os dois fios somente desse motor. Depois teste no chão em baixa área livre, com um obstáculo grande e plano à frente.
- O sensor não detecta todos os objetos, superfícies inclinadas ou tecidos. A parada em 25 cm não garante evitar colisões. Não use perto de escadas, pessoas ou animais; mantenha o interruptor acessível.
Review all connections
1. Connections between "sonar" and "ESP32"
2. Connections between "rtop" and "ESP32"
3. Connections between "rbottom" and "ESP32"
4. Connections between "driver" and "ESP32"
5. Connections between "battery" and "ESP32"
6. Connections between "bulk" and "ESP32"
7. Connections between "cleft" and "ESP32"
8. Connections between "cright" and "ESP32"
Deploy the firmware
#include <Arduino.h>
#include <WiFi.h>
#include <WebServer.h>
WebServer server(80);
const int TRIG=18,ECHO=19,A1=25,A2=26,MOTOR_B1=27,MOTOR_B2=14,SLEEP=23,FAULT=33;
float distanceCm=-1;
bool moving=false;
uint32_t lastSample=0,lastHeartbeat=0;
void stopMotor(){moving=false; digitalWrite(SLEEP,LOW); digitalWrite(A1,LOW); digitalWrite(A2,LOW); digitalWrite(MOTOR_B1,LOW); digitalWrite(MOTOR_B2,LOW);}
const char page[] PROGMEM=R"PAGE(<!doctype html><html lang="pt-BR"><meta charset="utf-8"><meta name="viewport" content="width=device-width,initial-scale=1"><title>Carrinho</title><style>body{font:18px sans-serif;margin:20px}canvas{width:100%;max-width:900px;border:1px solid #aaa}button{padding:15px;margin:8px}</style><h1>Distância × tempo</h1><p id="status">Conectando...</p><button onclick="cmd('start')">Avançar</button><button onclick="cmd('stop')">Parar</button><button onclick="points=[];draw()">Limpar gráfico</button><p>Distância em cm; tempo em segundos desde a ligação. Últimos 60 segundos.</p><canvas id="graph" width="900" height="420"></canvas><p>O avanço para abaixo de 25 cm, sem leitura válida, com falha do motor ou perda de comunicação. Não é um sistema anticolisão garantido.</p><script>
let points=[],busy=false;const c=document.getElementById('graph'),g=c.getContext('2d');
async function cmd(s){try{await fetch('/'+s,{method:'POST'})}catch(e){}}
function draw(){g.clearRect(0,0,900,420);let end=points.length?points[points.length-1].t:60,start=Math.max(0,end-60);g.font='16px sans-serif';g.strokeStyle='#ddd';g.fillStyle='#333';for(let d=0;d<=400;d+=100){let y=370-d*0.85;g.beginPath();g.moveTo(65,y);g.lineTo(880,y);g.stroke();g.fillText(d+' cm',3,y+5)}for(let i=0;i<=6;i++){let x=65+i*815/6;g.fillText((start+i*60/6).toFixed(0)+' s',x-10,400)}g.strokeStyle='#087aca';g.lineWidth=2;g.beginPath();let pen=false;for(const p of points){if(p.d===null){pen=false;continue}let x=65+(p.t-start)/60*815,y=370-p.d*.85;if(pen)g.lineTo(x,y);else g.moveTo(x,y);pen=true}g.stroke()}
setInterval(async()=>{if(busy)return;busy=true;try{let r=await fetch('/data',{cache:'no-store'}),p=await r.json();points.push(p);points=points.filter(q=>q.t>=p.t-60);document.getElementById('status').textContent=(p.d===null?'Sem eco válido':p.d.toFixed(1)+' cm')+' — '+(p.run?'avançando':'parado');draw()}catch(e){document.getElementById('status').textContent='Sem conexão — carrinho para automaticamente'}finally{busy=false}},200);
</script></html>)PAGE";
void setup(){
 pinMode(SLEEP,OUTPUT);digitalWrite(SLEEP,LOW);
 pinMode(A1,OUTPUT);pinMode(A2,OUTPUT);pinMode(MOTOR_B1,OUTPUT);pinMode(MOTOR_B2,OUTPUT);stopMotor();
 pinMode(FAULT,INPUT_PULLUP);pinMode(TRIG,OUTPUT);digitalWrite(TRIG,LOW);pinMode(ECHO,INPUT);
 Serial.begin(115200);WiFi.mode(WIFI_AP);WiFi.softAP("Carrinho-ESP32","carrinho32");
 server.on("/",HTTP_GET,[]{server.send_P(200,"text/html; charset=utf-8",page);});
 server.on("/data",HTTP_GET,[]{lastHeartbeat=millis();String json="{\"t\":"+String(millis()/1000.0,2)+",\"d\":"+(distanceCm<0?String("null"):String(distanceCm,1))+",\"run\":"+(moving?String("true"):String("false"))+"}";server.send(200,"application/json",json);});
 server.on("/start",HTTP_POST,[]{if(distanceCm>=30 && digitalRead(FAULT)==HIGH){lastHeartbeat=millis();moving=true;digitalWrite(A1,HIGH);digitalWrite(A2,LOW);digitalWrite(MOTOR_B1,HIGH);digitalWrite(MOTOR_B2,LOW);digitalWrite(SLEEP,HIGH);}server.send(200,"text/plain","OK");});
 server.on("/stop",HTTP_POST,[]{stopMotor();server.send(200,"text/plain","OK");});
 server.begin();Serial.println("Wi-Fi Carrinho-ESP32 / senha carrinho32 / http://192.168.4.1");
}
void loop(){server.handleClient();uint32_t now=millis();
 if(now-lastSample>=100){lastSample=now;digitalWrite(TRIG,LOW);delayMicroseconds(2);digitalWrite(TRIG,HIGH);delayMicroseconds(10);digitalWrite(TRIG,LOW);unsigned long us=pulseIn(ECHO,HIGH,25000);distanceCm=(us>=116 && us<=23200)?us/58.0f:-1;Serial.printf("%.2f,%0.1f\n",millis()/1000.0,distanceCm);if(distanceCm<25)stopMotor();}
 if(moving && (now-lastHeartbeat>1200 || digitalRead(FAULT)==LOW))stopMotor();
}
Remix this project
Make it yours in one click
Open a full copy of this project in your own Schematik workspace, diagram, code, parts, and assembly steps included. Swap the sensor, add features, or redesign the whole thing with AI. The author's original stays untouched.