Community project
Crea El Esquema De Conexiones Pin Pin Para
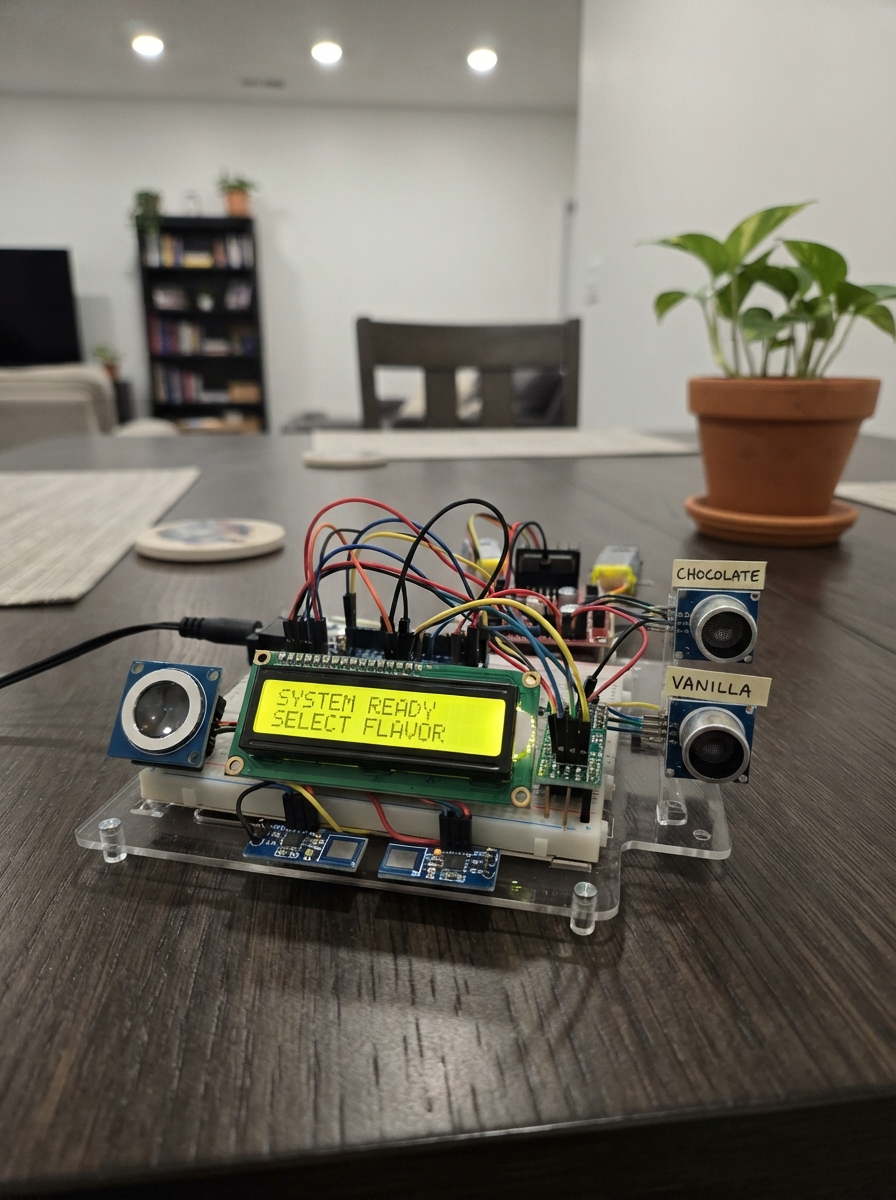
This project builds a fingerprint-authenticated dual-flavor beverage dispenser with chocolate and vanilla pumps controlled by an ESP32. The system uses ultrasonic sensors to monitor liquid levels in each reservoir, capacitive touch buttons to select flavor, and an LCD display to show status and availability.
The guide provides a complete wiring diagram with pin-by-pin connections for the UART fingerprint sensor, I2C LCD display, H-bridge motor driver, ultrasonic distance sensors, touch buttons, and dual 12V pump system. Assembly steps cover power distribution setup, sensor voltage level-shifting, and pre-power verification, along with the firmware needed to authenticate users and dispense the selected flavor.
Wiring diagram

Gather all the parts
Assemble it in 7 steps
1. Prepare tres carriles de alimentación
Con la fuente de 12 V desenchufada, use la protoboard solo para señales y baja corriente. Reserve un carril rojo para 5 V, uno rojo distinto para 3V3 y uno negro para GND. Conecte a GND común: negativo de la fuente, GND del L298N, un GND del ESP32, GND de LCD, AS608, ambos TTP223, ambos HC-SR04 y el conversor I²C. (tierra compartida)
- No una el carril de 5 V al de 3V3: son voltajes distintos.
- Mantenga el L298N y los cables de las bombas fuera de la protoboard.
- No conecte todavía el positivo de 12 V: un cable puesto en el lugar equivocado puede dañar los módulos.
2. Conecte la fuente, el L298N y las bombas
Conecte fuente +12V → L298N VS/+12V (potencia), fuente GND → L298N GND (tierra), bomba Chocolate M+ y M− → L298N OUT1 y OUT2 (potencia), y bomba Vainilla M+ y M− → L298N OUT3 y OUT4 (potencia). Deje puestos los puentes ENA y ENB. Conecte L298N IN1 → GPIO4, IN2 → GPIO13, IN3 → GPIO14 e IN4 → GPIO18 (órdenes para las bombas).
- Use los bornes de tornillo y cable más grueso para 12 V y las bombas.
- Si una bomba gira al revés, desconecte la fuente e intercambie solo sus dos cables en OUT1/OUT2 o OUT3/OUT4.
- Nunca conecte 12 V al ESP32, a la LCD ni a los sensores: puede quemarlos.
3. Alimente el ESP32, LCD y sensores
Tras comprobar con un multímetro que el pin 5V del L298N está cerca de 5 V, conecte L298N 5V → ESP32 VIN/5V, LCD VCC y carril de 5 V (alimentación). Conecte ESP32 3V3 → carril de 3V3 (alimentación). Desde ese carril conecte AS608 VCC, TTP223 Chocolate VCC, TTP223 Vainilla VCC y LV del conversor I²C. Conecte cada GND al carril negro (tierra).
- Los HC-SR04 normales van al carril de 5 V en el siguiente paso.
- Compruebe 5 V antes de conectar VIN del ESP32.
- Si el 5V del L298N no mide cerca de 5 V, no alimente el ESP32 desde él: un voltaje incorrecto puede dañarlo.
4. Conecte LCD, huella y botones
LCD: VCC → 5V (alimentación), GND → GND (tierra), SDA → HV1 y SCL → HV2 del conversor. Conversor I²C: HV → 5V (alimentación), LV → 3V3 (alimentación), GND → GND (tierra), LV1 → GPIO21 (datos) y LV2 → GPIO22 (reloj). AS608: VCC → 3V3 (alimentación), GND → GND (tierra), TX → GPIO16 (datos hacia ESP32) y RX → GPIO17 (datos desde ESP32). TTP223 Chocolate: VCC → 3V3 (alimentación), GND → GND (tierra), SIG → GPIO32 (selección). TTP223 Vainilla: VCC → 3V3 (alimentación), GND → GND (tierra), SIG → GPIO33 (selección).
- Los dos canales sobrantes del BSS138 quedan sin conectar.
- TX y RX del lector se cruzan por su trabajo: TX del lector llega al GPIO que recibe.
- No conecte SDA ni SCL de la LCD de 5 V directamente al ESP32; el conversor I²C protege GPIO21 y GPIO22.
- Use la conexión directa del AS608 únicamente si su módulo confirma UART TTL de 3,3 V o alimentación 3,3–5 V.
5. Monte el divisor del sensor Chocolate
Coloque el HC-SR04 Chocolate cerca de la parte alta del depósito mirando al polvo. Conecte VCC → 5V (alimentación), GND → GND (tierra) y TRIG → GPIO25 (orden de medida). Para ECHO, haga esta unión en una fila libre de la protoboard: ECHO → resistencia de 1 kΩ → punto central; desde ese mismo punto central conecte GPIO27 (señal) y una resistencia de 2 kΩ → GND (protección).
- El punto central es la misma fila de la protoboard donde se juntan GPIO27, el extremo de la resistencia de 1 kΩ y el extremo de la resistencia de 2 kΩ.
- El código conserva GPIO25 y GPIO27; no cambie esos pines.
- No conecte ECHO directamente a GPIO27: el pulso de 5 V puede dañar el ESP32.
- No intercambie los valores: 1 kΩ va entre ECHO y el punto central; 2 kΩ va entre el punto central y GND.
6. Monte el divisor del sensor Vainilla
Coloque el HC-SR04 Vainilla en la parte alta de su depósito sin que una pared bloquee sus dos transductores. Conecte VCC → 5V (alimentación), GND → GND (tierra) y TRIG → GPIO26 (orden de medida). Para ECHO, haga otra unión independiente: ECHO → resistencia de 1 kΩ → punto central; desde ese punto central conecte GPIO23 (señal) y una resistencia de 2 kΩ → GND (protección).
- Mantenga separado este punto central del punto central de Chocolate.
- Sujete los sensores para que no apunten a una pared inclinada del depósito.
- No conecte ECHO directamente a GPIO23: sus 5 V pueden dañar el ESP32.
7. Revise antes de encender
Revise que todos los GND estén unidos y que cada HC-SR04 tenga exactamente su divisor. Conecte el ESP32 por USB primero para cargar el programa y comprobar la LCD. Después conecte la fuente de 12 V al L298N para probar las bombas con vasos y tubos preparados.
- Con el depósito vacío, la pantalla debe avisar que hay que recargar cuando mida 20 cm o más.
- Si la pantalla dice que un sensor no responde, revise primero VCC, GND, TRIG y la unión central de su divisor.
- Pare de inmediato si el ESP32 se reinicia cuando arranca una bomba, si el L298N se calienta mucho o si huele a quemado.
Review all connections
1. Connections between "supply_12v" and "ESP32"
2. Connections between "l298n_driver" and "ESP32"
3. Connections between "lcd_16x2" and "ESP32"
4. Connections between "i2c_level_shifter" and "ESP32"
5. Connections between "touch_chocolate" and "ESP32"
6. Connections between "touch_vanilla" and "ESP32"
7. Connections between "ultrasonic_chocolate" and "ESP32"
8. Connections between "ultrasonic_vanilla" and "ESP32"
9. Connections between "fingerprint_as608" and "ESP32"
10. Connections between "resistor_chocolate_series" and "ESP32"
11. Connections between "resistor_chocolate_ground" and "ESP32"
12. Connections between "resistor_vanilla_series" and "ESP32"
13. Connections between "resistor_vanilla_ground" and "ESP32"
Deploy the firmware
#include <Arduino.h>
#include <Wire.h>
#include <LiquidCrystal_I2C.h>
#include <Adafruit_Fingerprint.h>

void printLine(uint8_t row, const char *text);
void stopPumps();
void runChocolatePump();
void runVanillaPump();
float readDistanceCm(uint8_t trigPin, uint8_t echoPin);
bool isEmpty(float distanceCm);
void showStatus();
bool selectedFlavorAvailable(bool chocolate);
bool fingerprintMatches();
void dispense(bool chocolate);

constexpr uint8_t L298_IN1 = 4;
constexpr uint8_t L298_IN2 = 13;
constexpr uint8_t L298_IN3 = 14;
constexpr uint8_t L298_IN4 = 18;
constexpr uint8_t FINGERPRINT_RX = 16;
constexpr uint8_t FINGERPRINT_TX = 17;
constexpr uint8_t TOUCH_CHOCOLATE = 32;
constexpr uint8_t TOUCH_VANILLA = 33;
constexpr uint8_t TRIG_CHOCOLATE = 25;
constexpr uint8_t ECHO_CHOCOLATE = 27;
constexpr uint8_t TRIG_VANILLA = 26;
constexpr uint8_t ECHO_VANILLA = 23;
constexpr uint8_t I2C_SDA = 21;
constexpr uint8_t I2C_SCL = 22;

constexpr uint8_t LCD_ADDRESS = 0x27;
constexpr unsigned long DISPENSE_TIME_MS = 5000;
constexpr unsigned long ULTRASONIC_TIMEOUT_US = 30000;
constexpr float EMPTY_DISTANCE_CM = 20.0F;
constexpr unsigned long STATUS_INTERVAL_MS = 2000;

LiquidCrystal_I2C lcd(LCD_ADDRESS, 16, 2);
HardwareSerial fingerprintSerial(2);
Adafruit_Fingerprint finger(&fingerprintSerial);

bool fingerprintReady = false;
bool sessionAuthorized = false;
bool chocolateWasTouched = false;
bool vanillaWasTouched = false;
unsigned long lastStatusUpdate = 0;

void printLine(uint8_t row, const char *text) {
  lcd.setCursor(0, row);
  lcd.print(text);
  for (uint8_t i = strlen(text); i < 16; i++) lcd.print(' ');
}

void stopPumps() {
  digitalWrite(L298_IN1, LOW);
  digitalWrite(L298_IN2, LOW);
  digitalWrite(L298_IN3, LOW);
  digitalWrite(L298_IN4, LOW);
}

void runChocolatePump() {
  digitalWrite(L298_IN1, HIGH);
  digitalWrite(L298_IN2, LOW);
}

void runVanillaPump() {
  digitalWrite(L298_IN3, HIGH);
  digitalWrite(L298_IN4, LOW);
}

float readDistanceCm(uint8_t trigPin, uint8_t echoPin) {
  digitalWrite(trigPin, LOW);
  delayMicroseconds(2);
  digitalWrite(trigPin, HIGH);
  delayMicroseconds(10);
  digitalWrite(trigPin, LOW);
  unsigned long duration = pulseIn(echoPin, HIGH, ULTRASONIC_TIMEOUT_US);
  if (duration == 0) return -1.0F;
  return (duration * 0.0343F) / 2.0F;
}

bool isEmpty(float distanceCm) {
  return distanceCm >= EMPTY_DISTANCE_CM;
}

void showStatus() {
  float chocolateDistance = readDistanceCm(TRIG_CHOCOLATE, ECHO_CHOCOLATE);
  float vanillaDistance = readDistanceCm(TRIG_VANILLA, ECHO_VANILLA);

  if (chocolateDistance < 0.0F && vanillaDistance < 0.0F) {
    printLine(0, "Revise sensores");
    printLine(1, "Choco y vain.");
  } else if (chocolateDistance < 0.0F) {
    printLine(0, "Revise sensor");
    printLine(1, "de chocolate");
  } else if (vanillaDistance < 0.0F) {
    printLine(0, "Revise sensor");
    printLine(1, "de vainilla");
  } else if (isEmpty(chocolateDistance) && isEmpty(vanillaDistance)) {
    printLine(0, "RECARGAR AMBOS");
    printLine(1, "Choco y vain.");
  } else if (isEmpty(chocolateDistance)) {
    printLine(0, "RECARGAR CHOCO");
    printLine(1, "Deposito vacio");
  } else if (isEmpty(vanillaDistance)) {
    printLine(0, "RECARGAR VAIN.");
    printLine(1, "Deposito vacio");
  } else {
    printLine(0, "ProtiPass listo");
    printLine(1, "Ponga su huella");
  }
}

bool selectedFlavorAvailable(bool chocolate) {
  float distance = chocolate ? readDistanceCm(TRIG_CHOCOLATE, ECHO_CHOCOLATE)
                             : readDistanceCm(TRIG_VANILLA, ECHO_VANILLA);
  if (distance < 0.0F) {
    printLine(0, "Sensor sin eco");
    printLine(1, chocolate ? "Revise chocolate" : "Revise vainilla");
    delay(1500);
    return false;
  }
  if (isEmpty(distance)) {
    printLine(0, chocolate ? "RECARGAR CHOCO" : "RECARGAR VAIN.");
    printLine(1, "No se sirve hoy");
    delay(1500);
    return false;
  }
  return true;
}

bool fingerprintMatches() {
  if (!fingerprintReady) return false;
  uint8_t result = finger.getImage();
  if (result != FINGERPRINT_OK) return false;
  result = finger.image2Tz();
  if (result != FINGERPRINT_OK) return false;
  result = finger.fingerFastSearch();
  if (result != FINGERPRINT_OK) {
    printLine(0, "Huella no valida");
    printLine(1, "Intente otra vez");
    delay(1200);
    return false;
  }
  printLine(0, "Acceso aceptado");
  printLine(1, "Elija un sabor");
  return true;
}

void dispense(bool chocolate) {
  if (!selectedFlavorAvailable(chocolate)) {
    sessionAuthorized = false;
    showStatus();
    return;
  }
  printLine(0, chocolate ? "Sirviendo choco" : "Sirviendo vain.");
  printLine(1, "Espere...");
  if (chocolate) runChocolatePump();
  else runVanillaPump();
  unsigned long started = millis();
  while (millis() - started < DISPENSE_TIME_MS) delay(10);
  stopPumps();
  printLine(0, "Porcion lista");
  printLine(1, "Retire su vaso");
  delay(1500);
  sessionAuthorized = false;
  showStatus();
}

void setup() {
  pinMode(L298_IN1, OUTPUT);
  pinMode(L298_IN2, OUTPUT);
  pinMode(L298_IN3, OUTPUT);
  pinMode(L298_IN4, OUTPUT);
  stopPumps();
  pinMode(TOUCH_CHOCOLATE, INPUT);
  pinMode(TOUCH_VANILLA, INPUT);
  pinMode(TRIG_CHOCOLATE, OUTPUT);
  pinMode(ECHO_CHOCOLATE, INPUT);
  pinMode(TRIG_VANILLA, OUTPUT);
  pinMode(ECHO_VANILLA, INPUT);
  Wire.begin(I2C_SDA, I2C_SCL);
  lcd.init();
  lcd.backlight();
  printLine(0, "Iniciando...");
  printLine(1, "ProtiPass");
  fingerprintSerial.begin(57600, SERIAL_8N1, FINGERPRINT_RX, FINGERPRINT_TX);
  fingerprintReady = finger.verifyPassword();
  if (!fingerprintReady) {
    printLine(0, "Revise huella");
    printLine(1, "Botones prueba");
    delay(1500);
  }
  showStatus();
}

void loop() {
  bool chocolateTouched = digitalRead(TOUCH_CHOCOLATE) == HIGH;
  bool vanillaTouched = digitalRead(TOUCH_VANILLA) == HIGH;
  if (fingerprintReady && !sessionAuthorized && fingerprintMatches()) sessionAuthorized = true;
  bool allowSelection = sessionAuthorized || !fingerprintReady;
  if (allowSelection && chocolateTouched && !chocolateWasTouched) dispense(true);
  else if (allowSelection && vanillaTouched && !vanillaWasTouched) dispense(false);
  chocolateWasTouched = chocolateTouched;
  vanillaWasTouched = vanillaTouched;
  if (!sessionAuthorized && millis() - lastStatusUpdate >= STATUS_INTERVAL_MS) {
    lastStatusUpdate = millis();
    showStatus();
  }
  delay(20);
}
Remix this project
Make it yours in one click
Open a full copy of this project in your own Schematik workspace — diagram, code, parts, and assembly steps included. Swap the sensor, add features, or redesign the whole thing with AI. The author's original stays untouched.