Community project
ESP32 Floppy Bird Game
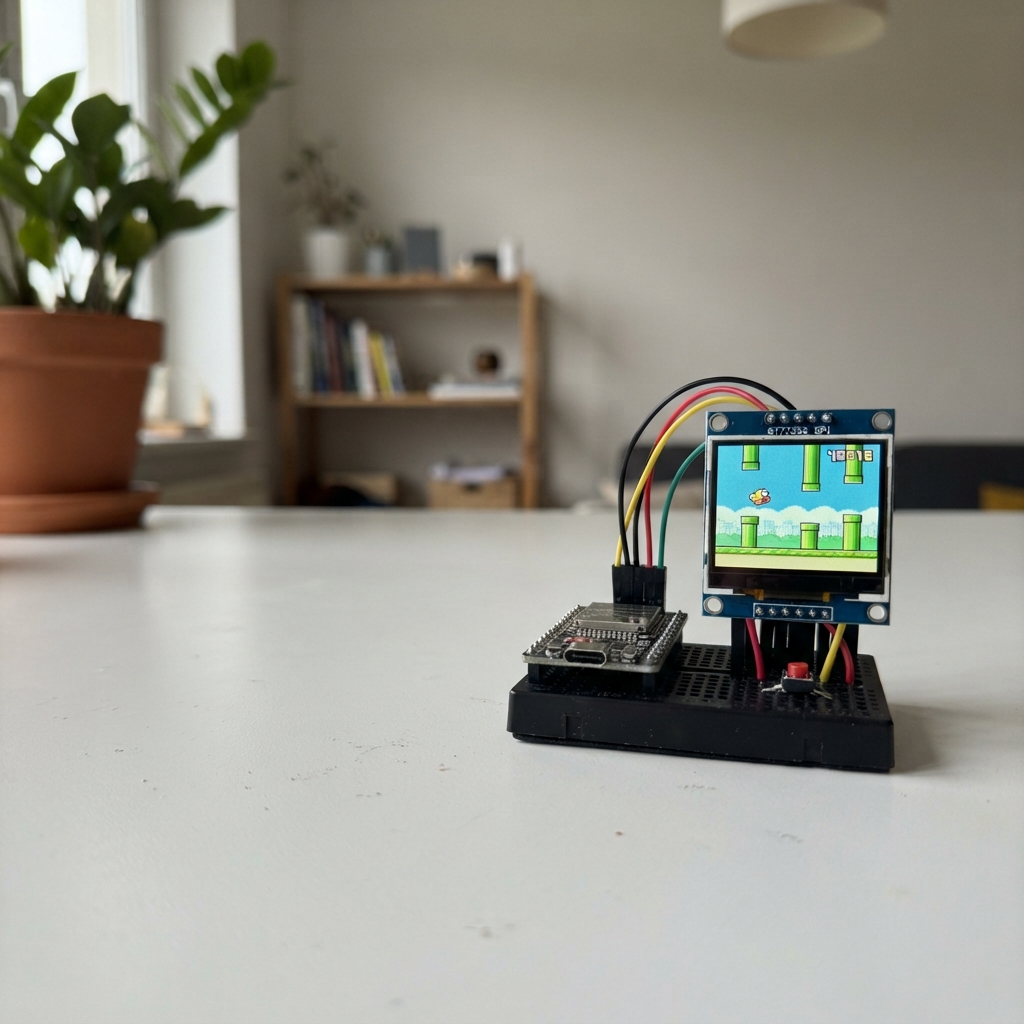
Build a playable Flappy Bird clone on an ESP32 microcontroller with a tiny 0.96 inch TFT display. This project uses hardware SPI for fast screen updates and a momentary pushbutton to control the bird's flight, delivering smooth gameplay on a minimal footprint.
This guide provides a complete wiring diagram, parts list, and step-by-step assembly instructions. The included firmware uses the Adafruit graphics libraries to render the game at 160×80 pixels, with collision detection, score tracking, and a title screen. Builders will learn how to interface SPI displays with the ESP32, handle button input, and implement game logic on a resource-constrained platform.
Wiring diagram
Gather all the parts
Assemble it in 5 steps
1. Keep the board unplugged while wiring
Place the ESP32-C3 Super Mini and the 0.96-inch screen on the breadboard with their pin labels facing up. Leave the USB cable disconnected while you add wires so a misplaced wire cannot power the screen the wrong way.
- Do not connect the screen VCC to 5V: this screen and the ESP32-C3 signal pins use 3.3V, and 5V can damage the screen.
2. Give the screen power
Run one red wire from the screen VCC pin to the board 3V3 pin (power). Run a second red wire from BLK to 3V3 (backlight power). Run one black wire from screen GND to any board GND pin (ground).
- The label may say SCL and SDA even though this colour screen uses those two pins as fast picture wires, not the usual sensor wires.
- Make sure VCC and GND are not swapped; swapped power can damage the screen.
3. Connect the five picture wires
Connect screen SCL to GPIO4 (clock). Connect screen SDA to GPIO6 (picture data). Connect screen CS to GPIO7 (screen select). Connect screen DC to GPIO3 (command/data signal). Connect screen RES to GPIO10 (screen reset).
- Use short wires if possible. The labels GPIO4, GPIO6, GPIO7, GPIO3, and GPIO10 are printed on the Super Mini board.
4. Wire the flap button
Put the pushbutton across the center gap of the breadboard. Connect one leg to GPIO20 (signal) and connect the leg directly across from it to GND (ground). Pressing it joins GPIO20 to ground, which makes the bird flap.
- On a four-leg button, the two legs on one side are already connected together. Use legs on opposite sides of the center gap.
- Do not use the BOOT button or GPIO9 for the game button; that pin is used when the board starts.
5. Check before powering
Compare every screen label and wire once more: VCC → 3V3 (power), GND → GND (ground), SCL → GPIO4 (clock), SDA → GPIO6 (picture data), CS → GPIO7 (screen select), DC → GPIO3 (signal), RES → GPIO10 (reset), BLK → 3V3 (backlight). Then plug the ESP32-C3 into USB.
- The game begins after one button press. Each later press makes the bird jump.
Review all connections
1. Connections between "tft_096" and "ESP32"
2. Connections between "flap_button" and "ESP32"
Deploy the firmware
#include <Arduino.h>
#include <SPI.h>
#include <Adafruit_GFX.h>
#include <Adafruit_ST7735.h>

constexpr uint8_t TFT_SCLK_PIN = 4;
constexpr uint8_t TFT_MOSI_PIN = 6;
constexpr uint8_t TFT_CS_PIN = 7;
constexpr uint8_t TFT_DC_PIN = 3;
constexpr uint8_t TFT_RST_PIN = 10;
constexpr uint8_t FLAP_BUTTON_PIN = 20;

constexpr int16_t SCREEN_W = 160;
constexpr int16_t SCREEN_H = 80;
constexpr int16_t GROUND_Y = 70;
constexpr int16_t BIRD_X = 38;
constexpr int16_t BIRD_RADIUS = 5;
constexpr int16_t PIPE_WIDTH = 20;
constexpr int16_t PIPE_CAP_OVERHANG = 2;
constexpr int16_t GAP_HEIGHT = 30;
// RGB565 colours chosen to keep every game object distinct on the small TFT.
constexpr uint16_t SKY = 0x9E7F;          // light blue
constexpr uint16_t PIPE = 0x05A0;
constexpr uint16_t PIPE_EDGE = 0x03E0;
constexpr uint16_t GROUND = 0xDDA0;
constexpr uint16_t BIRD_ORANGE = 0xFD20;
constexpr uint16_t BIRD_OUTLINE = 0xC400;

// This constructor uses the ESP32-C3 hardware SPI engine. It is much faster
// than sending every screen pixel through ordinary GPIO pins.
Adafruit_ST7735 tft(TFT_CS_PIN, TFT_DC_PIN, TFT_RST_PIN);
// Build a complete frame in memory before changing the real screen. This avoids
// the visible blue wipe between frames that made the game look blurry.
GFXcanvas16 frame(SCREEN_W, SCREEN_H);

enum GameState : uint8_t { TITLE, PLAYING, GAME_OVER };
GameState gameState = TITLE;
float birdY = 38.0f;
float birdVelocity = 0.0f;
int16_t pipeX = SCREEN_W;
int16_t gapCentreY = 37;
uint16_t score = 0;
uint16_t shownScore = 999;
unsigned long lastFrameMs = 0;
bool stableButton = HIGH;
bool rawButton = HIGH;
unsigned long rawChangedAtMs = 0;

bool buttonPressed() {
  const bool reading = digitalRead(FLAP_BUTTON_PIN);
  const unsigned long now = millis();
  if (reading != rawButton) {
    rawButton = reading;
    rawChangedAtMs = now;
  }
  if (rawButton != stableButton && now - rawChangedAtMs >= 25) {
    const bool wasHigh = stableButton == HIGH;
    stableButton = rawButton;
    return wasHigh && stableButton == LOW;
  }
  return false;
}

void presentFrame() {
  tft.drawRGBBitmap(0, 0, frame.getBuffer(), SCREEN_W, SCREEN_H);
}

void centeredText(const char *text, int16_t y, uint16_t colour, uint8_t size) {
  int16_t x1, y1;
  uint16_t width, height;
  frame.setTextSize(size);
  frame.setTextColor(colour);
  frame.getTextBounds(text, 0, y, &x1, &y1, &width, &height);
  frame.setCursor((SCREEN_W - width) / 2, y);
  frame.print(text);
}

void drawGround() {
  frame.fillRect(0, GROUND_Y, SCREEN_W, SCREEN_H - GROUND_Y, GROUND);
  frame.drawFastHLine(0, GROUND_Y, SCREEN_W, ST77XX_GREEN);
}

void drawBird(int16_t y) {
  frame.fillCircle(BIRD_X, y, BIRD_RADIUS, BIRD_ORANGE);
  frame.drawCircle(BIRD_X, y, BIRD_RADIUS, BIRD_OUTLINE);
  frame.fillCircle(BIRD_X + 2, y - 2, 2, ST77XX_WHITE);
  frame.drawPixel(BIRD_X + 3, y - 2, ST77XX_BLACK);
  frame.fillTriangle(BIRD_X + 4, y, BIRD_X + 10, y + 3, BIRD_X + 4, y + 5, ST77XX_YELLOW);
}

void drawPipeAt(int16_t x) {
  if (x <= -PIPE_WIDTH - PIPE_CAP_OVERHANG || x >= SCREEN_W) return;
  const int16_t gapTop = gapCentreY - GAP_HEIGHT / 2;
  const int16_t gapBottom = gapCentreY + GAP_HEIGHT / 2;
  frame.fillRect(x, 0, PIPE_WIDTH, gapTop, PIPE);
  frame.fillRect(x - PIPE_CAP_OVERHANG, gapTop - 4, PIPE_WIDTH + 2 * PIPE_CAP_OVERHANG, 4, PIPE_EDGE);
  frame.fillRect(x, gapBottom, PIPE_WIDTH, GROUND_Y - gapBottom, PIPE);
  frame.fillRect(x - PIPE_CAP_OVERHANG, gapBottom, PIPE_WIDTH + 2 * PIPE_CAP_OVERHANG, 4, PIPE_EDGE);
}

void drawGameScene() {
  frame.fillScreen(SKY);
  // The sun belongs behind the pipe, so it remains a complete circle.
  frame.fillCircle(130, 14, 7, ST77XX_YELLOW);
  drawPipeAt(pipeX);
  drawGround();
  frame.setTextSize(1);
  frame.setTextColor(ST77XX_WHITE);
  frame.setCursor(4, 4);
  frame.print(score);
  drawBird(static_cast<int16_t>(birdY));
  presentFrame();
}

void showTitle() {
  frame.fillScreen(SKY);
  frame.fillCircle(130, 14, 7, ST77XX_YELLOW);
  drawGround();
  drawBird(39);
  centeredText("FLOPPY", 8, ST77XX_WHITE, 2);
  centeredText("BIRD", 27, ST77XX_WHITE, 2);
  centeredText("PRESS BUTTON", 56, ST77XX_BLACK, 1);
  presentFrame();
}

void startGame() {
  birdY = 38.0f;
  birdVelocity = -1.2f;
  pipeX = SCREEN_W;
  gapCentreY = random(28, 48);
  score = 0;
  shownScore = 999;
  gameState = PLAYING;
  drawGameScene();
  lastFrameMs = millis();
}

bool hasHitPipe() {
  const bool besidePipe = BIRD_X + BIRD_RADIUS >= pipeX && BIRD_X - BIRD_RADIUS <= pipeX + PIPE_WIDTH;
  const int16_t gapTop = gapCentreY - GAP_HEIGHT / 2;
  const int16_t gapBottom = gapCentreY + GAP_HEIGHT / 2;
  return besidePipe && (birdY - BIRD_RADIUS < gapTop || birdY + BIRD_RADIUS > gapBottom);
}

void showGameOver() {
  frame.fillRoundRect(22, 24, 116, 29, 3, ST77XX_BLACK);
  centeredText("GAME OVER", 29, ST77XX_WHITE, 1);
  centeredText("PRESS TO RESTART", 42, ST77XX_YELLOW, 1);
  presentFrame();
}

void updateFrame() {
  // A steady 40 Hz update gives the bird responsive, consistent motion.
  birdVelocity += 0.08f;
  birdVelocity = min(birdVelocity, 1.5f);
  birdY += birdVelocity;
  pipeX -= 1;

  if (pipeX < -PIPE_WIDTH - PIPE_CAP_OVERHANG) {
    pipeX = SCREEN_W;
    gapCentreY = random(28, 48);
    ++score;
  }

  if (birdY - BIRD_RADIUS <= 0 || birdY + BIRD_RADIUS >= GROUND_Y || hasHitPipe()) {
    gameState = GAME_OVER;
    drawGameScene();
    showGameOver();
    return;
  }

  drawGameScene();
}

void setup() {
  pinMode(FLAP_BUTTON_PIN, INPUT_PULLUP);
  rawButton = digitalRead(FLAP_BUTTON_PIN);
  stableButton = rawButton;
  randomSeed(micros());
  // Use the display wires already connected to GPIO4 (clock) and GPIO6 (data).
  SPI.begin(TFT_SCLK_PIN, -1, TFT_MOSI_PIN, TFT_CS_PIN);
  tft.initR(INITR_MINI160x80);
  // A conservative clock is more reliable with the short jumper wires used by
  // this display; an unreliable 24 MHz signal causes smeared or broken pixels.
  tft.setSPISpeed(12000000);
  tft.setRotation(1);
  tft.setTextWrap(false);
  showTitle();
}

void loop() {
  const bool pressed = buttonPressed();
  if (gameState == TITLE || gameState == GAME_OVER) {
    if (pressed) startGame();
    delay(5);
    return;
  }

  if (pressed) birdVelocity = -1.4f;
  const unsigned long now = millis();
  const unsigned long elapsed = now - lastFrameMs;
  // A 25 ms cadence targets 40 frames per second without spinning the CPU.
  if (elapsed < 25) {
    delay(25 - elapsed);
    return;
  }
  lastFrameMs = now;
  updateFrame();
}
Remix this project
Make it yours in one click
Open a full copy of this project in your own Schematik workspace, diagram, code, parts, and assembly steps included. Swap the sensor, add features, or redesign the whole thing with AI. The author's original stays untouched.