Community project
ESP32 Handheld Game Console
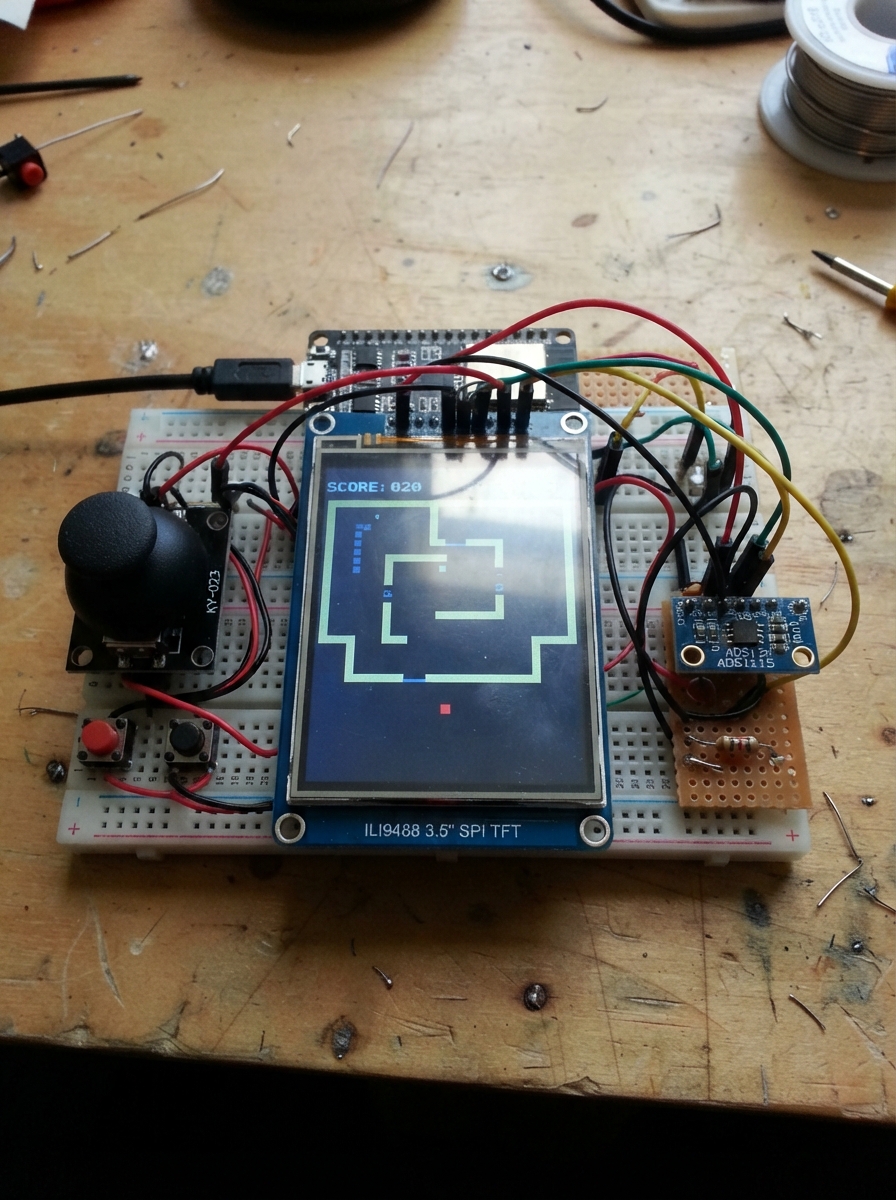
Build a portable handheld game console powered by an ESP32 microcontroller with a 3.5-inch color display and dual-axis joystick controls. This project combines a high-resolution ILI9488 TFT screen, precision analog input from an ADS1115 ADC module, and responsive button inputs to create an interactive gaming device capable of running retro-style games like Snake.
This guide provides a complete wiring diagram, parts list, and step-by-step assembly instructions to connect all components to the ESP32. Included firmware demonstrates game logic, display rendering, and input handling, giving makers a foundation to customize controls, add new games, or expand the console's capabilities.
Wiring diagram

Gather all the parts
Assemble it in 7 steps
1. Lay out the console parts
Place the NodeMCU, 3.5-inch TFT screen, ADS1115 input module, joystick, two push buttons, and two 10 kΩ resistors on a breadboard. Keep the screen and joystick at the front where they will be easy to use.
- Check the screen labels before starting; the screen pins may be printed as SCK, MOSI, MISO, CS, DC, RST, T_CS, VCC, and GND.
- The ADS1115 is the small input board that lets the joystick and buttons share two NodeMCU wires.
- Do not plug in USB while moving wires; a misplaced power wire can damage a part.
2. Connect the shared 3.3 V power and ground
Join TFT VCC → NodeMCU 3V3 (power), TFT GND → NodeMCU GND (ground), ADS1115 VDD → 3V3 (power), ADS1115 GND → GND (ground), joystick VCC → 3V3 (power), joystick GND → GND (ground), Button A GND → GND (ground), and Button B GND → GND (ground). Connect ADS1115 ADDR → GND (address selection). Connect the TFT LED pin → 3V3 (backlight power).
- Use one common ground row so every control has the same electrical reference.
- Use the NodeMCU pin marked 3V3, not VIN, for all of these low-voltage parts.
- Make sure VCC and GND are not swapped — swapped power can damage the screen or input module.
- Do not power the joystick from 5 V; its signal voltage must stay safe for the 3.3 V input module.
3. Wire the colour screen
Connect TFT SCK → NodeMCU D5 / GPIO14 (clock), TFT MOSI → D7 / GPIO13 (screen data), TFT MISO → D6 / GPIO12 (touch data), TFT CS → D8 / GPIO15 (screen select), TFT DC → D4 / GPIO2 (screen command select), and TFT RESET → D3 / GPIO0 (screen reset). The TFT VCC, GND, and LED wires go to 3V3 and GND as in the previous step.
- Keep these screen wires short and check each printed screen label rather than relying only on its position.
- MISO is shared by the screen and touch controller; only their separate select wires tell them when to respond.
- GPIO0/D3 and GPIO2/D4 affect startup. Do not add extra pull-down wires to these two screen connections, or the NodeMCU may not start.
4. Wire the touchscreen control
Connect TFT T_CS → NodeMCU D0 / GPIO16 (touch select). Leave T_IRQ disconnected; the game checks touch directly. The touchscreen shares SCK → D5 / GPIO14, MOSI → D7 / GPIO13, MISO → D6 / GPIO12, VCC → 3V3 (power), and GND → GND (ground) with the screen.
- T_CS may be printed as TCS, TOUCH_CS, or TP_CS on the display board.
- The game uses a tap to pause or continue, and a tap after a crash to restart.
- Do not connect T_CS to the TFT CS pin; the screen and touch controller need separate select wires.
5. Connect the input module
Connect ADS1115 SDA → NodeMCU D2 / GPIO4 (data) and ADS1115 SCL → NodeMCU D1 / GPIO5 (clock). Its VDD → 3V3 (power), GND → GND (ground), and ADDR → GND (address selection) were connected earlier.
- SDA and SCL are the two shared wires that carry all joystick and button readings.
- Most ADS1115 boards already include the small resistors needed on these two wires.
- Do not swap SDA and SCL; swapped data wires stop all controls from responding.
6. Connect the joystick and buttons
Connect joystick VRx → ADS1115 AIN0 (left/right signal) and joystick VRy → ADS1115 AIN1 (up/down signal). Connect Button A SIGNAL → ADS1115 AIN2 (button signal) and Button B SIGNAL → ADS1115 AIN3 (button signal). Connect one end of pullup_a (10 kΩ) → 3V3 (power) and its other end → ADS1115 AIN2 (keeps Button A unpressed until pushed). Connect one end of pullup_b (10 kΩ) → 3V3 (power) and its other end → ADS1115 AIN3 (keeps Button B unpressed until pushed).
- For a loose four-leg button, use legs on opposite sides of the button, not two legs on the same side.
- Button A restarts after a crash. Button B pauses and continues the game.
- Without the 10 kΩ resistors, the button signals can drift and make unwanted presses.
7. Power up and play Snake
Check every 3V3 and GND wire one last time, then plug the NodeMCU into USB. Press the Schematik Deploy button to load the game. Move the joystick to steer the green snake; eat the yellow squares. Press B or tap the screen to pause, and press A or tap the screen after a crash to play again.
- If left/right or up/down is reversed, unplug USB and swap only that pair of joystick wires at ADS1115 AIN0 and AIN1.
- A blank but lit screen is usually a swapped CS, DC, or RESET wire.
- Disconnect USB before changing any wires.
Review all connections
1. Connections between "tft_35_1" and "ESP32"
2. Connections between "ads1115_1" and "ESP32"
3. Connections between "joystick_1" and "ESP32"
4. Connections between "button_a" and "ESP32"
5. Connections between "button_b" and "ESP32"
6. Connections between "pullup_a" and "ESP32"
7. Connections between "pullup_b" and "ESP32"
Deploy the firmware
#include <Arduino.h>
#include <Wire.h>
#include <SPI.h>
#include <Adafruit_ADS1X15.h>
#include <Arduino_GFX_Library.h>
#include <XPT2046_Touchscreen.h>


// Hoisted type definitions
enum Direction { UP, DOWN, LEFT, RIGHT };

struct Point { int8_t x; int8_t y; };


// Forward declarations
bool snakeContains(Point point, uint8_t length);
void drawCell(Point point, uint16_t colour);
void drawFood();
void placeFood();
void drawHeader();
void drawBoard();
void drawOverlay(const __FlashStringHelper *line1, const __FlashStringHelper *line2);
void resetGame();
void readControls();
void moveSnake();

constexpr uint8_t TFT_CS = 15;
constexpr uint8_t TFT_DC = 2;
constexpr uint8_t TFT_RST = 0;
constexpr uint8_t TFT_SCK = 14;
constexpr uint8_t TFT_MOSI = 13;
constexpr uint8_t TFT_MISO = 12;
constexpr uint8_t TOUCH_CS = 16;
constexpr uint8_t I2C_SDA = 4;
constexpr uint8_t I2C_SCL = 5;

constexpr int16_t SCREEN_W = 480;
constexpr int16_t SCREEN_H = 320;
constexpr int16_t CELL = 10;
constexpr int8_t GRID_W = 46;
constexpr int8_t GRID_H = 28;
constexpr int16_t BOARD_X = 10;
constexpr int16_t BOARD_Y = 30;
constexpr uint8_t MAX_SNAKE = 180;
constexpr uint16_t MOVE_INTERVAL_MS = 130;
constexpr int16_t LOW_DIRECTION = 9000;
constexpr int16_t HIGH_DIRECTION = 24000;
constexpr int16_t BUTTON_PRESSED = 2500;

constexpr uint16_t BLACK = 0x0000;
constexpr uint16_t WHITE = 0xFFFF;
constexpr uint16_t GREEN = 0x07E0;
constexpr uint16_t RED = 0xF800;
constexpr uint16_t BLUE = 0x001F;
constexpr uint16_t YELLOW = 0xFFE0;

Arduino_DataBus *bus = new Arduino_ESP8266SPI(TFT_DC, TFT_CS, TFT_SCK, TFT_MOSI, TFT_MISO);
Arduino_GFX *display = new Arduino_ILI9488(bus, TFT_RST, 1, false);
Adafruit_ADS1115 ads;
XPT2046_Touchscreen touch(TOUCH_CS);


Point snake[MAX_SNAKE];
Point food;
uint8_t snakeLength = 0;
Direction direction = RIGHT;
Direction nextDirection = RIGHT;
bool paused = false;
bool gameOver = false;
bool previousA = false;
bool previousB = false;
bool previousTouch = false;
uint32_t lastMoveAt = 0;

bool snakeContains(Point point, uint8_t length) {
  for (uint8_t i = 0; i < length; ++i) {
    if (snake[i].x == point.x && snake[i].y == point.y) return true;
  }
  return false;
}

void drawCell(Point point, uint16_t colour) {
  display->fillRect(BOARD_X + point.x * CELL + 1, BOARD_Y + point.y * CELL + 1, CELL - 1, CELL - 1, colour);
}

void drawFood() {
  display->drawRect(BOARD_X + food.x * CELL + 1, BOARD_Y + food.y * CELL + 1, CELL - 2, CELL - 2, YELLOW);
}

void placeFood() {
  do {
    food.x = random(GRID_W);
    food.y = random(GRID_H);
  } while (snakeContains(food, snakeLength));
}

void drawHeader() {
  display->fillRect(0, 0, SCREEN_W, 25, BLUE);
  display->setTextColor(WHITE);
  display->setTextSize(2);
  display->setCursor(10, 5);
  display->print(F("NODEMCU SNAKE"));
  display->setCursor(300, 5);
  display->print(F("Score: "));
  display->print(snakeLength - 5);
}

void drawBoard() {
  display->fillScreen(BLACK);
  drawHeader();
  display->drawRect(BOARD_X - 1, BOARD_Y - 1, GRID_W * CELL + 2, GRID_H * CELL + 2, WHITE);
  for (uint8_t i = 0; i < snakeLength; ++i) drawCell(snake[i], GREEN);
  drawFood();
}

void drawOverlay(const __FlashStringHelper *line1, const __FlashStringHelper *line2) {
  display->fillRect(95, 115, 290, 90, BLACK);
  display->drawRect(95, 115, 290, 90, WHITE);
  display->setTextColor(WHITE);
  display->setTextSize(3);
  display->setCursor(145, 132);
  display->print(line1);
  display->setTextSize(2);
  display->setCursor(115, 172);
  display->print(line2);
}

void resetGame() {
  snakeLength = 5;
  direction = RIGHT;
  nextDirection = RIGHT;
  for (uint8_t i = 0; i < snakeLength; ++i) snake[i] = { static_cast<int8_t>(12 - i), 13 };
  paused = false;
  gameOver = false;
  placeFood();
  drawBoard();
}

void readControls() {
  const int16_t horizontal = ads.readADC_SingleEnded(0);
  const int16_t vertical = ads.readADC_SingleEnded(1);
  const bool buttonA = ads.readADC_SingleEnded(2) < BUTTON_PRESSED;
  const bool buttonB = ads.readADC_SingleEnded(3) < BUTTON_PRESSED;
  const bool screenTouched = touch.touched();

  if ((buttonA && !previousA) || (screenTouched && !previousTouch && gameOver)) {
    if (gameOver) resetGame();
  }
  if ((buttonB && !previousB) || (screenTouched && !previousTouch && !gameOver)) {
    if (!gameOver) {
      paused = !paused;
      if (paused) drawOverlay(F("PAUSED"), F("Press B or touch screen"));
      else drawBoard();
    }
  }
  previousA = buttonA;
  previousB = buttonB;
  previousTouch = screenTouched;

  if (paused || gameOver) return;
  if (horizontal < LOW_DIRECTION && direction != RIGHT) nextDirection = LEFT;
  else if (horizontal > HIGH_DIRECTION && direction != LEFT) nextDirection = RIGHT;
  else if (vertical < LOW_DIRECTION && direction != DOWN) nextDirection = UP;
  else if (vertical > HIGH_DIRECTION && direction != UP) nextDirection = DOWN;
}

void moveSnake() {
  direction = nextDirection;
  Point head = snake[0];
  if (direction == UP) --head.y;
  else if (direction == DOWN) ++head.y;
  else if (direction == LEFT) --head.x;
  else ++head.x;

  if (head.x < 0 || head.x >= GRID_W || head.y < 0 || head.y >= GRID_H || snakeContains(head, snakeLength - 1)) {
    gameOver = true;
    drawOverlay(F("GAME OVER"), F("Press A or touch screen"));
    return;
  }

  const bool ate = (head.x == food.x && head.y == food.y);
  const Point oldTail = snake[snakeLength - 1];
  const uint8_t shiftEnd = ate && snakeLength < MAX_SNAKE ? snakeLength : snakeLength - 1;
  for (uint8_t i = shiftEnd; i > 0; --i) snake[i] = snake[i - 1];
  snake[0] = head;

  if (!ate) drawCell(oldTail, BLACK);
  drawCell(head, GREEN);
  if (ate) {
    if (snakeLength < MAX_SNAKE) ++snakeLength;
    placeFood();
    drawFood();
    drawHeader();
  }
}

void setup() {
  Wire.begin(I2C_SDA, I2C_SCL);
  ads.begin();
  ads.setGain(GAIN_ONE);

  SPI.begin();
  display->begin();
  display->fillScreen(BLACK);
  touch.begin();
  touch.setRotation(1);

  randomSeed(micros() ^ ads.readADC_SingleEnded(0));
  resetGame();
}

void loop() {
  readControls();
  const uint32_t now = millis();
  if (!paused && !gameOver && now - lastMoveAt >= MOVE_INTERVAL_MS) {
    lastMoveAt = now;
    moveSnake();
  }
}
Remix this project
Make it yours in one click
Open a full copy of this project in your own Schematik workspace — diagram, code, parts, and assembly steps included. Swap the sensor, add features, or redesign the whole thing with AI. The author's original stays untouched.