Community project
ESP32 MP3 Walkman Player
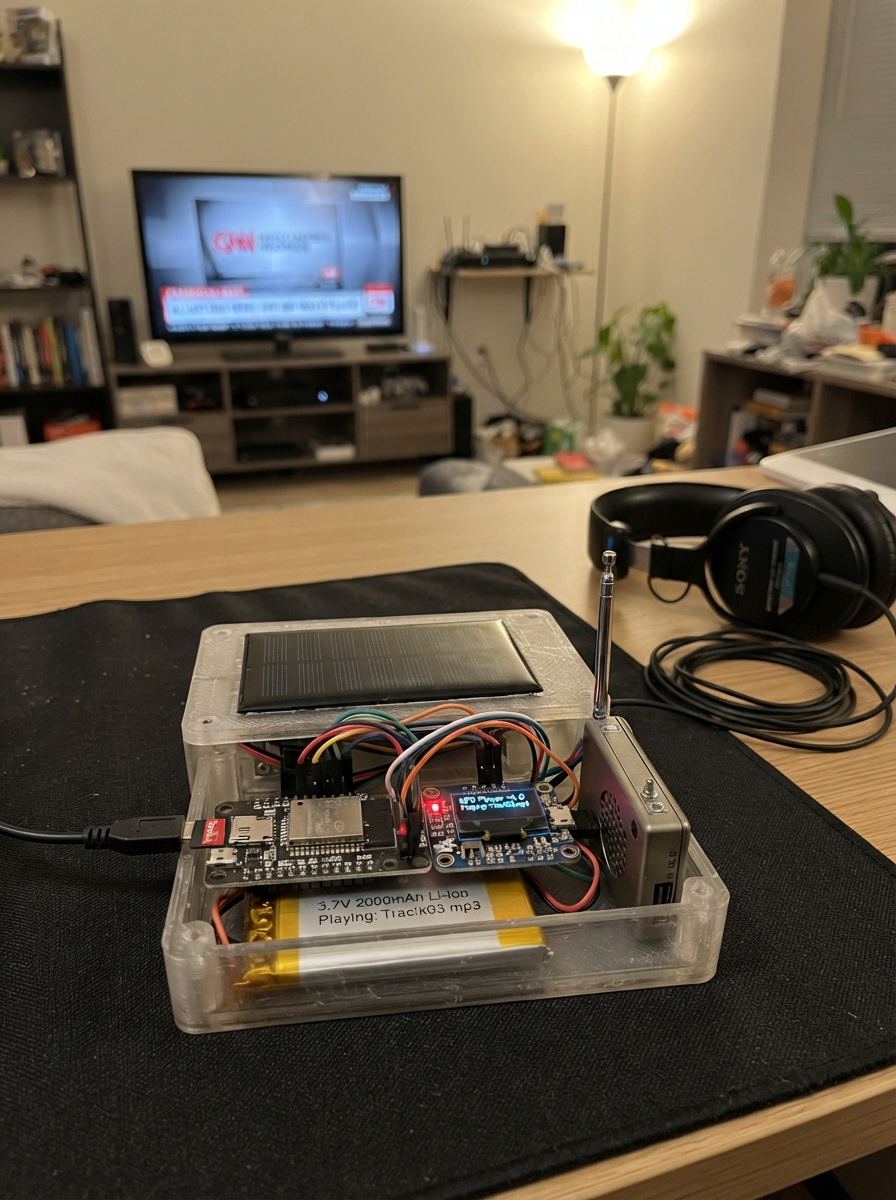
This project combines solar charging with portable audio playback, creating a self-sustaining MP3 and WAV player powered by a 6V solar panel. The ESP32 microcontroller manages music files stored on a microSD card, while the bq25185 charger board handles power from solar, USB, or DC sources to keep the 2000mAh lithium battery topped up. The portable AM/FM/LW/SW receiver adds radio capability alongside local file playback.
This guide provides a complete parts list, wiring diagram showing how to connect the solar panel, charger board, battery, and audio output, plus step-by-step assembly instructions. Builders will also get the Arduino firmware that handles SD card file management, MP3/WAV playback via I2S audio output, and amplifier control. The thermal management layer keeps components cool during extended use.
Wiring diagram

Gather all the parts
Assemble it in 6 steps
1. Place the heat spreader
With the player completely unpowered, peel the backing from the 40 mm adhesive aluminum heat spreader and press it gently onto the flat metal shield or the hottest flat area of the ESP32-P4 board. Keep it clear of the display flex cable, buttons, card slot, connectors, and any tiny parts.
- A passive heat spreader has no wires and makes no noise; it moves heat across a larger metal area.
- Do not place the metal heat spreader where it can touch exposed pins or solder joints, because it can short them and damage the board.
2. Wire the solar charging supply
Connect solar_panel_1 V+ to solar_charger_1 VIN (charging power), and solar_panel_1 GND to solar_charger_1 GND (ground). Connect battery_pack_1 BAT+ to solar_charger_1 BAT (stored power), and battery_pack_1 BAT− to solar_charger_1 GND (ground). Connect solar_charger_1 5V to the ESP32-P4 board 5V input (power), and solar_charger_1 GND to the board GND input (ground).
- Make these connections with the battery disconnected first, then connect the battery last.
- Use insulated wire suitable for the battery current and secure the battery so it cannot pull on its leads.
- Never connect the boosted 5 V output to the board's 3V3 pin; that can permanently damage the board.
- Do not swap battery positive and negative, because a lithium battery wired backwards can overheat or damage the charger.
3. Prepare the player music card
On a FAT32 microSD card, make a folder named MUSIC and copy MP3 or WAV music files into it. Insert the card into the board's built-in microSD slot with the card contacts facing the direction marked on the board.
- The player starts the first supported audio file it finds in the MUSIC folder.
- Do not force the card into the slot; forcing it can bend the contacts.
4. Connect the receiver antenna
Push the BNC plug on antenna_1 into the BNC ANTENNA socket on broadcast_receiver_1, then twist it until it locks. Extend the antenna after turning the receiver on, and keep it away from the solar-panel wiring when possible.
- This is a receive-only radio: its antenna receives broadcasts and does not transmit.
- Use the receiver's own buttons to select AM, FM, long-wave, or short-wave stations.
- Do not connect this antenna to the ESP32-P4 board or to any transmitter.
5. Use the radio's separate audio and charging sockets
Plug headphones or powered speakers into broadcast_receiver_1's own 3.5 mm AUDIO OUT socket. Charge this separate receiver only through its own USB 5V IN socket with a suitable 5 V USB lead; it is not electrically connected to the player board.
- The music player and the radio are two separate audio sources, so use the source you want rather than tying their audio outputs together.
- Do not join the radio audio-out wires to the board's speaker output; joining two powered audio outputs can damage the audio electronics.
6. Power and test the player
Check every power wire once more, then expose solar_panel_1 to daylight or charge the battery through the solar charger as appropriate. Plug the ESP32-P4 board into USB for flashing and press Deploy in Schematik. Disconnect USB afterward if you want it to run from the battery.
- Start at a low listening volume and increase it slowly.
- The solar panel extends running time in sunlight but does not guarantee charging under indoor light.
- Keep the lithium battery and charger where you can observe them during initial charging; stop if anything becomes unusually hot, swollen, or smells sharp.
Review all connections
1. Connections between "solar_panel_1" and "ESP32"
2. Connections between "solar_charger_1" and "ESP32"
3. Connections between "battery_pack_1" and "ESP32"
Deploy the firmware
#include <Arduino.h>
#include <SD_MMC.h>
#include <Audio.h>

bool isAudioFile(const String &filename);
bool findFirstTrack();

constexpr int I2S_BCLK_PIN = 12;
constexpr int I2S_LRCK_PIN = 10;
constexpr int I2S_DOUT_PIN = 9;
constexpr int I2S_MCLK_PIN = 13;
constexpr int AMP_ENABLE_PIN = 53;

Audio audio;
String selectedTrack;

bool isAudioFile(const String &filename) {
  String lower = filename;
  lower.toLowerCase();
  return lower.endsWith(".mp3") || lower.endsWith(".wav");
}

bool findFirstTrack() {
  File folder = SD_MMC.open("/MUSIC");
  if (!folder || !folder.isDirectory()) return false;

  File entry = folder.openNextFile();
  while (entry) {
    if (!entry.isDirectory() && isAudioFile(String(entry.name()))) {
      selectedTrack = String(entry.name());
      entry.close();
      folder.close();
      return true;
    }
    entry.close();
    entry = folder.openNextFile();
  }
  folder.close();
  return false;
}

void setup() {
  Serial.begin(115200);
  delay(300);
  Serial.println("Solar Walkman starting");

  pinMode(AMP_ENABLE_PIN, OUTPUT);
  digitalWrite(AMP_ENABLE_PIN, HIGH);

  if (!SD_MMC.begin("/sdcard", false, false, SDMMC_FREQ_DEFAULT)) {
    Serial.println("No microSD card found. Insert a FAT32 card and restart.");
    return;
  }
  if (!findFirstTrack()) {
    Serial.println("Put an MP3 or WAV file in the /MUSIC folder on the card.");
    return;
  }

  audio.setPinout(I2S_BCLK_PIN, I2S_LRCK_PIN, I2S_DOUT_PIN, I2S_MCLK_PIN);
  audio.setVolume(12);
  audio.connecttoFS(SD_MMC, selectedTrack.c_str());
  Serial.print("Playing: ");
  Serial.println(selectedTrack);
}

void loop() {
  audio.loop();
}
Remix this project
Make it yours in one click
Open a full copy of this project in your own Schematik workspace — diagram, code, parts, and assembly steps included. Swap the sensor, add features, or redesign the whole thing with AI. The author's original stays untouched.
Related projects

Create A Complete Electrical Schematic Esp32 Sma
ESP32 · September 17, 2026Ayansh Agrawal
ESP32 Kare Ekran Projeleri
ESP32 · September 16, 2026Seref Ai
Component Qty --------------------------- ------
ESP32 · September 16, 2026Yathartha Chakrawal