Community project
ESP32 Touchscreen Phone
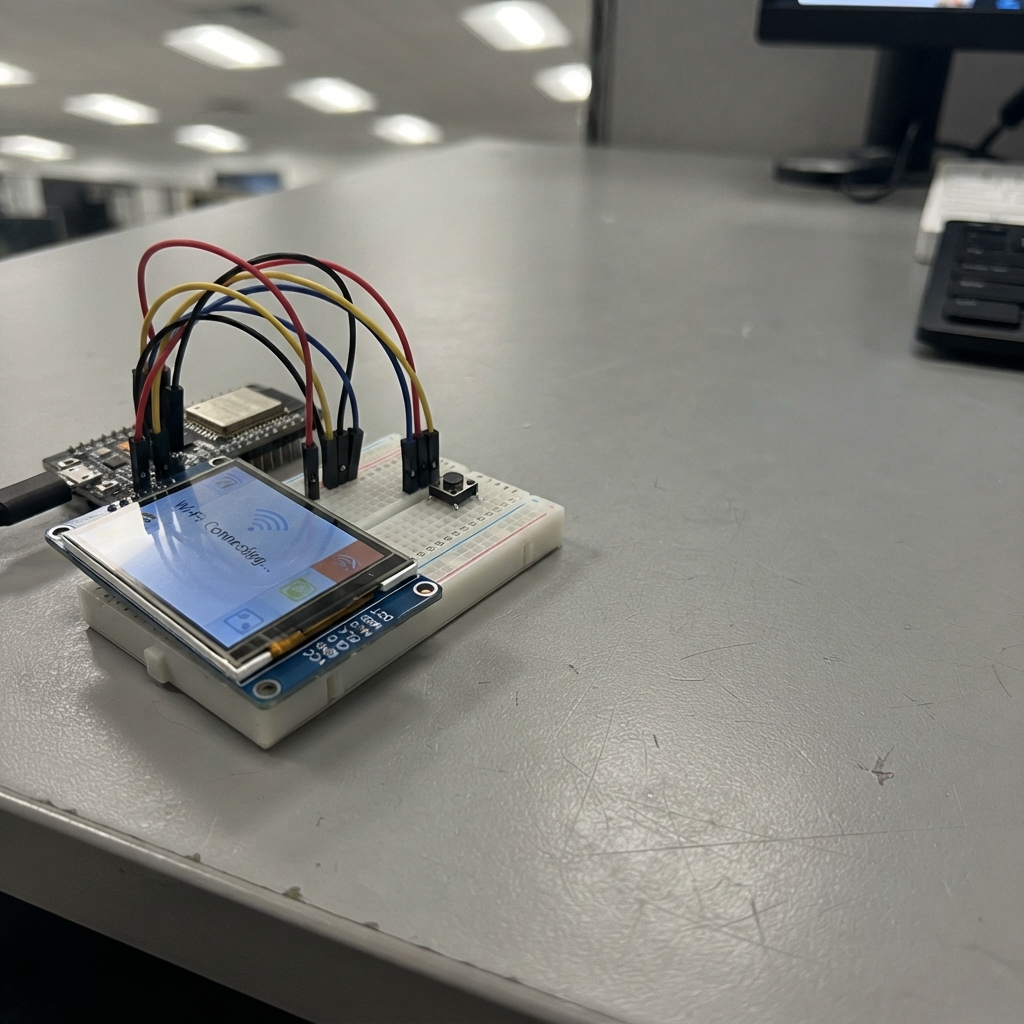
Build a touchscreen phone interface powered by an ESP32 microcontroller and a 3.2-inch ILI9341 TFT display. This project combines WiFi connectivity, a responsive touch interface, and a physical home button to create an interactive device with multiple app screens including a clock, WiFi status monitor, and settings menu.
This guide provides a complete wiring diagram showing all connections between the ESP32, touchscreen display, and push button, a full parts list, ready-to-use Arduino firmware with touch handling and multi-screen navigation, and step-by-step assembly instructions to get your touchscreen phone running.
Wiring diagram

Gather all the parts
Assemble it in 6 steps
1. Place the board and screen
Place the ESP32 DevKit v1 and the 2.8-inch ILI9341 touchscreen on a non-metal surface with their labels facing up. Do not plug in USB power yet.
- Keep the screen close enough to reach with short jumper wires.
- Do not power the screen from the ESP32 5V pin — this screen uses 3.3V signals and 3.3V power.
2. Connect screen power
Connect the screen VCC pin to the ESP32 3V3 pin (power). Connect the screen GND pin to an ESP32 GND pin (ground). Connect TFT_BL to 3V3 (backlight power) so the screen is bright.
- Use red for 3V3 and black for GND so the two important wires are easy to check.
- Make sure VCC and GND are not swapped — swapped power can damage the screen.
3. Connect the shared screen wires
Connect MOSI to GPIO23 (picture and touch data), MISO to GPIO19 (touch data back), and SCK to GPIO18 (timing signal). These three wires are shared by the screen and its touch layer.
- Match each printed label on the display board exactly; MOSI and MISO are easy to mix up.
- Do not connect these screen wires to the ESP32's 5V pin — they are signal wires, not power wires.
4. Connect the screen control wires
Connect TFT_CS to GPIO4 (selects the screen), TFT_DC to GPIO27 (tells the screen whether data is a command or a picture), TFT_RST to GPIO26 (resets the screen at startup), and TOUCH_CS to GPIO25 (selects the touch layer).
- Write the GPIO number on a small piece of tape beside each jumper while building.
- A wire on the wrong screen control pin will usually leave the display blank or make touch taps land in the wrong place.
5. Add the Home button
Connect one leg of the momentary button to GPIO33 (signal) and the other leg to GND (ground). If you use a four-leg breadboard button, use two legs on opposite sides of its center gap, not two legs on the same connected side.
- The button needs no extra resistor because the ESP32 turns on its built-in pull-up resistor.
- Do not connect the button to 3V3; this design expects the button to connect GPIO33 to GND only when pressed.
6. Power up and check the menu
Inspect every wire once more, then connect the ESP32 to your computer with USB. The screen should show the ESP Phone home menu after you deploy the project.
- Tap Clock, Wi-Fi, or Settings. Press the physical button to return to the home menu.
- If the screen stays dark, unplug USB first and recheck 3V3, GND, and TFT_BL before moving any other wires.
Review all connections
1. Connections between "touchscreen_1" and "ESP32"
2. Connections between "home_button_1" and "ESP32"
Deploy the firmware
#include <Arduino.h>
#include <SPI.h>
#include <WiFi.h>
#include <Adafruit_GFX.h>
#include <Adafruit_ILI9341.h>
#include <XPT2046_Touchscreen.h>


// Hoisted type definitions
enum Screen { HOME, CLOCK_APP, WIFI_APP, SETTINGS_APP };


// Forward declarations
uint16_t colorForApp(Screen app);
void drawHeader(const char *title);
void drawHome();
void drawClock(bool full);
void drawWifi();
void drawSettings();
void openScreen(Screen next);
bool readTouch(int &x, int &y);
void handleTouch();

constexpr int TFT_CS_PIN = 4;
constexpr int TFT_DC_PIN = 27;
constexpr int TFT_RST_PIN = 26;
constexpr int TOUCH_CS_PIN = 25;
constexpr int HOME_BUTTON_PIN = 33;
constexpr int SPI_SCK_PIN = 18;
constexpr int SPI_MISO_PIN = 19;
constexpr int SPI_MOSI_PIN = 23;

Adafruit_ILI9341 tft(TFT_CS_PIN, TFT_DC_PIN, TFT_RST_PIN);
XPT2046_Touchscreen touch(TOUCH_CS_PIN);


Screen screen = HOME;
bool lastHomePressed = false;
unsigned long lastClockSecond = 999999;

uint16_t colorForApp(Screen app) {
  if (app == CLOCK_APP) return ILI9341_ORANGE;
  if (app == WIFI_APP) return ILI9341_CYAN;
  return ILI9341_MAGENTA;
}

void drawHeader(const char *title) {
  tft.fillRect(0, 0, 320, 28, ILI9341_BLACK);
  tft.setTextColor(ILI9341_WHITE);
  tft.setTextSize(2);
  tft.setCursor(10, 6);
  tft.print(title);
  tft.drawFastHLine(0, 28, 320, ILI9341_DARKGREY);
}

void drawHome() {
  tft.fillScreen(ILI9341_BLACK);
  drawHeader("ESP Phone");
  tft.setTextColor(ILI9341_LIGHTGREY);
  tft.setTextSize(1);
  tft.setCursor(10, 36);
  tft.print("Wi-Fi touchscreen gadget");

  const char *labels[] = {"Clock", "Wi-Fi", "Settings"};
  Screen apps[] = {CLOCK_APP, WIFI_APP, SETTINGS_APP};
  for (int i = 0; i < 3; i++) {
    int x = 14 + i * 103;
    uint16_t c = colorForApp(apps[i]);
    tft.fillRoundRect(x, 72, 86, 86, 12, c);
    tft.fillCircle(x + 43, 110, 22, ILI9341_BLACK);
    tft.setTextColor(ILI9341_WHITE);
    tft.setTextSize(1);
    int labelX = x + (86 - strlen(labels[i]) * 6) / 2;
    tft.setCursor(labelX, 168);
    tft.print(labels[i]);
  }
  tft.setTextColor(ILI9341_DARKGREY);
  tft.setTextSize(1);
  tft.setCursor(42, 218);
  tft.print("Tap an app or press Home to return here");
}

void drawClock(bool full) {
  if (full) {
    tft.fillScreen(ILI9341_BLACK);
    drawHeader("Clock");
    tft.setTextColor(ILI9341_LIGHTGREY);
    tft.setTextSize(1);
    tft.setCursor(42, 190);
    tft.print("Time since this gadget was switched on");
  }
  unsigned long seconds = millis() / 1000;
  if (seconds == lastClockSecond && !full) return;
  lastClockSecond = seconds;
  unsigned long hours = seconds / 3600;
  unsigned long minutes = (seconds / 60) % 60;
  unsigned long secs = seconds % 60;
  char timeText[12];
  snprintf(timeText, sizeof(timeText), "%02lu:%02lu:%02lu", hours, minutes, secs);
  tft.fillRect(36, 82, 248, 56, ILI9341_BLACK);
  tft.setTextColor(ILI9341_ORANGE);
  tft.setTextSize(4);
  tft.setCursor(42, 94);
  tft.print(timeText);
}

void drawWifi() {
  tft.fillScreen(ILI9341_BLACK);
  drawHeader("Wi-Fi");
  tft.setTextColor(ILI9341_LIGHTGREY);
  tft.setTextSize(1);
  tft.setCursor(10, 42);
  tft.print("Searching for nearby networks...");
  int networkCount = WiFi.scanNetworks();
  tft.fillRect(0, 56, 320, 184, ILI9341_BLACK);
  if (networkCount <= 0) {
    tft.setCursor(10, 72);
    tft.print("No network names found.");
  } else {
    int shown = networkCount > 7 ? 7 : networkCount;
    for (int i = 0; i < shown; i++) {
      tft.setTextColor(ILI9341_CYAN);
      tft.setTextSize(2);
      tft.setCursor(12, 60 + i * 24);
      tft.print(WiFi.SSID(i));
      tft.setTextColor(ILI9341_LIGHTGREY);
      tft.setTextSize(1);
      tft.print("  ");
      tft.print(WiFi.RSSI(i));
      tft.print(" dBm");
    }
  }
  WiFi.scanDelete();
}

void drawSettings() {
  tft.fillScreen(ILI9341_BLACK);
  drawHeader("Settings");
  tft.setTextColor(ILI9341_MAGENTA);
  tft.setTextSize(2);
  tft.setCursor(18, 62);
  tft.print("Device name");
  tft.setTextColor(ILI9341_WHITE);
  tft.setCursor(18, 88);
  tft.print("ESP Phone");
  tft.setTextColor(ILI9341_MAGENTA);
  tft.setCursor(18, 132);
  tft.print("Display");
  tft.setTextColor(ILI9341_WHITE);
  tft.setCursor(18, 158);
  tft.print("Full brightness");
  tft.setTextColor(ILI9341_LIGHTGREY);
  tft.setTextSize(1);
  tft.setCursor(18, 212);
  tft.print("This starter version has no online account or calls.");
}

void openScreen(Screen next) {
  screen = next;
  if (screen == HOME) drawHome();
  else if (screen == CLOCK_APP) drawClock(true);
  else if (screen == WIFI_APP) drawWifi();
  else drawSettings();
}

bool readTouch(int &x, int &y) {
  if (!touch.touched()) return false;
  TS_Point p = touch.getPoint();
  // Values are typical for 2.8-inch XPT2046 modules. Change these four
  // endpoints only if your own panel's touch point is offset.
  x = map(p.y, 200, 3800, 0, 320);
  y = map(p.x, 200, 3800, 0, 240);
  x = constrain(x, 0, 319);
  y = constrain(y, 0, 239);
  return true;
}

void handleTouch() {
  int x, y;
  if (!readTouch(x, y)) return;
  delay(120); // one touch counts once
  if (screen != HOME) {
    openScreen(HOME);
    return;
  }
  if (y >= 65 && y <= 185) {
    if (x < 110) openScreen(CLOCK_APP);
    else if (x < 215) openScreen(WIFI_APP);
    else openScreen(SETTINGS_APP);
  }
}

void setup() {
  pinMode(HOME_BUTTON_PIN, INPUT_PULLUP);
  SPI.begin(SPI_SCK_PIN, SPI_MISO_PIN, SPI_MOSI_PIN);
  tft.begin();
  tft.setRotation(1);
  touch.begin();
  touch.setRotation(1);
  WiFi.mode(WIFI_STA);
  WiFi.disconnect(true, true);
  openScreen(HOME);
}

void loop() {
  bool homePressed = digitalRead(HOME_BUTTON_PIN) == LOW;
  if (homePressed && !lastHomePressed) openScreen(HOME);
  lastHomePressed = homePressed;

  handleTouch();
  if (screen == CLOCK_APP) drawClock(false);
  delay(15);
}
Remix this project
Make it yours in one click
Open a full copy of this project in your own Schematik workspace — diagram, code, parts, and assembly steps included. Swap the sensor, add features, or redesign the whole thing with AI. The author's original stays untouched.
Related projects

Create A Complete Electrical Schematic Esp32 Sma
ESP32 · September 17, 2026Ayansh Agrawal
ESP32 Kare Ekran Projeleri
ESP32 · September 16, 2026Seref Ai
Component Qty --------------------------- ------
ESP32 · September 16, 2026Yathartha Chakrawal