Community project
Fingertip Pulse Oximeter
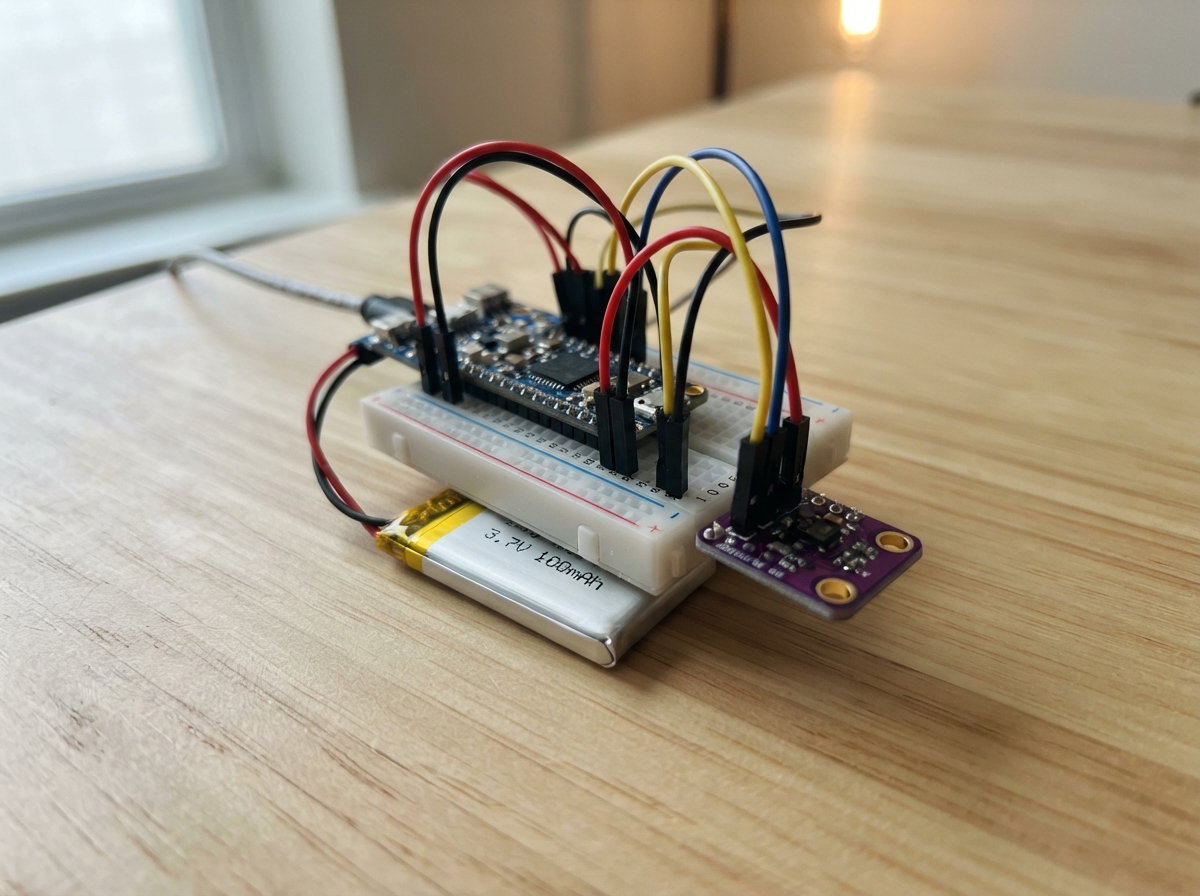
This fingertip pulse oximeter measures blood oxygen saturation (SpO2) and heart rate by shining red and infrared LEDs through the fingertip and analyzing the reflected light. Built around an ESP32 microcontroller and MAX30102 optical sensor, the device streams real-time readings via Bluetooth Low Energy to a smartphone or computer, making it ideal for fitness tracking, sleep monitoring, or health research.
The guide provides a complete wiring diagram, parts list, and step-by-step assembly instructions for building a wearable prototype. Firmware is included to handle sensor calibration, SpO2 calculation, and BLE communication. The design uses a removable 80 mAh LiPo battery and fits into a 3D-printed or laser-cut finger band for comfortable extended wear.
Wiring diagram
Gather all the parts
Assemble it in 4 steps
1. Make the finger band and sensor window
Make a soft band that sits around the base of one finger. Put the MAX30102 board on the inside of the band, with its dark window and LEDs facing the skin. Add a thin black foam or silicone rim around the window so room light cannot leak in, but do not make the band tight enough to cause pain, numbness, or a pale fingertip.
- A snug sensor that does not move gives cleaner readings than a tight sensor.
- Do not restrict blood flow; doing so makes the readings unreliable and can hurt your finger.
2. Stack the electronics above the finger
Mount the Seeed Studio XIAO ESP32-C3 on the top side of the finger band, above the MAX30102. Keep the board’s USB-C socket and the two battery pads reachable before closing the case. Join MAX30102 VCC → XIAO 3V3 (power), MAX30102 GND → XIAO GND (ground), MAX30102 SDA → XIAO D4/GPIO6 (data), and MAX30102 SCL → XIAO D5/GPIO7 (clock). Use short flexible wires and cover solder joints with heat-shrink tubing.
- Leave a small loose bend in each wire so finger movement does not pull a solder joint loose.
- Make sure VCC and GND are not swapped, because swapped power can damage the sensor.
3. Fit the removable battery
Place the 80 mAh LiPo on top of the finger above or beside the XIAO, with a thin insulating layer between the battery and the circuit board. Connect battery BAT+ → XIAO BAT+ pad (battery positive) and battery BAT- → XIAO BAT- pad (battery negative). Add a tiny connector or other safe removable connection so the cell can be taken out for charging in a separate single-cell LiPo charger.
- Secure the cell with soft foam tape so it cannot flex, rub on solder joints, or move while you wear it.
- Never plug USB into the XIAO while this small battery is connected; the XIAO’s onboard charger can charge it too quickly. Never connect the battery to the XIAO 3V3 pin, because a full LiPo can damage 3.3 V parts.
4. Close and wear the prototype
Put a smooth insulating cover over the board, battery, and every solder joint so no metal touches skin. Wear the band at the base of the finger, keep the sensor window flat against the underside of the finger, and use a Bluetooth Low Energy phone viewer to connect to the device named RingPulse.
- Keep the hand still for the first reading; the phone receives heart-rate and estimated oxygen values about every two seconds.
- This is an educational prototype, not a medical device. Do not use its readings to make medical decisions.
Review all connections
1. Connections between "max30102_1" and "ESP32"
2. Connections between "lipo_100mah_1" and "ESP32"
Deploy the firmware
#include <Arduino.h>
#include <Wire.h>
#include <BLEDevice.h>
#include <BLEServer.h>
#include <BLEUtils.h>
#include <BLE2902.h>
#include "MAX30105.h"
#include "spo2_algorithm.h"

constexpr int I2C_SDA_PIN = 6;
constexpr int I2C_SCL_PIN = 7;
constexpr uint8_t SAMPLE_AVERAGE = 4;
constexpr uint8_t LED_MODE_RED_IR = 2;
constexpr int SAMPLE_RATE_HZ = 100;
constexpr int LED_PULSE_WIDTH_US = 411;
constexpr int ADC_RANGE_NA = 4096;
constexpr int BUFFER_LENGTH = 100;
constexpr int NEW_SAMPLES_PER_RESULT = 25;
constexpr uint32_t FINGER_PRESENT_IR = 50000;
constexpr uint32_t NOTIFY_INTERVAL_MS = 2000;

MAX30105 pulseSensor;
BLECharacteristic *heartRateCharacteristic;
BLECharacteristic *oxygenCharacteristic;
uint32_t irBuffer[BUFFER_LENGTH];
uint32_t redBuffer[BUFFER_LENGTH];
int32_t bloodOxygenPercent = 0;
int8_t bloodOxygenValid = 0;
int32_t heartRateBpm = 0;
int8_t heartRateValid = 0;
uint32_t lastNotifyMs = 0;

bool waitForSample(uint32_t timeoutMs) {
  const uint32_t started = millis();
  while (!pulseSensor.available()) {
    pulseSensor.check();
    if (millis() - started >= timeoutMs) return false;
    delay(1);
  }
  return true;
}

bool collectSample(uint32_t &red, uint32_t &ir) {
  if (!waitForSample(1000)) return false;
  red = pulseSensor.getRed();
  ir = pulseSensor.getIR();
  pulseSensor.nextSample();
  return true;
}

void publishReading() {
  if (millis() - lastNotifyMs < NOTIFY_INTERVAL_MS) return;
  lastNotifyMs = millis();
  const bool fingerPresent = irBuffer[BUFFER_LENGTH - 1] >= FINGER_PRESENT_IR;
  const bool valid = fingerPresent && heartRateValid && bloodOxygenValid &&
                     heartRateBpm > 30 && heartRateBpm < 220 &&
                     bloodOxygenPercent >= 70 && bloodOxygenPercent <= 100;
  uint8_t heartRatePacket[2] = {0x00, 0x00};
  uint8_t oxygenPacket[1] = {0};
  if (valid) {
    heartRatePacket[1] = static_cast<uint8_t>(heartRateBpm);
    oxygenPacket[0] = static_cast<uint8_t>(bloodOxygenPercent);
  }
  heartRateCharacteristic->setValue(heartRatePacket, sizeof(heartRatePacket));
  oxygenCharacteristic->setValue(oxygenPacket, sizeof(oxygenPacket));
  heartRateCharacteristic->notify();
  oxygenCharacteristic->notify();
}

void calculateAndPublish() {
  maxim_heart_rate_and_oxygen_saturation(irBuffer, BUFFER_LENGTH, redBuffer,
    &bloodOxygenPercent, &bloodOxygenValid, &heartRateBpm, &heartRateValid);
  publishReading();
}

void setupBluetooth() {
  BLEDevice::init("RingPulse");
  BLEServer *server = BLEDevice::createServer();
  BLEService *heartRateService = server->createService("180D");
  heartRateCharacteristic = heartRateService->createCharacteristic(
    "2A37", BLECharacteristic::PROPERTY_READ | BLECharacteristic::PROPERTY_NOTIFY);
  heartRateCharacteristic->addDescriptor(new BLE2902());
  BLEService *oxygenService = server->createService("9b6d0001-5c7e-4f6e-9b18-7cb00b1b0001");
  oxygenCharacteristic = oxygenService->createCharacteristic(
    "9b6d0002-5c7e-4f6e-9b18-7cb00b1b0001",
    BLECharacteristic::PROPERTY_READ | BLECharacteristic::PROPERTY_NOTIFY);
  oxygenCharacteristic->addDescriptor(new BLE2902());
  heartRateService->start();
  oxygenService->start();
  BLEAdvertising *advertising = BLEDevice::getAdvertising();
  advertising->addServiceUUID(heartRateService->getUUID());
  advertising->addServiceUUID(oxygenService->getUUID());
  advertising->setScanResponse(true);
  BLEDevice::startAdvertising();
}

void setup() {
  Wire.begin(I2C_SDA_PIN, I2C_SCL_PIN);
  // The sensor is mounted under the finger, with the XIAO stacked above it.
  // Use standard-mode I2C for margin with the short flexible interconnect.
  Wire.setClock(100000);
  setupBluetooth();
  if (!pulseSensor.begin(Wire, I2C_SPEED_FAST)) while (true) delay(1000);
  pulseSensor.setup(0x1F, SAMPLE_AVERAGE, LED_MODE_RED_IR, SAMPLE_RATE_HZ,
                    LED_PULSE_WIDTH_US, ADC_RANGE_NA);
  pulseSensor.setPulseAmplitudeGreen(0);
  pulseSensor.clearFIFO();
  for (int i = 0; i < BUFFER_LENGTH; ++i) {
    if (!collectSample(redBuffer[i], irBuffer[i])) while (true) delay(1000);
  }
  calculateAndPublish();
}

void loop() {
  for (int i = NEW_SAMPLES_PER_RESULT; i < BUFFER_LENGTH; ++i) {
    redBuffer[i - NEW_SAMPLES_PER_RESULT] = redBuffer[i];
    irBuffer[i - NEW_SAMPLES_PER_RESULT] = irBuffer[i];
  }
  for (int i = BUFFER_LENGTH - NEW_SAMPLES_PER_RESULT; i < BUFFER_LENGTH; ++i) {
    if (!collectSample(redBuffer[i], irBuffer[i])) {
      delay(50);
      return;
    }
  }
  calculateAndPublish();
}
Remix this project
Make it yours in one click
Open a full copy of this project in your own Schematik workspace, diagram, code, parts, and assembly steps included. Swap the sensor, add features, or redesign the whole thing with AI. The author's original stays untouched.