Community project
RGB LED Matrix Animation
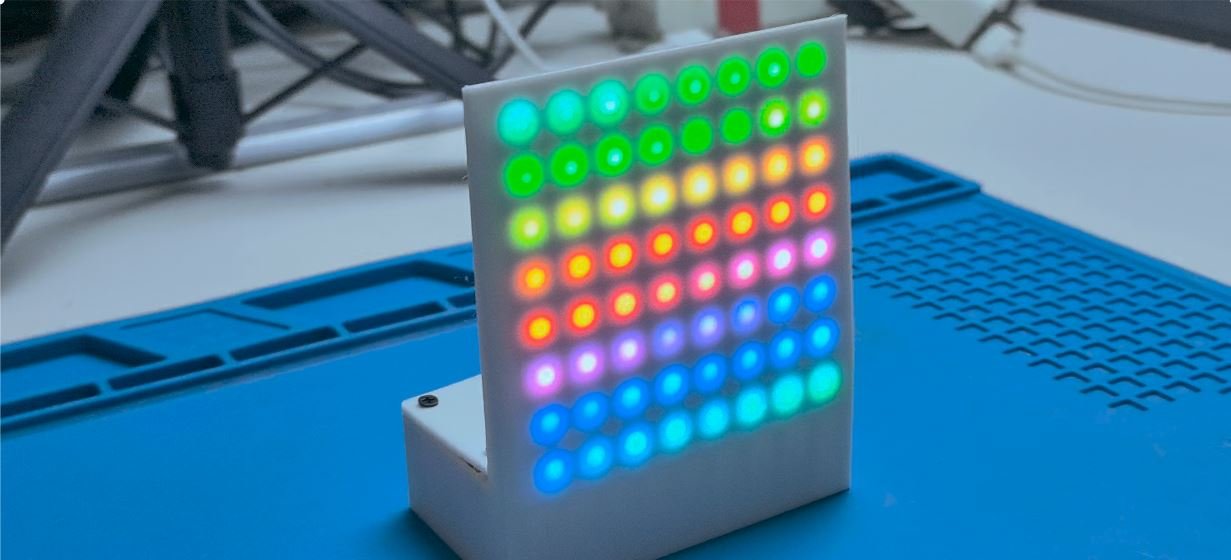
This project brings an 8x8 RGB LED matrix to life with animated patterns running on an ESP32. The matrix displays six different animations—rainbow gradients, comets, sparkles, and geometric shapes—that cycle automatically, creating eye-catching light shows suitable for decorations, displays, or learning about addressable LEDs.
The guide provides a complete parts list, wiring diagram with level-shifting circuitry, assembly steps, and ready-to-deploy firmware. Builders will learn how to interface NeoPixel matrices with microcontrollers, handle power delivery for LED arrays, and implement smooth animations using the Adafruit NeoPixel library.
Wiring diagram
Gather all the parts
Assemble it in 5 steps
1. 先断开所有电源
先不要把 USB 线或 5V 电源接上。把 ESP32、8×8 灯板、74AHCT125、小电阻和电容放在桌面或面包板上,确认灯板输入端标着 DIN,而不是 DOUT。
- DIN 是数据进入灯板的一端;若接到 DOUT,灯珠不会显示动画。
- 带电插拔或接错线可能损坏 ESP32、灯板或电源。
2. 接好 5V 电源和公共地线
把 5V 电源的 +5V 线接到灯板 VCC、74AHCT125 的 VCC,以及 ESP32 的 VIN/5V 针脚;把电源 GND 线接到灯板 GND、74AHCT125 的 GND 和 ESP32 的 GND 针脚。所有 GND 必须连在一起,动画数据才有共同的参考线。
- VCC → 外部 5V(电源);GND → 外部 GND(地线);ESP32 VIN/5V → 外部 5V(给开发板供电);ESP32 GND → 外部 GND(共同参考)。
- 不要把外部 5V 接到 ESP32 的 3V3 针脚;这样可能立刻损坏开发板。
3. 把保护电容接在灯板旁边
把 1000 µF 电容尽量靠近灯板电源输入端插好:较长的正脚接 5V,带条纹的一侧负脚接 GND。它能吸收灯珠突然变亮时的电流波动。
- 电容 + → 外部 5V(稳定电源);电容 - → GND(地线)。
- 电容正负脚接反可能发热、漏液或损坏。
4. 接数据电平转换线路
把 ESP32 的 GPIO18 接到 74AHCT125 的 1A;把 1OE 接 GND,让这个通道一直工作。然后把 1Y 接到 330 Ω 电阻的一端,电阻另一端接灯板 DIN。74AHCT125 会把 ESP32 的 3.3V 数据信号变成灯板更可靠的 5V 信号。
- GPIO18 → 1A(数据);1OE → GND(启用);1Y → 电阻一端(数据);电阻另一端 → DIN(数据)。电阻没有正负方向。
- 不要省略公共地线;没有它,灯板可能随机闪烁或完全不亮。
5. 检查后通电并部署动画
再核对一次:灯板 VCC 是 5V、灯板 GND 是地线、数据线走到 DIN。先用 USB 把 ESP32 接到电脑,然后按 Schematik 的 Deploy 按钮写入动画。外部 5V 电源接通后,灯板会每 10 秒在彩虹、橙色彗星和蓝色闪烁之间切换。
- 若灯板没有亮,先断电,确认数据线接的是 DIN,并确认 ESP32 GND 与电源 GND 已相连。
- 电源刚接上时不要让裸露的 5V 与 GND 导线碰在一起;短路会使电源保护断开或使导线发热。
Review all connections
1. Connections between "power_supply" and "ESP32"
2. Connections between "matrix_8x8" and "ESP32"
3. Connections between "level_shifter" and "ESP32"
4. Connections between "data_resistor" and "ESP32"
5. Connections between "bulk_capacitor" and "ESP32"
Deploy the firmware
#include <Arduino.h>
#include <Adafruit_NeoPixel.h>

enum AnimationMode { RAINBOW, COMET, SPARKLE, SQUARE, RECTANGLE, CIRCLE };


// Forward declarations
uint16_t xy(uint8_t x, uint8_t y);
void setXY(int8_t x, int8_t y, uint32_t color);
void drawRectangle(int8_t left, int8_t top, int8_t right, int8_t bottom, uint32_t color);
void showRainbow();
void showComet();
void showSparkle();
void showSquare();
void showRectangle();
void showCircle();
void nextMode();

constexpr uint8_t MATRIX_PIN = 18;
constexpr uint8_t WIDTH = 8;
constexpr uint8_t HEIGHT = 8;
constexpr uint16_t PIXEL_COUNT = WIDTH * HEIGHT;
constexpr uint8_t BRIGHTNESS = 85;
constexpr uint32_t FRAME_INTERVAL_MS = 50;
constexpr uint32_t MODE_DURATION_MS = 10000;

Adafruit_NeoPixel matrix(PIXEL_COUNT, MATRIX_PIN, NEO_GRB + NEO_KHZ800);
AnimationMode mode = RAINBOW;
uint32_t lastFrameMs = 0;
uint32_t modeStartedMs = 0;
uint16_t frameNumber = 0;

uint16_t xy(uint8_t x, uint8_t y) {
  return (y % 2 == 0) ? (y * WIDTH + x) : (y * WIDTH + (WIDTH - 1 - x));
}

void setXY(int8_t x, int8_t y, uint32_t color) {
  if (x >= 0 && x < WIDTH && y >= 0 && y < HEIGHT) matrix.setPixelColor(xy(x, y), color);
}

void drawRectangle(int8_t left, int8_t top, int8_t right, int8_t bottom, uint32_t color) {
  for (int8_t x = left; x <= right; ++x) {
    setXY(x, top, color);
    setXY(x, bottom, color);
  }
  for (int8_t y = top + 1; y < bottom; ++y) {
    setXY(left, y, color);
    setXY(right, y, color);
  }
}

void showRainbow() {
  for (uint16_t i = 0; i < PIXEL_COUNT; ++i) {
    uint16_t hue = (i * 65536UL / PIXEL_COUNT) + frameNumber * 700UL;
    matrix.setPixelColor(i, matrix.gamma32(matrix.ColorHSV(hue)));
  }
}

void showComet() {
  matrix.clear();
  uint8_t head = frameNumber % PIXEL_COUNT;
  for (uint8_t tail = 0; tail < 12; ++tail) {
    int16_t pixel = head - tail;
    if (pixel < 0) pixel += PIXEL_COUNT;
    uint8_t intensity = 255 - tail * 20;
    matrix.setPixelColor(pixel, matrix.Color(intensity, intensity / 6, 0));
  }
}

void showSparkle() {
  for (uint8_t y = 0; y < HEIGHT; ++y) {
    for (uint8_t x = 0; x < WIDTH; ++x) {
      uint8_t phase = (frameNumber + x * 19 + y * 31) % 64;
      uint8_t value = (phase < 12) ? (255 - phase * 14) : 0;
      matrix.setPixelColor(xy(x, y), matrix.Color(0, value / 4, value));
    }
  }
}

void showSquare() {
  matrix.clear();
  uint8_t inset = (frameNumber / 10) % 4;
  uint16_t hue = frameNumber * 900UL;
  drawRectangle(inset, inset, 7 - inset, 7 - inset, matrix.gamma32(matrix.ColorHSV(hue)));
}

void showRectangle() {
  matrix.clear();
  uint8_t phase = (frameNumber / 8) % 6;
  int8_t top = (phase < 3) ? phase : 5 - phase;
  int8_t bottom = 7 - top;
  uint16_t hue = 21845UL + frameNumber * 700UL;
  drawRectangle(0, top, 7, bottom, matrix.gamma32(matrix.ColorHSV(hue)));
}

void showCircle() {
  matrix.clear();
  uint8_t phase = (frameNumber / 10) % 4;
  uint32_t color = matrix.gamma32(matrix.ColorHSV(43690UL + frameNumber * 800UL));
  if (phase == 0) {
    setXY(3, 3, color); setXY(4, 3, color); setXY(3, 4, color); setXY(4, 4, color);
  } else if (phase == 1) {
    const int8_t points[][2] = {{3,2},{4,2},{2,3},{5,3},{2,4},{5,4},{3,5},{4,5}};
    for (const auto &p : points) setXY(p[0], p[1], color);
  } else if (phase == 2) {
    const int8_t points[][2] = {{2,1},{3,1},{4,1},{5,1},{1,2},{6,2},{1,3},{6,3},{1,4},{6,4},{1,5},{6,5},{2,6},{3,6},{4,6},{5,6}};
    for (const auto &p : points) setXY(p[0], p[1], color);
  } else {
    const int8_t points[][2] = {{2,0},{3,0},{4,0},{5,0},{1,1},{6,1},{0,2},{7,2},{0,3},{7,3},{0,4},{7,4},{0,5},{7,5},{1,6},{6,6},{2,7},{3,7},{4,7},{5,7}};
    for (const auto &p : points) setXY(p[0], p[1], color);
  }
}

void nextMode() {
  mode = static_cast<AnimationMode>((mode + 1) % 6);
  modeStartedMs = millis();
  frameNumber = 0;
  matrix.clear();
}

void setup() {
  matrix.begin();
  matrix.setBrightness(BRIGHTNESS);
  matrix.clear();
  matrix.show();
  modeStartedMs = millis();
}

void loop() {
  uint32_t now = millis();
  if (now - modeStartedMs >= MODE_DURATION_MS) nextMode();
  if (now - lastFrameMs < FRAME_INTERVAL_MS) return;
  lastFrameMs = now;

  switch (mode) {
    case RAINBOW: showRainbow(); break;
    case COMET: showComet(); break;
    case SPARKLE: showSparkle(); break;
    case SQUARE: showSquare(); break;
    case RECTANGLE: showRectangle(); break;
    case CIRCLE: showCircle(); break;
  }
  matrix.show();
  ++frameNumber;
}
Remix this project
Make it yours in one click
Open a full copy of this project in your own Schematik workspace — diagram, code, parts, and assembly steps included. Swap the sensor, add features, or redesign the whole thing with AI. The author's original stays untouched.