Community project
Voice-Controlled Robot Face
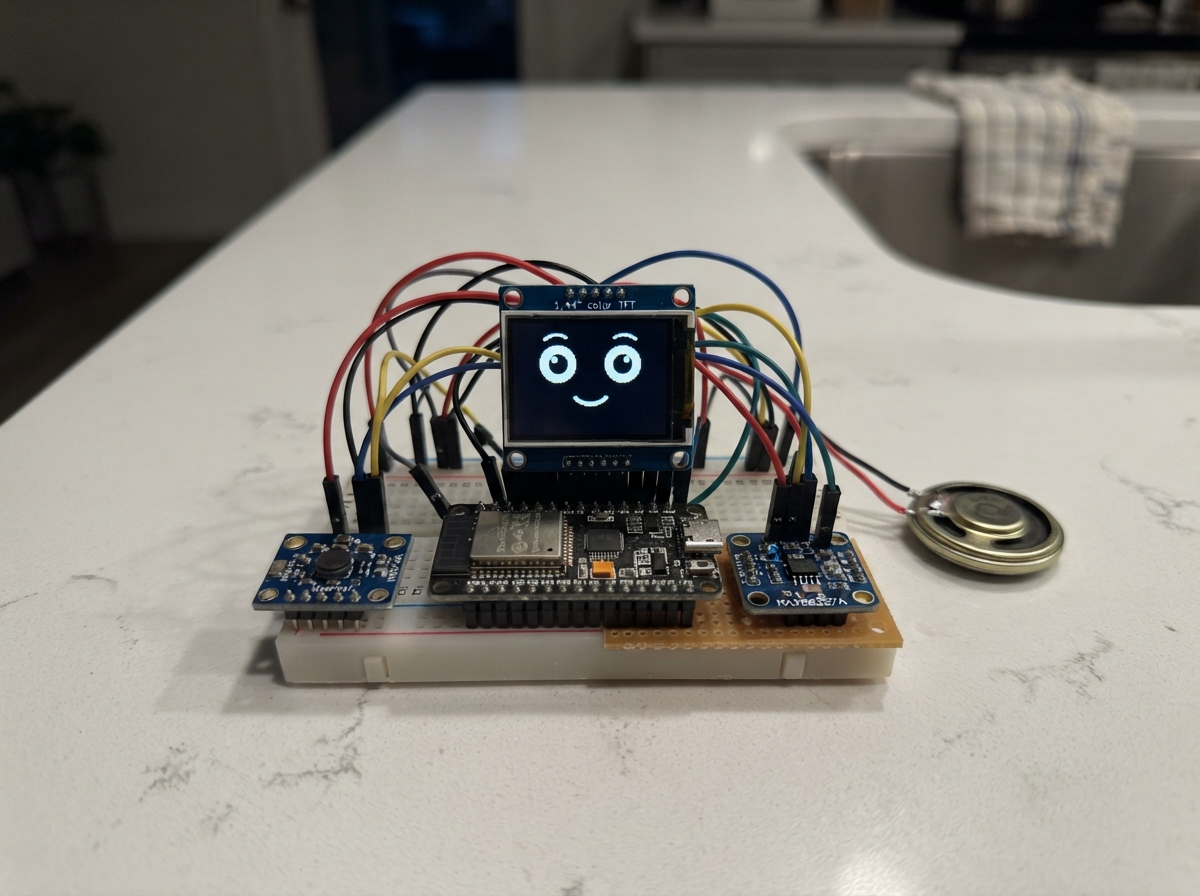
Build an expressive robot face that reacts to sound and responds to voice commands. This project combines an ESP32-S3 microcontroller with a colorful 128×128 TFT display, an I2S microphone, and an audio amplifier to create an interactive character that cycles through moods—idle, happy, sad, and surprised—while the microphone input drives real-time mouth animations. The face can be controlled remotely via a web interface accessible from any device on the same Wi-Fi network.
This guide provides a complete wiring diagram, parts list, and ready-to-flash firmware that handles display graphics, microphone input processing, Wi-Fi connectivity, and web-based mood selection. Assembly takes about an hour and requires only basic soldering skills. The firmware is structured as a foundation layer, leaving room to extend the project with audio playback or speech recognition features.
Wiring diagram
Gather all the parts
Assemble it in 7 steps
1. Wire the ST7735 TFT display
Connect the ST7735 display to the ESP32-S3: VCC to 3.3 V, GND to GND, CS to GPIO10, DC to GPIO9, RST to GPIO8. SCK and SDA (MOSI) wire to the board's hardware SPI2 bus — typically GPIO36 (SCK) and GPIO35 (MOSI) on most ESP32-S3 DevKitC-1 boards; check your board's silkscreen for the correct SPI pins. The display runs at 3.3 V; do not connect VCC to 5 V.
- Some ST7735 modules label the data pin SDA rather than MOSI — both are the same signal.
- The 1.44" 128×128 green-tab variant is used here; if you have a red-tab or black-tab module, change INITR_144GREENTAB to INITR_REDTAB or INITR_BLACKTAB in setup().
- Never connect VCC on the display to the 5 V rail — the ST7735 logic is 3.3 V only.
2. Wire the INMP441 I2S microphone
Connect the INMP441 to the ESP32-S3: VDD to 3.3 V, GND to GND, BCLK to GPIO4, WS (LRCLK) to GPIO5, SD (data out) to GPIO7. Leave the L/R pin floating or tie it to GND to select the left channel.
- Tying L/R to GND selects the left channel, which matches I2S_CHANNEL_FMT_ONLY_LEFT in the firmware.
- Keep the mic wires short (under 10 cm) to reduce noise pickup.
3. Wire the MAX98357A amplifier
Connect the MAX98357A to the ESP32-S3: VIN to 5 V, GND to GND, BCLK to GPIO4 (shared with the mic), LRC to GPIO5 (shared with the mic), DIN to GPIO6. Connect the amplifier's speaker terminals to the 8 Ω speaker. The amp I2S TX is wired and ready but not activated in this starter firmware — audio playback can be added later without rewiring.
- The MAX98357A can share the BCLK/LRC lines with the INMP441 because it only listens on those lines (it never drives them).
- SD (shutdown) pin on the MAX98357A can be left unconnected — the chip defaults to active.
- Use the 5 V rail for VIN on the amp — 3.3 V will work at very low volume but is below spec.
- Do not short the speaker terminals together or connect the speaker without the amp in circuit.
4. Check common ground and power
Confirm all GND pins — ESP32-S3, display, microphone, and amplifier — share a common GND rail. Verify the display and mic are on 3.3 V and the amplifier VIN is on 5 V before powering up. USB power from the ESP32-S3 DevKitC-1 is sufficient for this build.
- A common ground is essential for I2S signals — floating ground on any module will cause noise or no audio data.
5. Edit Wi-Fi credentials and upload
Open the firmware and set WIFI_SSID and WIFI_PASS to your network name and password near the top of the file. Flash the firmware via Schematik or PlatformIO. Open the Serial Monitor at 115200 baud — within a few seconds you should see the IP address printed, e.g. 'Wi-Fi connected — IP: 192.168.1.42'.
- The IP address is also briefly shown on the TFT display after Wi-Fi connects.
- If Wi-Fi does not connect after 15 seconds the firmware continues offline — the face still draws and the mic still reacts, but the web control page will not be available.
6. Control moods from your phone
Open a browser on any device on the same Wi-Fi network and navigate to http://<ip-address>/ using the IP shown in Serial Monitor. You will see four buttons — Idle, Happy, Sad, and Surprised. Tap a button to change the face expression instantly. You can also change mood directly via URL: http://<ip>/mood?set=happy
- Bookmark the IP address on your phone for quick access. Most home routers assign stable DHCP addresses to known devices after the first connection.
7. Calibrate mic sensitivity
Talk at normal volume from about 30 cm away and watch the mouth on the display — it should open noticeably when you speak. If the mouth barely moves, lower RMS_MIN in the firmware (try 500). If the mouth is always fully open, raise RMS_MIN (try 5000) or lower RMS_MAX. These thresholds are calibrated for the INMP441 at room volume; adjust for your environment.
- Serial.printf() the raw RMS value temporarily if you want to see exact numbers — readMic() calculates it from the I2S samples.
Review all connections
1. Connections between "st7735-display" and "ESP32"
2. Connections between "i2s-microphone" and "ESP32"
3. Connections between "i2s-amplifier" and "ESP32"
4. Connections between "speaker" and "ESP32"
Deploy the firmware
/*
 * Voice-Controlled Robot Face
 * ESP32-S3 firmware — ST7735 TFT face + INMP441 I2S mic + Wi-Fi control page
 *
 * What it does:
 *   - Draws an expressive robot face on a 128×128 ST7735 colour TFT
 *   - Cycles through moods: IDLE, HAPPY, SAD, SURPRISED
 *   - Mic amplitude drives mouth-open height in real time (non-speech recognition;
 *     raw level reactivity only — this is the foundation layer)
 *   - WebServer at http://<ip>/ shows mood-select buttons; GET /mood?set=happy etc.
 *   - IP address printed to Serial on boot
 *
 * Audio OUTPUT wiring is ready for extension:
 *   The MAX98357A amp is wired to AMP_BCLK_PIN / AMP_LRC_PIN / AMP_DIN_PIN below.
 *   I2S TX is not initialised in this starter — add a second i2s_driver_install()
 *   call on I2S_NUM_1 with those pins when you are ready to add audio playback.
 */

#include <Arduino.h>
#include <SPI.h>
#include <Adafruit_GFX.h>
#include <Adafruit_ST7735.h>
#include <WiFi.h>
#include <WebServer.h>
#include <driver/i2s.h>

// ─── Wi-Fi credentials ────────────────────────────────────────────────────────
const char* WIFI_SSID = "YOUR_WIFI_NAME";   // <-- edit before flashing
const char* WIFI_PASS = "YOUR_WIFI_PASSWORD"; // <-- edit before flashing

// ─── TFT display pins ─────────────────────────────────────────────────────────
#define TFT_CS_PIN   10
#define TFT_DC_PIN    9
#define TFT_RST_PIN   8
#define TFT_SCLK_PIN 11
#define TFT_MOSI_PIN 12
// GPIO 35-37 are reserved by octal flash/PSRAM on the N8R8 module.
// Use explicit display pins instead of board-variant SPI defaults.

// ─── I2S microphone (INMP441) pins ───────────────────────────────────────────
#define I2S_BCLK_PIN   4
#define I2S_LRCLK_PIN  5
#define I2S_DIN_PIN    7   // mic data out → ESP32-S3 data in

// ─── MAX98357A amplifier pins (audio OUTPUT — wired, not yet activated) ───────
// Wire the amp now so the board is extension-ready; the I2S TX driver is not
// started in this starter.  Activate by installing a second i2s_driver on
// I2S_NUM_1 with these pins when you add audio playback.
#define AMP_BCLK_PIN   4   // shared BCLK bus (both devices on same I2S clock)
#define AMP_LRC_PIN    5   // shared LRCLK bus
#define AMP_DIN_PIN    6   // amp data in ← ESP32-S3 data out (I2S TX)

// ─── I2S microphone configuration ────────────────────────────────────────────
#define I2S_PORT          I2S_NUM_0
#define I2S_SAMPLE_RATE   16000
#define I2S_SAMPLE_BITS   I2S_BITS_PER_SAMPLE_32BIT
#define I2S_READ_LEN      64    // samples per read — small for low latency

// ─── Face geometry (128×128 display) ─────────────────────────────────────────
#define SCREEN_W  128
#define SCREEN_H  128

// Eye positions and sizes
#define EYE_L_X   38
#define EYE_R_X   90
#define EYE_Y     45
#define EYE_W     24   // eye rectangle width
#define EYE_H     20   // eye rectangle height — squished to 0 when blinking

// Mouth bounding box
#define MOUTH_X   30
#define MOUTH_Y   75
#define MOUTH_W   68
#define MOUTH_H_MIN  6   // minimum mouth height (closed)
#define MOUTH_H_MAX  30  // maximum mouth height (fully open)

// ─── Colours ──────────────────────────────────────────────────────────────────
#define COL_BG       ST77XX_BLACK
#define COL_FACE     0x4208   // dark grey face panel
#define COL_EYE      ST77XX_CYAN
#define COL_PUPIL    ST77XX_BLACK
#define COL_MOUTH    ST77XX_WHITE
#define COL_SAD_EYE  ST77XX_BLUE
#define COL_HAPPY_EYE 0x07E0  // green
#define COL_SURP_EYE  ST77XX_YELLOW
#define COL_OUTLINE  0xBDF7   // light grey

// ─── Mood enum ────────────────────────────────────────────────────────────────
enum Mood { MOOD_IDLE = 0, MOOD_HAPPY, MOOD_SAD, MOOD_SURPRISED };

// ─── Globals ──────────────────────────────────────────────────────────────────
Adafruit_ST7735 tft = Adafruit_ST7735(TFT_CS_PIN, TFT_DC_PIN, TFT_MOSI_PIN, TFT_SCLK_PIN, TFT_RST_PIN);
WebServer server(80);

volatile Mood currentMood = MOOD_IDLE;

// Blink timing
unsigned long lastBlinkTime   = 0;
unsigned long blinkInterval   = 3500; // ms between blinks
bool          eyeOpen         = true;
unsigned long blinkStartTime  = 0;
const unsigned long BLINK_DUR = 120;  // blink duration ms

// Mouth amplitude (0.0–1.0), smoothed
float mouthLevel    = 0.0f;
float mouthSmooth   = 0.0f;
const float SMOOTH_K = 0.35f; // EMA coefficient — higher = faster response

// Screen dirty flag — redraw face when mood changes or blink state changes
bool needsFullRedraw = true;
Mood lastDrawnMood = (Mood)-1;
bool lastEyeOpen   = true;
float lastMouthSmooth = -1.0f;

// ─── Forward declarations ─────────────────────────────────────────────────────
void setupWiFi();
void setupI2S();
void setupWebServer();
void readMic();
void drawFace();
void drawEyes(Mood mood, bool open);
void drawMouth(Mood mood, float level);
void drawFacePanel();
String moodName(Mood m);
Mood moodFromString(const String& s);

// ─── Setup ────────────────────────────────────────────────────────────────────
void setup() {
  Serial.begin(115200);
  delay(300);
  Serial.println("=== Robot Face starting ===");

  // TFT init
  tft.initR(INITR_144GREENTAB);   // 1.44" 128×128 green-tab variant
  tft.setRotation(0);
  tft.fillScreen(COL_BG);
  Serial.println("TFT initialised");

  // Draw a splash while Wi-Fi connects
  tft.setTextColor(ST77XX_WHITE);
  tft.setTextSize(1);
  tft.setCursor(20, 55);
  tft.print("Connecting...");

  setupWiFi();
  setupI2S();
  setupWebServer();

  needsFullRedraw = true;
  Serial.println("Setup complete — serving robot face");
}

// ─── Loop ─────────────────────────────────────────────────────────────────────
void loop() {
  server.handleClient();
  readMic();

  unsigned long now = millis();

  // ── Blink state machine ──────────────────────────────────────────────────
  if (eyeOpen && (now - lastBlinkTime) >= blinkInterval) {
    eyeOpen        = false;
    blinkStartTime = now;
    // Randomise next blink interval (2.5–5 s)
    blinkInterval  = 2500 + (esp_random() % 2500);
    needsFullRedraw = true;
  }
  if (!eyeOpen && (now - blinkStartTime) >= BLINK_DUR) {
    eyeOpen        = true;
    lastBlinkTime  = now;
    needsFullRedraw = true;
  }

  // ── Smooth mic level and check if mouth needs redraw ─────────────────────
  mouthSmooth = mouthSmooth * (1.0f - SMOOTH_K) + mouthLevel * SMOOTH_K;
  float mouthDelta = fabsf(mouthSmooth - lastMouthSmooth);
  if (mouthDelta > 0.03f) needsFullRedraw = true;

  // ── Mood change forces full redraw ────────────────────────────────────────
  if (currentMood != lastDrawnMood) needsFullRedraw = true;

  // ── Draw ──────────────────────────────────────────────────────────────────
  if (needsFullRedraw) {
    drawFace();
    needsFullRedraw  = false;
    lastDrawnMood    = currentMood;
    lastEyeOpen      = eyeOpen;
    lastMouthSmooth  = mouthSmooth;
  }
}

// ─── Wi-Fi setup ──────────────────────────────────────────────────────────────
void setupWiFi() {
  WiFi.begin(WIFI_SSID, WIFI_PASS);
  Serial.printf("Connecting to %s", WIFI_SSID);
  unsigned long t0 = millis();
  while (WiFi.status() != WL_CONNECTED && millis() - t0 < 15000) {
    delay(400);
    Serial.print('.');
  }
  if (WiFi.status() == WL_CONNECTED) {
    Serial.printf("\nWi-Fi connected — IP: %s\n", WiFi.localIP().toString().c_str());
    tft.fillScreen(COL_BG);
    tft.setCursor(4, 55);
    tft.print(WiFi.localIP().toString());
    delay(1500);
  } else {
    Serial.println("\nWi-Fi not connected — continuing offline");
  }
}

// ─── I2S microphone setup (INMP441) ──────────────────────────────────────────
void setupI2S() {
  // Legacy core-2.x I2S driver (driver/i2s.h)
  i2s_config_t cfg = {
    .mode                 = (i2s_mode_t)(I2S_MODE_MASTER | I2S_MODE_RX),
    .sample_rate          = I2S_SAMPLE_RATE,
    .bits_per_sample      = I2S_SAMPLE_BITS,
    .channel_format       = I2S_CHANNEL_FMT_ONLY_LEFT,
    .communication_format = I2S_COMM_FORMAT_STAND_I2S,
    .intr_alloc_flags     = ESP_INTR_FLAG_LEVEL1,
    .dma_buf_count        = 4,
    .dma_buf_len          = I2S_READ_LEN,
    .use_apll             = false,
    .tx_desc_auto_clear   = false,
    .fixed_mclk           = 0,
  };
  i2s_pin_config_t pins = {
    .mck_io_num   = I2S_PIN_NO_CHANGE,
    .bck_io_num   = I2S_BCLK_PIN,
    .ws_io_num    = I2S_LRCLK_PIN,
    .data_out_num = I2S_PIN_NO_CHANGE,
    .data_in_num  = I2S_DIN_PIN,
  };
  esp_err_t err = i2s_driver_install(I2S_PORT, &cfg, 0, NULL);
  if (err != ESP_OK) {
    Serial.printf("I2S driver install failed: %s — check BCLK/LRCLK/DOUT wiring on GPIO%d/%d/%d\n",
                  esp_err_to_name(err), I2S_BCLK_PIN, I2S_LRCLK_PIN, I2S_DIN_PIN);
    return;
  }
  i2s_set_pin(I2S_PORT, &pins);
  i2s_zero_dma_buffer(I2S_PORT);
  Serial.printf("I2S mic ready on BCLK=%d LRCLK=%d DIN=%d\n",
                I2S_BCLK_PIN, I2S_LRCLK_PIN, I2S_DIN_PIN);
}

// ─── Read mic and update mouthLevel ──────────────────────────────────────────
void readMic() {
  int32_t samples[I2S_READ_LEN];
  size_t  bytesRead = 0;
  // Non-blocking read — timeout 0 ms so loop() stays responsive
  i2s_read(I2S_PORT, samples, sizeof(samples), &bytesRead, 0);
  int count = bytesRead / sizeof(int32_t);
  if (count == 0) return;

  // RMS of the batch (INMP441 outputs left-justified 24-bit in 32-bit word)
  int64_t sumSq = 0;
  for (int i = 0; i < count; i++) {
    int32_t s = samples[i] >> 8; // shift to 24-bit range
    sumSq += (int64_t)s * s;
  }
  float rms = sqrtf((float)sumSq / count);

  // Map RMS to 0–1. Thresholds calibrated for INMP441 at ~30 cm distance.
  // Quiet room floor ≈ 500–2000; loud voice ≈ 200000+
  const float RMS_MIN = 2000.0f;
  const float RMS_MAX = 150000.0f;
  float level = (rms - RMS_MIN) / (RMS_MAX - RMS_MIN);
  mouthLevel = constrain(level, 0.0f, 1.0f);
}

// ─── Web server setup ─────────────────────────────────────────────────────────
void setupWebServer() {
  server.on("/", HTTP_GET, []() {
    String ip = WiFi.localIP().toString();
    String html = R"rawhtml(<!DOCTYPE html>
<html>
<head>
  <meta charset="utf-8">
  <meta name="viewport" content="width=device-width,initial-scale=1">
  <title>Robot Face Control</title>
  <style>
    body{font-family:sans-serif;background:#111;color:#eee;text-align:center;padding:24px}
    h1{margin-bottom:8px}
    p{color:#aaa;font-size:14px;margin-bottom:24px}
    .btn{display:inline-block;margin:8px;padding:14px 28px;font-size:18px;
         border:none;border-radius:10px;cursor:pointer;min-width:120px}
    .idle    {background:#555;color:#fff}
    .happy   {background:#2e7d32;color:#fff}
    .sad     {background:#1565c0;color:#fff}
    .surprised{background:#e65100;color:#fff}
    .active  {outline:3px solid #fff}
  </style>
</head>
<body>
  <h1>Robot Face</h1>
  <p>)rawhtml";
    html += ip;
    html += R"rawhtml(</p>
  <div>
    <button class="btn idle"     onclick="setMood('idle')">Idle</button>
    <button class="btn happy"    onclick="setMood('happy')">Happy</button>
    <button class="btn sad"      onclick="setMood('sad')">Sad</button>
    <button class="btn surprised" onclick="setMood('surprised')">Surprised</button>
  </div>
  <p id="status" style="margin-top:20px;color:#aaa"></p>
  <script>
    function setMood(m){
      fetch('/mood?set='+m)
        .then(r=>r.text())
        .then(t=>{ document.getElementById('status').textContent = t; });
    }
  </script>
</body>
</html>)rawhtml";
    server.send(200, "text/html", html);
  });

  server.on("/mood", HTTP_GET, []() {
    if (!server.hasArg("set")) {
      server.send(400, "text/plain", "Missing ?set= parameter");
      return;
    }
    String val = server.arg("set");
    val.toLowerCase();
    Mood m = moodFromString(val);
    currentMood     = m;
    needsFullRedraw = true;
    String resp = "Mood set to: " + moodName(m);
    Serial.println(resp);
    server.send(200, "text/plain", resp);
  });

  server.begin();
  Serial.println("Web server started — navigate to http://" + WiFi.localIP().toString());
}

// ─── Drawing helpers ──────────────────────────────────────────────────────────

void drawFacePanel() {
  // Rounded face background
  tft.fillRoundRect(8, 8, SCREEN_W - 16, SCREEN_H - 16, 14, COL_FACE);
  tft.drawRoundRect(8, 8, SCREEN_W - 16, SCREEN_H - 16, 14, COL_OUTLINE);
}

void drawEyes(Mood mood, bool open) {
  uint16_t eyeCol;
  switch (mood) {
    case MOOD_HAPPY:     eyeCol = COL_HAPPY_EYE; break;
    case MOOD_SAD:       eyeCol = COL_SAD_EYE;   break;
    case MOOD_SURPRISED: eyeCol = COL_SURP_EYE;  break;
    default:             eyeCol = COL_EYE;        break;
  }

  int eyeH = open ? EYE_H : 2;  // squish to 2px when blinking

  // Left eye
  int lx = EYE_L_X - EYE_W / 2;
  int ly = EYE_Y - eyeH / 2;
  tft.fillRoundRect(lx, ly, EYE_W, eyeH, 5, eyeCol);
  if (open && eyeH > 4) {
    // Pupil — 6×6 centred
    tft.fillCircle(EYE_L_X, EYE_Y, 5, COL_PUPIL);
    // Mood-specific eye shape overlays
    if (mood == MOOD_SAD) {
      // Downturned inner corners — draw a dark triangle in upper-inner corner
      tft.fillTriangle(lx + EYE_W - 8, ly, lx + EYE_W, ly, lx + EYE_W, ly + 8, COL_FACE);
    } else if (mood == MOOD_HAPPY) {
      // Arc-shaped happy eye — hide bottom of rectangle with face colour
      tft.fillRect(lx, ly + eyeH - 5, EYE_W, 5, COL_FACE);
    }
  }

  // Right eye
  int rx = EYE_R_X - EYE_W / 2;
  int ry = EYE_Y - eyeH / 2;
  tft.fillRoundRect(rx, ry, EYE_W, eyeH, 5, eyeCol);
  if (open && eyeH > 4) {
    tft.fillCircle(EYE_R_X, EYE_Y, 5, COL_PUPIL);
    if (mood == MOOD_SAD) {
      tft.fillTriangle(rx, ry, rx + 8, ry, rx, ry + 8, COL_FACE);
    } else if (mood == MOOD_HAPPY) {
      tft.fillRect(rx, ry + eyeH - 5, EYE_W, 5, COL_FACE);
    }
  }

  // SURPRISED: add raised eyebrows (small arcs above eyes)
  if (mood == MOOD_SURPRISED && open) {
    tft.drawFastHLine(lx + 2, EYE_Y - EYE_H / 2 - 8, EYE_W - 4, COL_SURP_EYE);
    tft.drawFastHLine(rx + 2, EYE_Y - EYE_H / 2 - 8, EYE_W - 4, COL_SURP_EYE);
  }
}

void drawMouth(Mood mood, float level) {
  // level 0.0 = quiet, 1.0 = loud — drives mouth-open height
  int mh = MOUTH_H_MIN + (int)(level * (MOUTH_H_MAX - MOUTH_H_MIN));
  int mx = MOUTH_X;
  int my = MOUTH_Y;
  int mw = MOUTH_W;

  switch (mood) {
    case MOOD_HAPPY: {
      // Wide smile arc — approximate with a filled rounded rect + mask top
      tft.fillRoundRect(mx, my, mw, mh + 4, 8, COL_MOUTH);
      // Hide top half to create arc-open smile shape
      tft.fillRect(mx, my, mw, (mh + 4) / 2, COL_FACE);
      // Inner mouth fill (dark)
      if (mh > MOUTH_H_MIN + 4) {
        tft.fillRoundRect(mx + 3, my + (mh + 4) / 2 + 1, mw - 6, mh / 2, 4, ST77XX_RED);
      }
      break;
    }
    case MOOD_SAD: {
      // Inverted arc — draw the bottom arc, hide the top
      int sadH = MOUTH_H_MIN + 4;
      tft.fillRoundRect(mx, my + 8, mw, sadH, 8, COL_MOUTH);
      tft.fillRect(mx, my + 8 + sadH / 2, mw, sadH / 2 + 2, COL_FACE);
      break;
    }
    case MOOD_SURPRISED: {
      // Open O-mouth, size driven by mic level
      int r = 8 + (int)(level * 8);
      int cx = MOUTH_X + MOUTH_W / 2;
      int cy = MOUTH_Y + MOUTH_H_MAX / 2;
      tft.fillCircle(cx, cy, r, COL_MOUTH);
      tft.fillCircle(cx, cy, r - 3, ST77XX_RED);
      break;
    }
    default: {
      // IDLE — neutral flat mouth, width responds to mic
      tft.fillRoundRect(mx, my + (MOUTH_H_MAX - mh) / 2, mw, mh, 4, COL_MOUTH);
      if (mh > MOUTH_H_MIN + 6) {
        // Open inner mouth
        tft.fillRoundRect(mx + 4, my + (MOUTH_H_MAX - mh) / 2 + 3, mw - 8, mh - 6, 3, ST77XX_RED);
      }
      break;
    }
  }
}

void drawFace() {
  tft.fillScreen(COL_BG);
  drawFacePanel();
  drawEyes(currentMood, eyeOpen);
  drawMouth(currentMood, mouthSmooth);

  // Mood label at the bottom
  tft.setTextSize(1);
  tft.setTextColor(COL_OUTLINE);
  String label = moodName(currentMood);
  int16_t tx = (SCREEN_W - label.length() * 6) / 2;
  tft.setCursor(tx, SCREEN_H - 16);
  tft.print(label);
}

// ─── Utilities ────────────────────────────────────────────────────────────────
String moodName(Mood m) {
  switch (m) {
    case MOOD_HAPPY:     return "HAPPY";
    case MOOD_SAD:       return "SAD";
    case MOOD_SURPRISED: return "SURPRISED";
    default:             return "IDLE";
  }
}

Mood moodFromString(const String& s) {
  if (s == "happy")     return MOOD_HAPPY;
  if (s == "sad")       return MOOD_SAD;
  if (s == "surprised") return MOOD_SURPRISED;
  return MOOD_IDLE;
}
Remix this project
Make it yours in one click
Open a full copy of this project in your own Schematik workspace, diagram, code, parts, and assembly steps included. Swap the sensor, add features, or redesign the whole thing with AI. The author's original stays untouched.