Community project
Wi-Fi Retro Photo Viewer
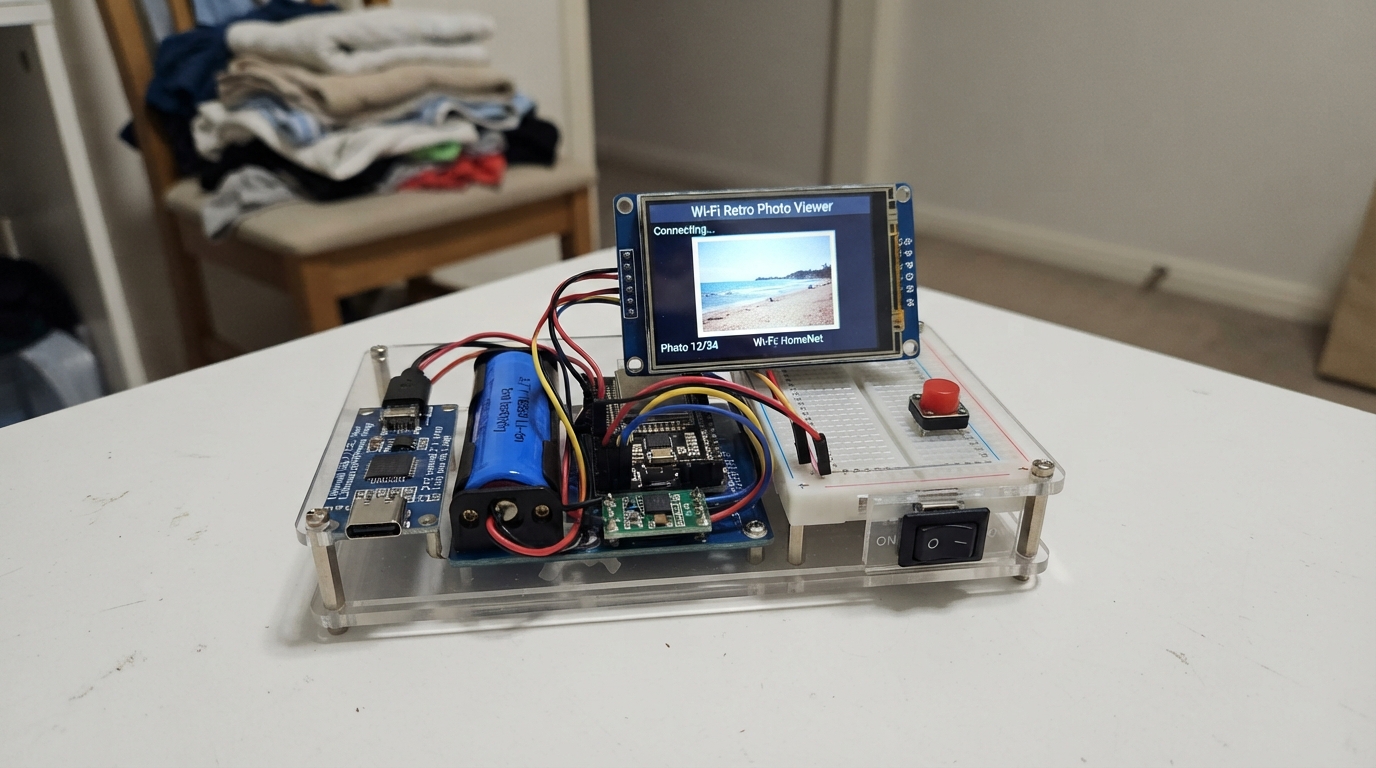
This Wi-Fi retro photo viewer displays images on a 320x240 TFT touchscreen powered by an ESP32. Users upload photos via a web interface, which the device automatically resizes and converts to a five-color palette for a nostalgic, lo-fi aesthetic. The guide includes a complete wiring diagram, parts list, and step-by-step assembly instructions for integrating the screen, battery charging system, boost converter, and control buttons.
The project runs on a rechargeable 18650 lithium-ion battery with integrated charging and power management. Two push buttons let you navigate between stored photos, while the touchscreen provides an interactive interface. Assembly involves connecting ready-made modules, configuring the boost converter to 5 volts, and wiring the ESP32 to the display and input controls. The included firmware handles Wi-Fi connectivity, photo upload, image processing, and display rendering.
Wiring diagram
Gather all the parts
Assemble it in 9 steps
1. Mount the ready-made modules
Fit the 2.8-inch screen, ESP32 board, USB-C charger board, 5 V boost converter, slide switch, and two buttons into a non-metal enclosure or on a breadboard. Keep the battery where it cannot be crushed or rubbed by sharp screw heads.
- Leave the charger USB-C socket and the ESP32 USB socket reachable from outside the case.
- Do not put a loose Li-ion cell in a case where its metal body can touch bare wires; a short circuit can make the battery hot or start a fire.
2. Connect the protected battery to the charger
With the slide switch OFF and no USB cable connected, connect the red BAT+ lead from battery_18650 to the LIPO terminal on charger_bq24074. Connect the black BAT- lead to the charger GND_3 terminal.
- Use a protected 18650 holder with red and black leads, or a protected single-cell pack with a matching connector.
- Red and black must not be swapped; reversed battery power can damage the charger and battery. Never connect an unprotected bare cell.
3. Make the charger-to-boost link
Connect charger_bq24074 OUT to boost_5v VIN+. Connect boost_5v VIN- to charger_bq24074 GND_2. These two wires carry battery or USB power through the charger's load-sharing output.
- Use short, thicker wires for this pair because the screen and Wi-Fi can draw short bursts of current.
- Do not connect the battery straight to the boost converter; use the charger's OUT terminal so USB charging and running the viewer share power safely.
4. Set the boost converter to 5 volts
Turn the slide switch OFF. Temporarily power charger_bq24074 from its USB-C charging socket, then use a multimeter across boost_5v VOUT+ and VOUT-. Turn the small adjustment screw until the meter reads 5.0 V. Unplug USB afterward.
- Mark the adjusted screw with a paint dot so it is easy to spot later.
- Do not connect the ESP32 until this reads 5.0 V; a higher setting can damage the ESP32 or screen.
5. Wire the on/off switch to the ESP32
Connect boost_5v VOUT+ to power_switch IN. Connect power_switch OUT to the ESP32 VIN or 5V pin. Connect boost_5v VOUT- to an ESP32 GND pin. The switch now removes power from the viewer while leaving the battery able to charge.
- Place the switch in the positive wire only; leave all ground wires connected together.
- Do not feed the 5 V boost output into the ESP32 3V3 pin; that bypasses the board regulator and can damage the board.
6. Power the screen from the ESP32
Connect tft_ili9341 VCC to the ESP32 3V3 pin and tft_ili9341 GND to an ESP32 GND pin. Connect tft_ili9341 TFT_BL to the same 3V3 pin so the backlight stays on.
- The display logic is 3.3 V, matching the ESP32, so no signal-level converter is needed.
- Make sure VCC and GND are not swapped; swapped power can damage the screen. Do not connect this display VCC to the 5 V boost rail.
7. Wire the screen data pins
Connect screen SCK to ESP32 GPIO18 (clock), MOSI to GPIO23 (data to the screen), MISO to GPIO19 (shared read wire), TFT_CS to GPIO4 (screen select), TFT_DC to GPIO27 (screen command/data), TFT_RST to GPIO26 (screen reset), and TOUCH_CS to GPIO25 (keeps the unused touch chip quiet). Leave TOUCH_IRQ unconnected.
- Keep these signal wires short and route them away from the boost converter coil to reduce screen glitches.
- Do not use the screen's 5 V-labelled power option when building this design; its data pins must stay at safe 3.3 V levels.
8. Wire the two photo buttons
For next_button, connect one leg to ESP32 GPIO32 (signal) and the other leg to GND (ground). For view_button, connect one leg to ESP32 GPIO33 (signal) and the other leg to GND (ground). The firmware supplies the needed pull-up inside the ESP32, so no extra resistors are required.
- On a four-leg tactile switch, use two legs on opposite sides of the switch; the two legs on one side are already connected together.
- Do not connect either button to 3V3; this design expects a press to connect the GPIO pin to ground.
9. Check before closing the case
With the power switch OFF, check that every module ground joins the ESP32 GND connection. Turn the switch ON and confirm the screen lights. Connect a USB-C cable to charger_bq24074 to charge the battery; its charge indicator should show charging when needed.
- The viewer can run while charging because the charger board has a separate load output.
- Use a normal 5 V USB supply for charging. Stop immediately if the battery, charger, or wires become hot.
Review all connections
1. Connections between "tft_ili9341" and "ESP32"
2. Connections between "next_button" and "ESP32"
3. Connections between "view_button" and "ESP32"
4. Connections between "battery_18650" and "ESP32"
5. Connections between "charger_bq24074" and "ESP32"
6. Connections between "boost_5v" and "ESP32"
7. Connections between "power_switch" and "ESP32"
Deploy the firmware
#include <Arduino.h>
#include <WiFi.h>
#include <WebServer.h>
#include <SPI.h>
#include <FS.h>
#include <SPIFFS.h>
#include <Adafruit_GFX.h>
#include <Adafruit_ILI9341.h>

#define TFT_CS 4
#define TFT_DC 27
#define TFT_RST 26
#define TFT_TOUCH_CS 25
#define NEXT_BUTTON 32
#define VIEW_BUTTON 33
#define TFT_SCK 18
#define TFT_MISO 19
#define TFT_MOSI 23

constexpr uint16_t SCREEN_W = 320;
constexpr uint16_t SCREEN_H = 240;
constexpr uint8_t MAX_PHOTOS = 10;
constexpr size_t PHOTO_BYTES = SCREEN_W * SCREEN_H * 2;

Adafruit_ILI9341 tft(TFT_CS, TFT_DC, TFT_RST);
WebServer server(80);
File uploadFile;
int uploadSlot = 0;
int photoCount = 0;
int currentPhoto = 0;
bool paletteMode = false;
bool lastNext = HIGH;
bool lastView = HIGH;
unsigned long lastNextPress = 0;
unsigned long lastViewPress = 0;

const char PAGE[] PROGMEM = R"HTML(
<!doctype html><html><head><meta name="viewport" content="width=device-width,initial-scale=1">
<style>body{font:16px sans-serif;max-width:520px;margin:20px auto;padding:0 14px;background:#202028;color:#fff}input,button{font:inherit;margin:8px 0;padding:10px;width:100%;box-sizing:border-box}button{background:#ffb000;border:0;border-radius:6px;font-weight:bold}small{color:#c8c8d0}</style></head><body>
<h2>Retro Viewer</h2><p>Choose a photo and a numbered picture slot. The phone resizes it to the screen and chooses five representative colours.</p>
<label>Picture slot (0–9)</label><input id="slot" type="number" min="0" max="9" value="0">
<input id="file" type="file" accept="image/*"><button onclick="send()">Send picture and palette</button><p id="msg"></p>
<small>After sending, press the photo button to move to the next stored picture. The second button shows its palette.</small>
<script>
async function send(){const f=document.getElementById('file').files[0],msg=document.getElementById('msg');if(!f){msg.textContent='Choose a picture first.';return}const slot=Math.max(0,Math.min(9,+document.getElementById('slot').value||0));msg.textContent='Resizing picture…';const im=new Image();im.src=URL.createObjectURL(f);await im.decode();const c=document.createElement('canvas');c.width=320;c.height=240;const x=c.getContext('2d');x.drawImage(im,0,0,320,240);const d=x.getImageData(0,0,320,240).data;const raw=new Uint8Array(320*240*2);let p=0;for(let i=0;i<d.length;i+=4){let v=((d[i]&248)<<8)|((d[i+1]&252)<<3)|(d[i+2]>>3);raw[p++]=v&255;raw[p++]=v>>8}let pal=new Uint8Array(10);for(let n=0;n<5;n++){let px=Math.floor((n+.5)*320/5),py=120,i=(py*320+px)*4,v=((d[i]&248)<<8)|((d[i+1]&252)<<3)|(d[i+2]>>3);pal[n*2]=v&255;pal[n*2+1]=v>>8}try{await fetch('/upload?slot='+slot,{method:'POST',body:raw});await fetch('/palette?slot='+slot,{method:'POST',body:pal});msg.textContent='Saved in slot '+slot+'.'}catch(e){msg.textContent='Transfer failed; stay connected to RetroViewer and try again.'}}
</script></body></html>
)HTML";

String photoPath(int slot) { return "/photo" + String(slot) + ".raw"; }
String palettePath(int slot) { return "/palette" + String(slot) + ".bin"; }

void scanPhotos() {
  photoCount = 0;
  for (int i = 0; i < MAX_PHOTOS; ++i) {
    if (SPIFFS.exists(photoPath(i))) photoCount++;
  }
  if (photoCount == 0) currentPhoto = 0;
  else if (!SPIFFS.exists(photoPath(currentPhoto))) {
    for (int i = 0; i < MAX_PHOTOS; ++i) if (SPIFFS.exists(photoPath(i))) { currentPhoto = i; break; }
  }
}

int nextExistingPhoto(int slot) {
  for (int n = 1; n <= MAX_PHOTOS; ++n) {
    int candidate = (slot + n) % MAX_PHOTOS;
    if (SPIFFS.exists(photoPath(candidate))) return candidate;
  }
  return slot;
}

void showStatus(const char *line1, const char *line2) {
  tft.fillScreen(ILI9341_BLACK);
  tft.setTextColor(ILI9341_ORANGE, ILI9341_BLACK);
  tft.setTextSize(3);
  tft.setCursor(20, 65); tft.print(line1);
  tft.setTextColor(ILI9341_WHITE, ILI9341_BLACK);
  tft.setTextSize(2);
  tft.setCursor(20, 120); tft.print(line2);
}

void showPhoto() {
  if (!SPIFFS.exists(photoPath(currentPhoto))) { showStatus("RETRO VIEWER", "Connect to RetroViewer Wi-Fi"); return; }
  File image = SPIFFS.open(photoPath(currentPhoto), FILE_READ);
  if (!image || image.size() != PHOTO_BYTES) { showStatus("PICTURE ERROR", "Upload this slot again"); return; }
  static uint16_t pixels[320];
  tft.startWrite();
  tft.setAddrWindow(0, 0, SCREEN_W, SCREEN_H);
  bool first = true;
  while (image.available()) {
    size_t got = image.read(reinterpret_cast<uint8_t *>(pixels), sizeof(pixels));
    if (got == 0) break;
    tft.writePixels(pixels, got / 2, true, false);
    first = false;
  }
  tft.endWrite();
  image.close();
}

void showPalette() {
  uint16_t colors[5] = {ILI9341_DARKGREY, ILI9341_DARKGREY, ILI9341_DARKGREY, ILI9341_DARKGREY, ILI9341_DARKGREY};
  File palette = SPIFFS.open(palettePath(currentPhoto), FILE_READ);
  if (palette && palette.size() == 10) palette.read(reinterpret_cast<uint8_t *>(colors), 10);
  if (palette) palette.close();
  tft.fillScreen(ILI9341_BLACK);
  tft.setTextColor(ILI9341_WHITE, ILI9341_BLACK);
  tft.setTextSize(2); tft.setCursor(12, 12); tft.printf("PALETTE  %d", currentPhoto + 1);
  for (int i = 0; i < 5; ++i) {
    int x = 12 + i * 62;
    tft.fillRoundRect(x, 52, 52, 125, 7, colors[i]);
    tft.drawRoundRect(x, 52, 52, 125, 7, ILI9341_WHITE);
    uint8_t r = ((colors[i] >> 11) & 0x1F) * 255 / 31;
    uint8_t g = ((colors[i] >> 5) & 0x3F) * 255 / 63;
    uint8_t b = (colors[i] & 0x1F) * 255 / 31;
    tft.setTextColor(ILI9341_WHITE, ILI9341_BLACK);
    tft.setTextSize(1); tft.setCursor(x, 190); tft.printf("#%02X%02X%02X", r, g, b);
  }
  tft.setTextSize(1); tft.setCursor(12, 222); tft.print("Press view button to return to photo");
}

void refreshDisplay() { if (paletteMode) showPalette(); else showPhoto(); }

void beginUpload(const char *extension) {
  HTTPUpload &upload = server.upload();
  if (upload.status == UPLOAD_FILE_START) {
    uploadSlot = constrain(server.arg("slot").toInt(), 0, MAX_PHOTOS - 1);
    String path = String(extension) == ".raw" ? photoPath(uploadSlot) : palettePath(uploadSlot);
    if (SPIFFS.exists(path)) SPIFFS.remove(path);
    uploadFile = SPIFFS.open(path, FILE_WRITE);
  } else if (upload.status == UPLOAD_FILE_WRITE && uploadFile) {
    uploadFile.write(upload.buf, upload.currentSize);
  } else if (upload.status == UPLOAD_FILE_END && uploadFile) {
    uploadFile.close();
  }
}

void handleImageUpload() { beginUpload(".raw"); }
void handlePaletteUpload() { beginUpload(".bin"); }

void setup() {
  pinMode(NEXT_BUTTON, INPUT_PULLUP);
  pinMode(VIEW_BUTTON, INPUT_PULLUP);
  pinMode(TFT_TOUCH_CS, OUTPUT); digitalWrite(TFT_TOUCH_CS, HIGH);
  SPI.begin(TFT_SCK, TFT_MISO, TFT_MOSI, TFT_CS);
  tft.begin(); tft.setRotation(1);
  if (!SPIFFS.begin(true)) { showStatus("FLASH ERROR", "Could not start photo storage"); }
  else showStatus("RETRO VIEWER", "Starting Wi-Fi...");
  WiFi.mode(WIFI_AP);
  WiFi.softAP("RetroViewer", "picturebox");
  server.on("/", HTTP_GET, []() { server.send_P(200, "text/html", PAGE); });
  server.on("/upload", HTTP_POST, []() { scanPhotos(); paletteMode = false; refreshDisplay(); server.send(200, "text/plain", "Picture saved"); }, handleImageUpload);
  server.on("/palette", HTTP_POST, []() { server.send(200, "text/plain", "Palette saved"); }, handlePaletteUpload);
  server.begin();
  scanPhotos();
  refreshDisplay();
}

void loop() {
  server.handleClient();
  unsigned long now = millis();
  bool nextNow = digitalRead(NEXT_BUTTON);
  bool viewNow = digitalRead(VIEW_BUTTON);
  if (lastNext == HIGH && nextNow == LOW && now - lastNextPress > 180) {
    lastNextPress = now;
    if (photoCount > 0) { currentPhoto = nextExistingPhoto(currentPhoto); paletteMode = false; refreshDisplay(); }
  }
  if (lastView == HIGH && viewNow == LOW && now - lastViewPress > 180) {
    lastViewPress = now;
    if (photoCount > 0) { paletteMode = !paletteMode; refreshDisplay(); }
  }
  lastNext = nextNow;
  lastView = viewNow;
  delay(2);
}
Remix this project
Make it yours in one click
Open a full copy of this project in your own Schematik workspace, diagram, code, parts, and assembly steps included. Swap the sensor, add features, or redesign the whole thing with AI. The author's original stays untouched.