Community project
WiFi Flapping Bird Game
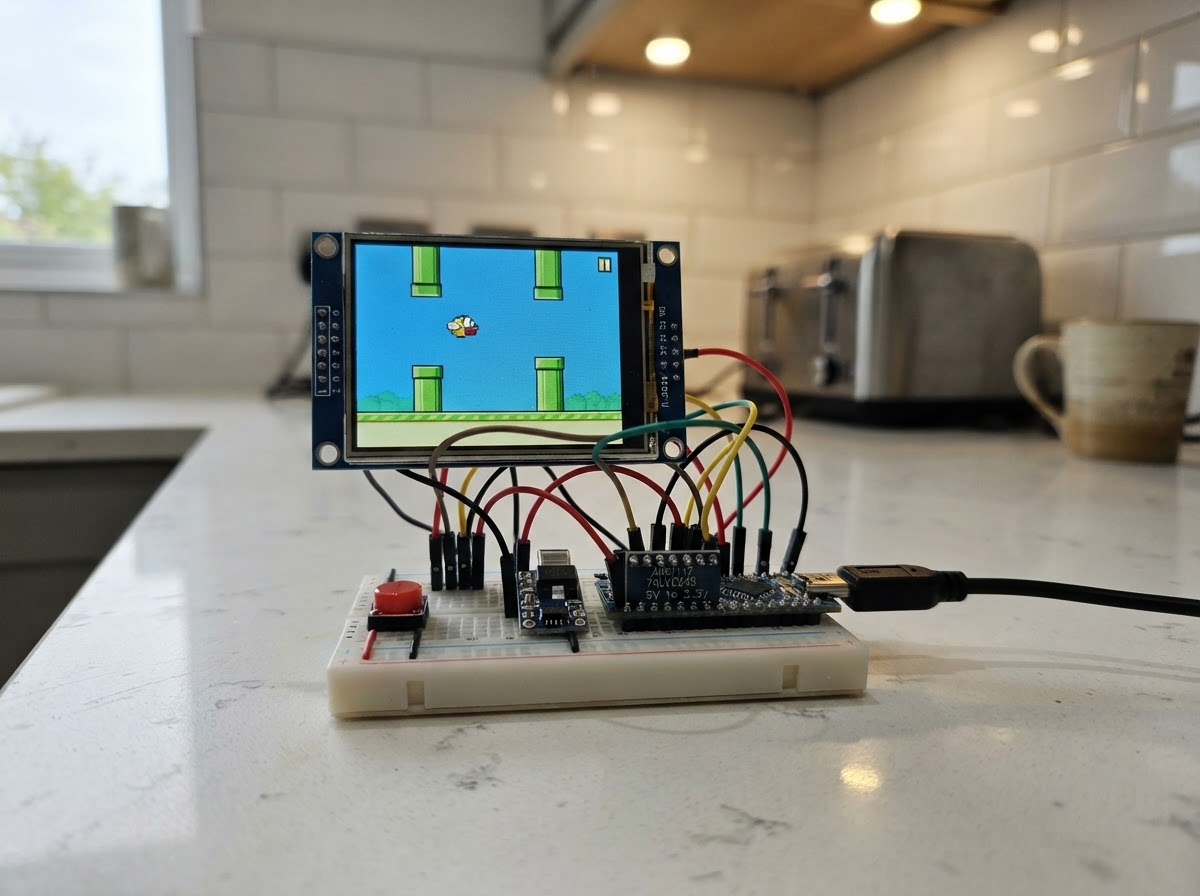
This project brings the addictive flappy bird gameplay to life on an Arduino Uno with a colorful 3.3-inch touchscreen display. Players tap a button to make the bird flap and navigate through scrolling obstacles, with sound effects from a piezo buzzer and score tracking on the TFT screen. The guide includes a complete wiring diagram showing how to connect the ILI9341 display, level-shifter module, power regulation, and input controls to the Arduino.
Builders will receive a full parts list, step-by-step assembly instructions, and ready-to-upload firmware that handles game logic, collision detection, sprite animation, and menu navigation. The level-shifter safely converts Arduino 5V signals to the 3.3V required by the display, while the slide switch controls power to the entire system. Once assembled and programmed, the game is ready to play immediately.
Wiring diagram

Gather all the parts
Assemble it in 5 steps
1. Place the 3.3 V parts
Put the Generic ESP8285 module, ILI9341 screen, AMS1117 regulator, button, passive buzzer, and slide switch on the breadboard. The ESP8285 and display both use 3.3 V signals, so the old 74LVC245 level converter is not used or needed.
- Keep the screen unpowered until every wire is checked.
- The ESP8285 is a 3.3 V board: never put 5 V on its GPIO pins.
- Connecting 5 V to an ESP8285 GPIO or to the screen VCC can permanently damage the module.
2. Wire the switched power
Connect usb_power_adapter +5V to console_power_switch COM (power input). Connect console_power_switch A to the 5V rail (switched power), then connect that rail to regulator_3v3 VIN (power). Connect usb_power_adapter GND and regulator_3v3 GND to the shared GND rail (ground). Connect regulator_3v3 VOUT to the 3V3 rail (safe power). Connect the ESP8285 3.3V supply pin and display VCC to that 3V3 rail (power), and connect their GND pins to shared GND (ground). Leave switch B unconnected for the off position.
- The switch physically turns the console on and off.
- Measure the regulator output first if you have a meter; it must be 3.3 V.
- Disconnect USB power before changing switch wiring. A 5 V-to-GND short can overheat or damage parts.
- Do not use the regulator if its output is not 3.3 V; too much voltage can damage the ESP8285 and screen.
3. Wire the color screen
Connect display MOSI to ESP8285 GPIO13 (data), display SCK to GPIO14 (clock), display TFT_CS to GPIO15 (screen select), display TFT_DC to GPIO5 (command/data), and display TFT_RST to GPIO16 (reset). Connect display TFT_BL to 3V3 (backlight power). Connect display TOUCH_CS to 3V3 (power) because the touch controller is not used. Leave display MISO and TOUCH_IRQ disconnected.
- These are direct connections: the ESP8285 already uses safe 3.3 V logic, so no level converter is needed.
- Follow the labels printed on the screen board; some boards call TFT_CS simply CS and TFT_DC simply DC.
- GPIO15 must be LOW while the ESP8285 starts. The screen's chip-select input is normally safe, but if the board does not boot, add a 10 kΩ resistor from GPIO15 to GND.
- Do not connect the display MISO pin: this game only writes to the screen.
4. Wire the game button and buzzer
Connect one side of flap_button to ESP8285 GPIO17 (game signal), and its opposite side to GND (ground). Connect one leg of game_buzzer to GPIO4 (sound signal), and its other leg to GND (ground).
- The game uses its built-in pull-up for the button, so no separate resistor is needed.
- A passive buzzer has no plus or minus marking, so either leg can go to GND.
- Do not connect the button or buzzer signal wire to 5 V. ESP8285 GPIO pins use 3.3 V only.
5. Turn on and play
Check that every GND connection is shared and that screen VCC is on 3V3, then connect the USB adapter and slide console_power_switch toward A to turn on. Wait for the loading bar. Quickly press flap_button to choose Eagle, Bird, Crow, Ostrich, or Chicken; hold it for about one second to start. Eagle, Bird, and Crow fly through wall gaps and collect coins. Ostrich and Chicken run on the ground; press the button to jump over cars.
- If the screen is blank, turn off power and recheck its VCC, GND, MOSI, SCK, CS, DC, and RST wires in that order.
- The loading bar and buzzer tones run once each time the power switch is turned on.
- Use only one 5 V power source at a time. Do not power the circuit from a USB adapter and another 5 V source together.
Review all connections
1. Connections between "usb_power_adapter" and "Arduino"
2. Connections between "console_power_switch" and "Arduino"
3. Connections between "regulator_3v3" and "Arduino"
4. Connections between "display_level_shifter" and "Arduino"
5. Connections between "ili9341_display" and "Arduino"
6. Connections between "flap_button" and "Arduino"
7. Connections between "game_buzzer" and "Arduino"
Deploy the firmware
#include <Arduino.h>
#include <SPI.h>
#include <Adafruit_GFX.h>
#include <Adafruit_ILI9341.h>
#include <avr/pgmspace.h>

#define BUZZER_PIN 3

#define TFT_CS_PIN 10
#define TFT_DC_PIN 9
#define TFT_RST_PIN 8

enum GameState { MENU, PLAY, CRASH, OVER };


// Forward declarations
bool runner();
void beep(uint16_t f,uint16_t d);
void sprite(const uint16_t *p,int16_t x,int16_t y,uint16_t c);
uint16_t color();
const __FlashStringHelper* name();
bool hit(int16_t ax,int16_t ay,int16_t aw,int16_t ah,int16_t bx,int16_t by,int16_t bw,int16_t bh);
void resetObstacle();
void resetRound();
void scenery();
void bricks(int16_t x,int16_t a,int16_t b);
void obstacle();
void hero();
void hud();
void menu();
void over();
void crash();
void tap();
void button();
void loading();

const uint8_t BUTTON_PIN=2;
const int16_t W=320,H=240,GROUND=207;
const uint16_t SKY=0x5D9B;
Adafruit_ILI9341 tft(TFT_CS_PIN,TFT_DC_PIN,TFT_RST_PIN);

GameState state=MENU;
uint8_t skin=0;
int16_t heroX=58,heroY=105,wallX=350,gapY=85,carW=38,carH=28;
float velocity=0;
uint16_t score=0,wins=0,losses=0,scrollX=0;
bool coinTaken=false,wasDown=false,held=false;
unsigned long pressAt=0,lastFrame=0,crashAt=0;

const uint16_t PROGMEM BODY[16]={0x0000,0x0180,0x07E0,0x1FF8,0x3FFC,0x7FFE,0xFFFF,0xFFFF,0x7FFE,0x3FFC,0x1FF8,0x0FF0,0x07E0,0x0200,0,0};
const uint16_t PROGMEM WINGUP[16]={0,0x6000,0x7800,0x7C00,0x3E00,0x1F00,0x0F80,0x0780,0,0,0,0,0,0,0,0};
const uint16_t PROGMEM WINGDOWN[16]={0,0,0,0,0,0,0x0780,0x0F80,0x1F00,0x3E00,0x7C00,0x7800,0x6000,0,0,0};
const uint16_t PROGMEM TREE[16]={0x0180,0x03C0,0x07E0,0x0FF0,0x1FF8,0x3FFC,0x7FFE,0x0FF0,0x0FF0,0x0FF0,0x0180,0x0180,0x0180,0x0180,0,0};

bool runner(){return skin>=3;}
void beep(uint16_t f,uint16_t d){tone(BUZZER_PIN,f,d);}
void sprite(const uint16_t *p,int16_t x,int16_t y,uint16_t c){for(uint8_t r=0;r<16;r++){uint16_t b=pgm_read_word(&p[r]);for(uint8_t q=0;q<16;q++)if(b&(0x8000>>q))tft.drawPixel(x+q,y+r,c);}}
uint16_t color(){if(skin==0)return 0xA145;if(skin==1)return ILI9341_YELLOW;if(skin==2)return 0x4208;if(skin==3)return 0xC5C0;return 0xFFE0;}
const __FlashStringHelper* name(){if(skin==0)return F("EAGLE");if(skin==1)return F("BIRD");if(skin==2)return F("CROW");if(skin==3)return F("OSTRICH");return F("CHICKEN");}
bool hit(int16_t ax,int16_t ay,int16_t aw,int16_t ah,int16_t bx,int16_t by,int16_t bw,int16_t bh){return ax+aw>bx&&ax<bx+bw&&ay+ah>by&&ay<by+bh;}
void resetObstacle(){wallX=W+random(35,110);coinTaken=false;if(runner()){carW=random(30,55);carH=random(20,38);}else gapY=random(35,123);}
void resetRound(){score=0;scrollX=0;heroX=58;heroY=runner()?GROUND-32:105;velocity=0;resetObstacle();}
void scenery(){tft.fillScreen(SKY);int16_t m=-(scrollX/4%120)-60;for(int16_t x=m;x<W+80;x+=120)tft.fillTriangle(x,GROUND,x+58,112,x+116,GROUND,0x3C8F);for(int16_t x=-(scrollX%74);x<W;x+=74)sprite(TREE,x+10,GROUND-44,0x05A0);tft.fillRect(0,GROUND,W,H-GROUND,0x4D85);tft.drawFastHLine(0,GROUND,W,ILI9341_GREEN);}
void bricks(int16_t x,int16_t a,int16_t b){if(b<=a)return;tft.fillRect(x,a,36,b-a,0x07A3);tft.fillRect(x,a,4,b-a,0xAFE5);tft.fillRect(x+32,a,4,b-a,0x04A0);for(int16_t y=a;y<b;y+=10){tft.drawFastHLine(x,y,36,0x04A0);for(int16_t z=x+((y/10&1)?8:0);z<x+36;z+=16)tft.drawFastVLine(z,y,10,0x04A0);}}
void obstacle(){if(runner()){int16_t y=GROUND-carH;tft.fillRoundRect(wallX,y+7,carW,carH-7,4,(score&1)?ILI9341_RED:ILI9341_BLUE);tft.fillRect(wallX+9,y,carW-18,12,0x5D9B);tft.fillCircle(wallX+8,GROUND-2,5,ILI9341_BLACK);tft.fillCircle(wallX+carW-8,GROUND-2,5,ILI9341_BLACK);}else{bricks(wallX,0,gapY);bricks(wallX,gapY+76,GROUND);if(!coinTaken){tft.fillCircle(wallX+18,gapY+38,7,0xFD20);tft.drawCircle(wallX+18,gapY+38,7,0xA4C0);}}}
void hero(){if(runner()){bool step=(millis()/90)&1;int8_t a=step?-2:2,b=step?2:-2;if(skin==3){tft.fillRoundRect(heroX-3,heroY+7,24,16,8,0xC5C0);tft.fillRect(heroX+15,heroY+1,4,15,0xC5C0);tft.fillCircle(heroX+18,heroY+2,5,0xFEC0);tft.fillCircle(heroX+20,heroY+1,1,ILI9341_BLACK);tft.drawLine(heroX+12,heroY+9,heroX+17,heroY+12,0x8B40);tft.fillTriangle(heroX+22,heroY+2,heroX+29,heroY+4,heroX+22,heroY+6,0xFD20);}else{tft.fillCircle(heroX+9,heroY+16,10,0xFFE0);tft.fillCircle(heroX+17,heroY+8,7,0xFFE0);tft.fillCircle(heroX+19,heroY+7,1,ILI9341_BLACK);tft.drawLine(heroX+3,heroY+14,heroX+10,heroY+18,0xFDC0);tft.fillTriangle(heroX+23,heroY+8,heroX+31,heroY+11,heroX+23,heroY+14,0xFD20);}tft.drawLine(heroX+7,heroY+23,heroX+7+a,heroY+30,0xFD20);tft.drawLine(heroX+13,heroY+23,heroX+13+b,heroY+30,0xFD20);}else{sprite(BODY,heroX,heroY,color());sprite(((millis()/85)&1)?WINGUP:WINGDOWN,heroX-4,heroY,skin==2?0x2104:ILI9341_RED);tft.fillCircle(heroX+11,heroY+5,3,ILI9341_WHITE);tft.fillCircle(heroX+12,heroY+5,1,ILI9341_BLACK);if(skin==0){tft.drawLine(heroX+3,heroY+12,heroX+11,heroY+14,ILI9341_WHITE);}else if(skin==1){tft.fillCircle(heroX+5,heroY+12,2,0xFDC0);}else{tft.drawLine(heroX+2,heroY+13,heroX+10,heroY+15,0x8410);}tft.fillTriangle(heroX+15,heroY+8,heroX+23,heroY+10,heroX+15,heroY+12,0xFD20);}}
void hud(){tft.setTextColor(ILI9341_WHITE,SKY);tft.setTextSize(2);tft.setCursor(6,5);tft.print(score);tft.setTextSize(1);tft.setCursor(236,8);tft.print(F("W:"));tft.print(wins);tft.print(F(" L:"));tft.print(losses);}
void menu(){tft.fillScreen(ILI9341_BLACK);tft.setTextColor(ILI9341_YELLOW);tft.setTextSize(3);tft.setCursor(72,23);tft.print(F("SKY & RUN"));tft.fillRoundRect(35,70,250,64,8,color());tft.drawRoundRect(35,70,250,64,8,ILI9341_WHITE);tft.setTextColor(ILI9341_BLACK);tft.setTextSize(2);tft.setCursor(88,91);tft.print(name());tft.setTextColor(ILI9341_WHITE);tft.setTextSize(1);tft.setCursor(43,157);tft.print(F("Tap: choose skin   Hold: start"));tft.setCursor(36,180);tft.print(runner()?F("Jump over cars and reach a win"):F("Fly through wall gaps, collect coins"));}
void over(){scenery();obstacle();hero();tft.fillRoundRect(47,78,226,66,8,ILI9341_BLACK);tft.drawRoundRect(47,78,226,66,8,ILI9341_WHITE);tft.setTextColor(ILI9341_WHITE);tft.setTextSize(3);tft.setCursor(74,88);tft.print(F("GAME OVER"));tft.setTextSize(1);tft.setCursor(61,122);tft.print(F("Tap: again  Hold: menu"));}
void crash(){state=CRASH;crashAt=millis();losses++;velocity=-3.5;beep(180,320);}
void tap(){if(state==MENU){skin=(skin+1)%5;beep(880,70);menu();}else if(state==OVER){resetRound();state=PLAY;beep(660,90);}else if(state==PLAY){if(runner()){if(heroY>=GROUND-33){velocity=-8.2;beep(520,70);}}else{velocity=-7;beep(760,55);}}}
void button(){bool down=digitalRead(BUTTON_PIN)==LOW;unsigned long n=millis();if(down&&!wasDown){pressAt=n;held=false;}if(down&&!held&&n-pressAt>=700){held=true;if(state==MENU){resetRound();state=PLAY;beep(1047,130);}else if(state==OVER){state=MENU;beep(440,100);menu();}}if(!down&&wasDown&&!held)tap();wasDown=down;}
void loading(){tft.fillScreen(ILI9341_BLACK);tft.setTextColor(ILI9341_YELLOW);tft.setTextSize(3);tft.setCursor(57,55);tft.print(F("SKY & RUN"));tft.setTextColor(ILI9341_WHITE);tft.setTextSize(1);tft.setCursor(104,99);tft.print(F("Loading game..."));tft.drawRoundRect(38,124,244,22,5,ILI9341_WHITE);for(uint8_t p=0;p<=100;p+=4){tft.fillRoundRect(41,127,(uint16_t)p*238/100,16,3,ILI9341_GREEN);tone(BUZZER_PIN,500+p*6,18);delay(55);}noTone(BUZZER_PIN);}
void setup(){pinMode(BUTTON_PIN,INPUT_PULLUP);pinMode(BUZZER_PIN,OUTPUT);randomSeed(micros());tft.begin();tft.setRotation(1);loading();menu();}
void loop(){button();if(state!=PLAY&&state!=CRASH)return;unsigned long n=millis();if(n-lastFrame<45)return;lastFrame=n;if(state==CRASH){velocity+=.65;heroY+=(int16_t)velocity;scrollX+=5;scenery();obstacle();hero();tft.drawLine(heroX-6,heroY-4,heroX+22,heroY+22,ILI9341_RED);if(n-crashAt>850||heroY>GROUND-16){heroY=GROUND-16;state=OVER;over();}return;}velocity+=runner()?.52:.46;heroY+=(int16_t)velocity;if(runner()&&heroY>GROUND-32){heroY=GROUND-32;velocity=0;}scrollX+=5;wallX-=5;bool wallHit=runner()?hit(heroX,heroY,16,24,wallX,GROUND-carH,carW,carH):(heroX+17>wallX&&heroX<wallX+36&&(heroY<gapY||heroY+17>gapY+76));if((!runner()&&(heroY<0||heroY>GROUND-16))||wallHit){crash();return;}if(!runner()&&!coinTaken&&hit(heroX,heroY,17,17,wallX+11,gapY+31,14,14)){coinTaken=true;score++;beep(1200,70);if(score%15==0){wins++;beep(1600,220);}}if(wallX<-carW-4){if(runner()||!coinTaken){score++;beep(900,60);if(score%(runner()?10:15)==0){wins++;beep(1500,220);}}resetObstacle();}scenery();obstacle();hero();hud();}
Remix this project
Make it yours in one click
Open a full copy of this project in your own Schematik workspace — diagram, code, parts, and assembly steps included. Swap the sensor, add features, or redesign the whole thing with AI. The author's original stays untouched.