Community project
WiFi Monkey Deterrent Speaker
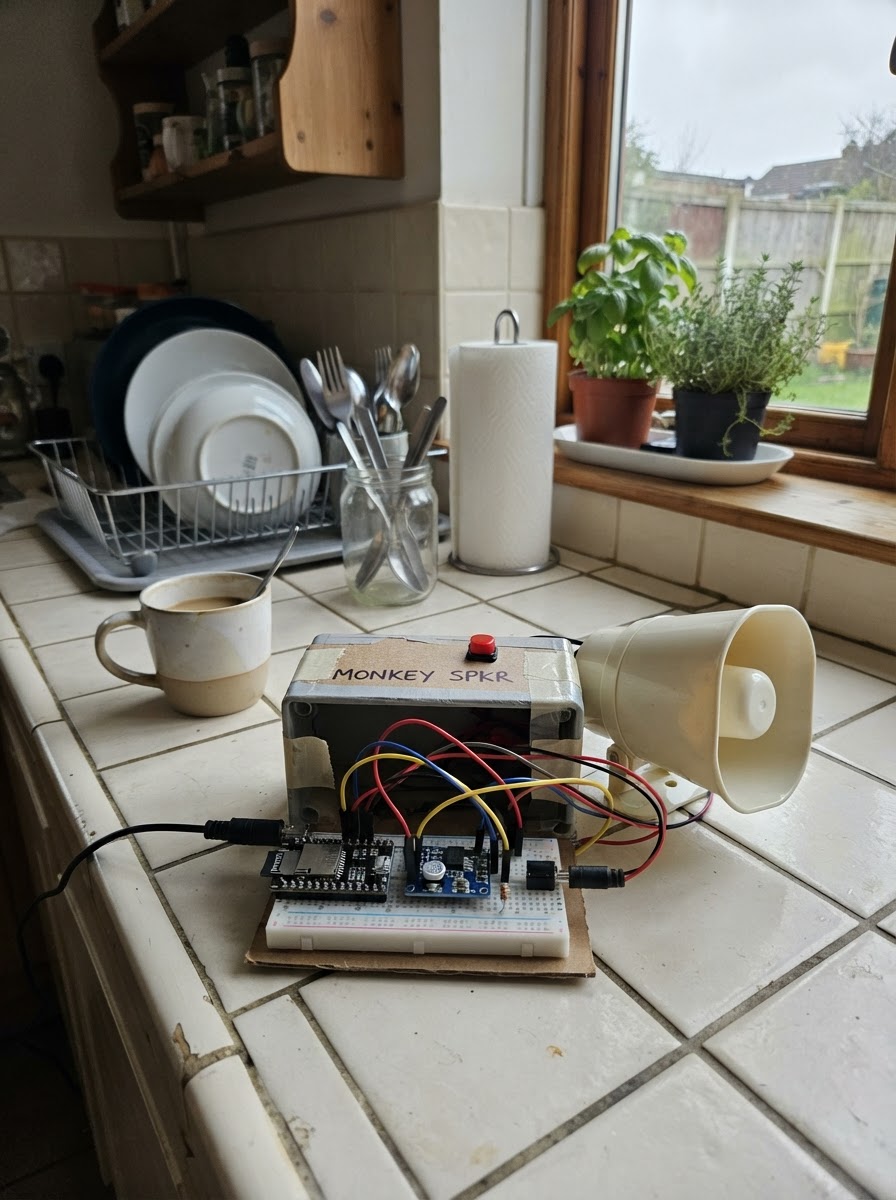
This WiFi-enabled speaker system deters monkeys and other wildlife by playing deterrent sounds on demand or on a schedule. Built around an ESP32 microcontroller, it combines offline audio playback via a DFPlayer Mini module with a weatherproof 12V horn speaker, powered by a buck converter and Class-D amplifier for reliable outdoor operation.
The guide provides a complete wiring diagram, parts list, and step-by-step assembly instructions for building the deterrent into a weatherproof enclosure. Firmware with WiFi control, a local web interface, and cooldown logic is included, allowing remote triggering of up to four pre-loaded deterrent sounds from a microSD card, plus a physical test button for on-site verification.
Wiring diagram

Gather all the parts
Assemble it in 7 steps
1. Prepare the weatherproof enclosure
Choose an IP65-or-better plastic enclosure with cable glands. Mount the ESP32, DFPlayer, 5 V converter, and amplifier inside it on standoffs, with the amplifier where it can shed heat without exposing its circuit board to rain.
- Put the enclosure under an eave if possible, even though it is weatherproof.
- Use downward-facing cable glands so water cannot run along a cable into the box.
- Do not put mains-voltage wiring inside this enclosure unless a qualified electrician provides the protected mains connection; use a ready-made approved 12 V DC adapter instead.
2. Set the 5 V converter before connecting electronics
With the 12 V adapter unplugged, connect supply_12v_1 +12V to buck_5v_1 VIN and supply_12v_1 GND to buck_5v_1 GND. Plug in the adapter and adjust the small converter screw until a meter reads exactly 5.0 V between buck_5v_1 VOUT and GND. Unplug the adapter again.
- Use a 12 V adapter rated for at least 3 A so the horn amplifier has enough current.
- Mark the converter’s adjusted screw with paint or nail varnish so vibration cannot move it.
- Do not connect the ESP32 or DFPlayer before checking the converter output; a wrongly adjusted converter can damage 5 V electronics.
3. Wire the shared power safely
Connect supply_12v_1 +12V to amp_12v_1 VCC and to buck_5v_1 VIN (12 V power). Connect supply_12v_1 GND, amp_12v_1 GND, and buck_5v_1 GND together (ground). Connect buck_5v_1 VOUT to the ESP32 5V/VIN pin and dfplayer_1 VCC (5 V power). Connect the ESP32 GND to dfplayer_1 GND and the same shared ground (ground).
- Use adequately sized wire for the 12 V amplifier and horn path; thin breadboard jumper wire is not suitable for the speaker power circuit.
- Keep the amplifier’s 12 V and speaker wiring away from the ESP32 antenna where practical.
- Make sure the 12 V positive wire never touches the 5 V output; putting 12 V into the ESP32 or DFPlayer will damage it.
4. Fit the offline sound card and audio lead
Format audio_card_1 as FAT32 on a computer. Make a folder named mp3 and place at least four MP3 files inside named 0001.mp3, 0002.mp3, 0003.mp3, and 0004.mp3; use varied, lawful deterrent recordings and keep each one short. Insert the card into dfplayer_1. Connect dfplayer_1 DAC_R to amp_12v_1 AUDIO_IN (audio signal).
- Use sound files you have permission to use, and set their volume consistently before copying them.
- The device chooses one numbered file at random for each accepted trigger.
- Do not connect the DFPlayer’s SPK1 and SPK2 terminals to the amplifier input; use DAC_R only, because SPK terminals are amplified speaker outputs.
5. Wire the ESP32 control leads
Connect dfplayer_1 TX to ESP32 GPIO16 (data). Connect ESP32 GPIO17 to rx_resistor_1 END1, then rx_resistor_1 END2 to dfplayer_1 RX (data); the 1 kΩ resistor protects the DFPlayer input from the ESP32’s 3.3 V signal edge. Connect one test_button_1 terminal to ESP32 GPIO27 and its other terminal to GND (manual test signal and ground).
- The push button can be a sealed momentary outdoor push button mounted through the enclosure wall.
- Keep these low-voltage signal wires short and away from the amplifier speaker output wires.
- Do not wire the button to 5 V; GPIO27 is meant to be connected only to ground when the button is pressed.
6. Connect and mount the outdoor horn
Connect amp_12v_1 SPK+ to horn_speaker_1 + and amp_12v_1 SPK- to horn_speaker_1 - (speaker signals). Mount the weatherproof horn outside, pointing down across the garden rather than at homes, paths, or people. Seal the cable entry with a properly tightened cable gland.
- Mount the horn high enough that people cannot easily touch it, and angle it slightly down so rain does not collect in its mouth.
- Start with the amplifier gain low, then raise it only enough to cover the intended garden area.
- A horn at close range can injure hearing. Keep people clear when testing, never aim it toward a neighbour, and follow local noise and wildlife rules.
7. Seal, configure, and test locally
Close the enclosure only after checking every wire. Power the unit from supply_12v_1. On first power-up, join the device’s temporary Wi-Fi network named GardenDeterrent-Setup using password change-me-now, open its local setup page at 192.168.4.1, and enter the garden router Wi-Fi details. After it restarts, the camera computer can send an HTTP POST to http://monkey-deterrent.local/trigger with form field key=replace-this-local-key. Press test_button_1 once to test without the camera.
- Change the two example passwords/keys in the firmware before field use; the trigger remains local to the garden Wi-Fi and does not use the internet.
- After any trigger, the unit rejects further triggers for 60 seconds so it cannot repeatedly blast while an animal remains present.
- Test at a safe distance with the horn aimed away from people and animals you do not intend to deter; loud sound can disturb neighbours and pets.
Review all connections
1. Connections between "supply_12v_1" and "ESP32"
2. Connections between "buck_5v_1" and "ESP32"
3. Connections between "amp_12v_1" and "ESP32"
4. Connections between "dfplayer_1" and "ESP32"
5. Connections between "rx_resistor_1" and "ESP32"
6. Connections between "test_button_1" and "ESP32"
Deploy the firmware
#include <Arduino.h>
#include <WiFi.h>
#include <WebServer.h>
#include <ESPmDNS.h>
#include <Preferences.h>
#include <DFRobotDFPlayerMini.h>


// Forward declarations
bool cooldownActive();
String statusJson();
bool playDeterrent(const char *source);
void handleTrigger();
void handleStatus();
void handleSetupForm();
void handleSaveWifi();
void startSetupAccessPoint();
bool connectToLocalWifi();
void setupNetwork();

constexpr int DFPLAYER_RX_PIN = 16;  // DFPlayer TX -> ESP32 RX
constexpr int DFPLAYER_TX_PIN = 17;  // ESP32 TX -> 1k resistor -> DFPlayer RX
constexpr int TEST_BUTTON_PIN = 27;
constexpr uint32_t COOLDOWN_MS = 60000UL;
constexpr uint8_t FIRST_TRACK = 1;
constexpr uint8_t LAST_TRACK = 4;
constexpr uint8_t PLAYBACK_VOLUME = 26;  // DFPlayer range: 0 to 30

const char *SETUP_AP_NAME = "GardenDeterrent-Setup";
const char *SETUP_AP_PASSWORD = "change-me-now";
const char *TRIGGER_KEY = "replace-this-local-key";

HardwareSerial dfSerial(2);
DFRobotDFPlayerMini player;
WebServer server(80);
Preferences preferences;

bool playerReady = false;
bool wasButtonPressed = false;
uint32_t lastTriggerMs = 0;
String stationSsid;
String stationPassword;

bool cooldownActive() {
  return lastTriggerMs != 0 && (uint32_t)(millis() - lastTriggerMs) < COOLDOWN_MS;
}

String statusJson() {
  String json = "{\"ready\":" + String(playerReady ? "true" : "false");
  json += ",\"cooldown\":" + String(cooldownActive() ? "true" : "false");
  json += ",\"cooldown_remaining_seconds\":";
  if (cooldownActive()) {
    json += String((COOLDOWN_MS - (millis() - lastTriggerMs) + 999UL) / 1000UL);
  } else {
    json += "0";
  }
  json += ",\"ip\":\"" + WiFi.localIP().toString() + "\"}";
  return json;
}

bool playDeterrent(const char *source) {
  if (!playerReady) {
    server.send(503, "application/json", "{\"accepted\":false,\"reason\":\"audio_player_not_ready\"}");
    return false;
  }
  if (cooldownActive()) {
    server.send(429, "application/json", "{\"accepted\":false,\"reason\":\"cooldown_active\"}");
    return false;
  }

  uint8_t track = random(FIRST_TRACK, LAST_TRACK + 1);
  player.playMp3Folder(track);
  lastTriggerMs = millis();
  Serial.printf("Triggered by %s; playing /mp3/%04u.mp3\n", source, track);
  return true;
}

void handleTrigger() {
  String suppliedKey = server.hasArg("key") ? server.arg("key") : "";
  if (suppliedKey != TRIGGER_KEY) {
    server.send(403, "application/json", "{\"accepted\":false,\"reason\":\"invalid_key\"}");
    return;
  }
  if (playDeterrent("network")) {
    server.send(202, "application/json", "{\"accepted\":true,\"cooldown_seconds\":60}");
  }
}

void handleStatus() {
  server.send(200, "application/json", statusJson());
}

void handleSetupForm() {
  const char page[] =
      "<!doctype html><html><body><h2>Garden deterrent Wi-Fi setup</h2>"
      "<p>This setup page is local to the device and never uses the internet.</p>"
      "<form method='POST' action='/save'><label>Garden Wi-Fi name <input name='ssid' required></label><br>"
      "<label>Garden Wi-Fi password <input type='password' name='password' required></label><br>"
      "<button type='submit'>Save and restart</button></form></body></html>";
  server.send(200, "text/html", page);
}

void handleSaveWifi() {
  if (!server.hasArg("ssid") || !server.hasArg("password") || server.arg("ssid").length() == 0) {
    server.send(400, "text/plain", "Wi-Fi name and password are required.");
    return;
  }
  preferences.begin("deterrent", false);
  preferences.putString("ssid", server.arg("ssid"));
  preferences.putString("password", server.arg("password"));
  preferences.end();
  server.send(200, "text/html", "Saved. The device will restart now and join the local garden Wi-Fi.");
  delay(1000);
  ESP.restart();
}

void startSetupAccessPoint() {
  WiFi.mode(WIFI_AP);
  WiFi.softAP(SETUP_AP_NAME, SETUP_AP_PASSWORD);
  server.on("/", HTTP_GET, handleSetupForm);
  server.on("/save", HTTP_POST, handleSaveWifi);
  server.on("/status", HTTP_GET, handleStatus);
  server.begin();
  Serial.print("Setup hotspot IP: ");
  Serial.println(WiFi.softAPIP());
}

bool connectToLocalWifi() {
  WiFi.mode(WIFI_STA);
  WiFi.setHostname("monkey-deterrent");
  WiFi.begin(stationSsid.c_str(), stationPassword.c_str());
  Serial.print("Connecting to saved local Wi-Fi");
  uint32_t started = millis();
  while (WiFi.status() != WL_CONNECTED && millis() - started < 20000UL) {
    delay(250);
    Serial.print('.');
  }
  Serial.println();
  return WiFi.status() == WL_CONNECTED;
}

void setupNetwork() {
  preferences.begin("deterrent", true);
  stationSsid = preferences.getString("ssid", "");
  stationPassword = preferences.getString("password", "");
  preferences.end();

  if (stationSsid.length() == 0 || !connectToLocalWifi()) {
    Serial.println("No usable saved Wi-Fi; starting local setup hotspot.");
    startSetupAccessPoint();
    return;
  }

  if (MDNS.begin("monkey-deterrent")) {
    MDNS.addService("http", "tcp", 80);
  }
  server.on("/", HTTP_GET, []() {
    server.send(200, "text/plain", "Garden deterrent is online. POST /trigger with key=...; GET /status.");
  });
  server.on("/trigger", HTTP_POST, handleTrigger);
  server.on("/status", HTTP_GET, handleStatus);
  server.begin();
  Serial.print("Local network IP: ");
  Serial.println(WiFi.localIP());
}

void setup() {
  Serial.begin(115200);
  pinMode(TEST_BUTTON_PIN, INPUT_PULLUP);
  randomSeed(esp_random());

  dfSerial.begin(9600, SERIAL_8N1, DFPLAYER_RX_PIN, DFPLAYER_TX_PIN);
  if (player.begin(dfSerial, true, true)) {
    playerReady = true;
    player.volume(PLAYBACK_VOLUME);
    Serial.println("DFPlayer ready.");
  } else {
    Serial.println("DFPlayer not found; check its 5 V power, microSD card, and UART wires.");
  }
  setupNetwork();
}

void loop() {
  server.handleClient();

  bool pressed = digitalRead(TEST_BUTTON_PIN) == LOW;
  if (pressed && !wasButtonPressed) {
    if (playerReady && !cooldownActive()) {
      uint8_t track = random(FIRST_TRACK, LAST_TRACK + 1);
      player.playMp3Folder(track);
      lastTriggerMs = millis();
      Serial.printf("Manual test; playing /mp3/%04u.mp3\n", track);
    }
  }
  wasButtonPressed = pressed;
  delay(10);
}
Remix this project
Make it yours in one click
Open a full copy of this project in your own Schematik workspace — diagram, code, parts, and assembly steps included. Swap the sensor, add features, or redesign the whole thing with AI. The author's original stays untouched.