Community project
WiFi Three-Servo Control
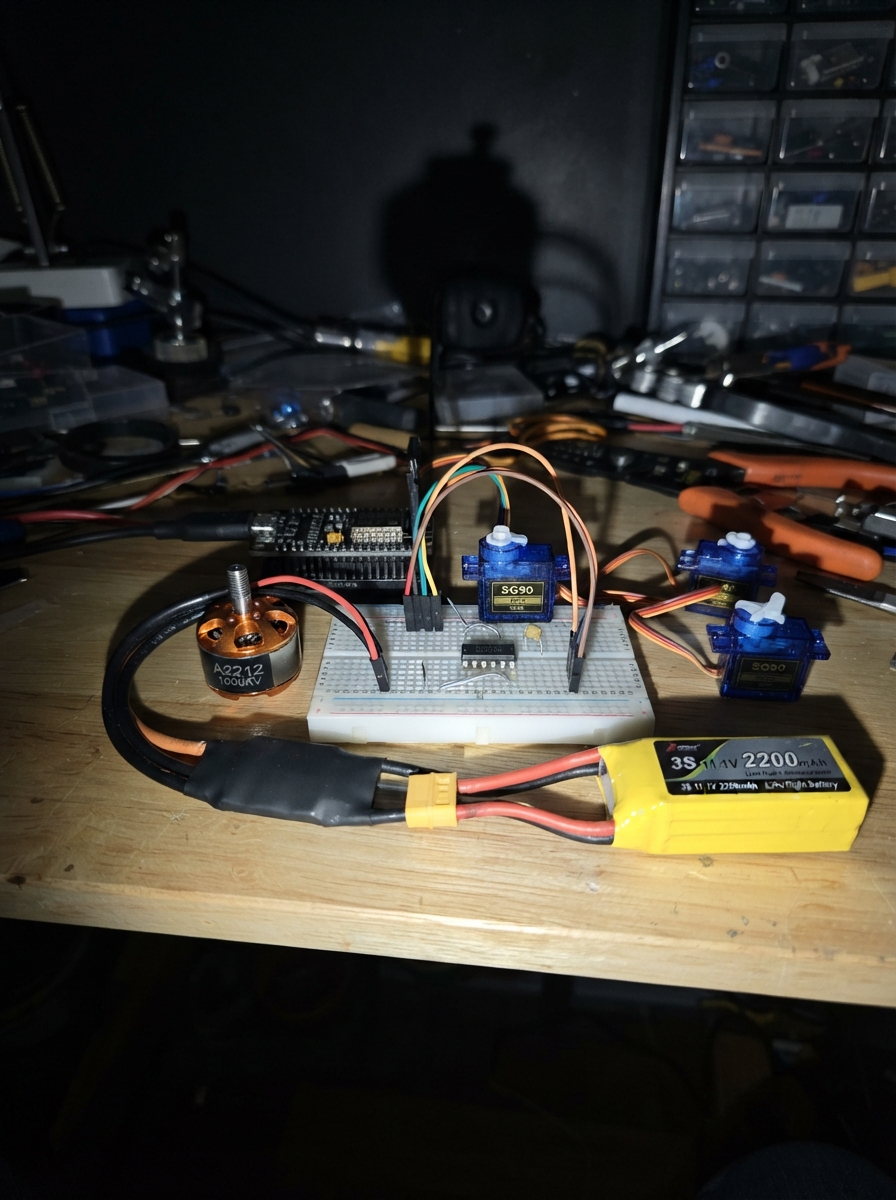
This project uses an ESP32 microcontroller to wirelessly control a brushless motor and three servos over WiFi. The system combines a 3S LiPo battery, a 30 A brushless ESC, an A2212 motor, three SG90 servos, and a 74HCT125 buffer chip to safely manage power distribution and signal integrity during bench testing.
The guide provides a complete wiring diagram, parts list, and step-by-step assembly instructions for building a WiFi-controlled test platform. Firmware with a web-based control interface lets you arm the motor, adjust throttle, and move each servo independently from a phone or computer browser. The setup includes safety features like command timeouts and bench-test throttle limits.
Wiring diagram

Gather all the parts
Assemble it in 6 steps
1. Prepare a propeller-free test area
Remove the propeller from the A2212 brushless motor before connecting the battery. Clamp the motor firmly to a wood block or test stand and keep the ESP32, battery, and wires away from the spinning motor shaft.
- Do every first test without a propeller. The bare motor is enough to confirm that the controller and speed control work.
- A brushless motor with a propeller can cut skin, pull in loose wires, and damage property if it starts unexpectedly.
2. Connect the battery, speed controller, and motor
With the battery unplugged, connect the battery positive lead to ESC BAT+ (power) and the battery negative lead to ESC BAT− (ground). Connect the ESC’s three motor wires to the motor’s three phase wires: MOTOR A to PHASE A, MOTOR B to PHASE B, and MOTOR C to PHASE C (motor drive).
- If the bare motor later spins in the unwanted direction, unplug the battery and swap any two of the three motor phase connections.
- Never connect or disconnect the LiPo battery while the propeller is fitted. A 3-cell LiPo can supply enough current to melt thin wires if its leads are shorted.
3. Connect the 5 V power and shared ground
Use the ESC’s 5 V BEC lead as the project supply: connect BEC 5V to the ESP32 VIN or 5V pin (power), all three servo red VCC leads (power), and the 74HCT125 VCC pin (power). Connect ESC BEC GND to an ESP32 GND pin, all three servo brown or black GND leads, and the 74HCT125 GND pin (ground).
- All the ground wires must meet on the same ground rail so every control signal has a shared reference.
- Do not connect the old 5 V USB-C adapter to the servo power rail at the same time as the ESC BEC. Two power supplies tied together can overheat or fail.
4. Wire the 5 V control-signal buffer
Place the SN74HCT125N across the breadboard centre gap, with its notch facing up. Connect GPIO25 to A1 (servo 1 signal), GPIO26 to A2 (servo 2 signal), GPIO27 to A3 (servo 3 signal), and GPIO32 to A4 (motor throttle signal). Connect Y1 to servo 1 orange/yellow SIGNAL, Y2 to servo 2 orange/yellow SIGNAL, Y3 to servo 3 orange/yellow SIGNAL, and Y4 to ESC PWM IN (control). Connect each OE1, OE2, OE3, and OE4 pin to GND (turns each buffer output on).
- The 74HCT125 is the small chip that changes the ESP32’s 3.3 V control pulses into dependable 5 V pulses.
- Check the chip’s notch and pin numbers carefully. Putting 5 V into an ESP32 GPIO pin can permanently damage the ESP32.
5. Add the buffer chip’s small capacitor
Put the 0.1 µF ceramic capacitor directly beside the 74HCT125: connect one lead to its 5 V supply row (power) and the other lead to the ground row (ground). Ceramic capacitors have no positive or negative side.
- Keep this capacitor’s leads short; it helps the signal-buffer chip stay stable when the servos and motor controller make electrical noise.
- Do not substitute a polarized capacitor unless you know its polarity; a reversed polarized capacitor can fail.
6. Connect the phone controller
Plug the ESP32 into USB only for flashing, then use the assembled ESC BEC and battery to power the circuit for the motor test. On the Android phone, join the Wi-Fi network ESP32-UAV-Control using password uavcontrol. Open 192.168.4.1 in the phone browser. Centre the three servos, then only with the propeller still removed, press ARM MOTOR and move the throttle slider gently.
- The page automatically stops and disarms the motor if it stops receiving throttle updates for about one second. Use STOP MOTOR NOW before touching wiring.
- The phone page is a bench controller, not a safe flight controller. Do not attempt to fly an aircraft with this Wi-Fi link or without a real flight controller, radio receiver, inertial sensor, and independent failsafe.
Review all connections
1. Connections between "servo_1" and "ESP32"
2. Connections between "servo_2" and "ESP32"
3. Connections between "servo_3" and "ESP32"
4. Connections between "battery_3s" and "ESP32"
5. Connections between "esc_1" and "ESP32"
6. Connections between "level_buffer_1" and "ESP32"
7. Connections between "decoupling_cap_1" and "ESP32"
Deploy the firmware
#include <Arduino.h>
#include <WiFi.h>
#include <WebServer.h>
#include <ESP32Servo.h>


// Forward declarations
function moveServo(n,a);
function armMotor();
function stopMotor();
function setThrottle(v);
function centerAll();
void stopMotor();
void handleServo();
void handleArm();
void handleThrottle();

constexpr int SERVO_1_PIN = 25;
constexpr int SERVO_2_PIN = 26;
constexpr int SERVO_3_PIN = 27;
constexpr int THROTTLE_PIN = 32;
constexpr int ESC_STOP_US = 1000;
constexpr int ESC_MAX_US = 1800;       // Bench-test limit: do not change for an aircraft.
constexpr unsigned long COMMAND_TIMEOUT_MS = 1000;

const char *AP_NAME = "ESP32-UAV-Control";
const char *AP_PASSWORD = "uavcontrol";

WebServer server(80);
Servo servos[3];
Servo esc;
const int servoPins[3] = {SERVO_1_PIN, SERVO_2_PIN, SERVO_3_PIN};
int servoAngles[3] = {90, 90, 90};
int throttlePercent = 0;
bool motorArmed = false;
unsigned long lastThrottleCommandMs = 0;

const char PAGE[] PROGMEM = R"rawliteral(
<!doctype html><html lang="en"><head>
<meta name="viewport" content="width=device-width,initial-scale=1"><title>UAV Bench Controller</title>
<style>
body{margin:0;background:#101827;color:#f8fafc;font-family:Arial,sans-serif}main{max-width:540px;margin:auto;padding:18px}h1{font-size:1.5rem}p{color:#cbd5e1;line-height:1.4}.card{background:#1e293b;border-radius:14px;padding:16px;margin:13px 0}.row{display:flex;justify-content:space-between;font-weight:bold}input{width:100%;margin-top:15px;accent-color:#38bdf8}.value{color:#38bdf8}button{width:100%;padding:14px;margin-top:10px;border:0;border-radius:10px;font-weight:bold;font-size:1rem}.arm{background:#fbbf24;color:#422006}.stop{background:#ef4444;color:white}.center{background:#38bdf8;color:#082f49}.state{font-weight:bold}.notice{border-left:4px solid #fbbf24;padding-left:12px}
</style></head><body><main>
<h1>UAV bench controller</h1><p class="notice">Remove the propeller before powering this controller. Wi-Fi control is for a restrained bench rig only, not flight.</p>
<div class="card"><div class="row"><span>Motor safety</span><span id="state" class="state">DISARMED</span></div><button class="arm" onclick="armMotor()">ARM MOTOR</button><button class="stop" onclick="stopMotor()">STOP MOTOR NOW</button></div>
<div class="card"><div class="row"><span>Brushless motor throttle</span><span id="tv" class="value">0%</span></div><input id="throttle" type="range" min="0" max="100" value="0" disabled oninput="setThrottle(this.value)"></div>
<div class="card"><div class="row"><span>Servo 1</span><span id="v0" class="value">90°</span></div><input id="s0" type="range" min="0" max="180" value="90" oninput="moveServo(0,this.value)"></div>
<div class="card"><div class="row"><span>Servo 2</span><span id="v1" class="value">90°</span></div><input id="s1" type="range" min="0" max="180" value="90" oninput="moveServo(1,this.value)"></div>
<div class="card"><div class="row"><span>Servo 3</span><span id="v2" class="value">90°</span></div><input id="s2" type="range" min="0" max="180" value="90" oninput="moveServo(2,this.value)"></div>
<button class="center" onclick="centerAll()">CENTRE ALL SERVOS</button>
<script>
let servoTimer, throttleTimer;
function moveServo(n,a){document.getElementById('v'+n).textContent=a+'°';clearTimeout(servoTimer);servoTimer=setTimeout(()=>fetch('/servo?s='+n+'&a='+a),35)}
function armMotor(){fetch('/arm',{method:'POST'}).then(r=>r.text()).then(t=>{if(t==='ARMED'){document.getElementById('state').textContent='ARMED — THROTTLE AT 0%';document.getElementById('throttle').disabled=false}else alert(t)})}
function stopMotor(){fetch('/stop',{method:'POST'});document.getElementById('throttle').value=0;document.getElementById('tv').textContent='0%';document.getElementById('throttle').disabled=true;document.getElementById('state').textContent='DISARMED'}
function setThrottle(v){document.getElementById('tv').textContent=v+'%';clearTimeout(throttleTimer);throttleTimer=setTimeout(()=>fetch('/throttle?v='+v),25)}
function centerAll(){for(let i=0;i<3;i++){document.getElementById('s'+i).value=90;document.getElementById('v'+i).textContent='90°';fetch('/servo?s='+i+'&a=90')}}
</script></main></body></html>
)rawliteral";

void stopMotor() {
  throttlePercent = 0;
  motorArmed = false;
  esc.writeMicroseconds(ESC_STOP_US);
}

void handleServo() {
  if (!server.hasArg("s") || !server.hasArg("a")) { server.send(400, "text/plain", "Missing servo or angle."); return; }
  const int number = server.arg("s").toInt();
  const int angle = server.arg("a").toInt();
  if (number < 0 || number > 2 || angle < 0 || angle > 180) { server.send(400, "text/plain", "Invalid servo command."); return; }
  servoAngles[number] = angle;
  servos[number].write(angle);
  server.send(200, "text/plain", "OK");
}

void handleArm() {
  if (throttlePercent != 0) { server.send(409, "text/plain", "Set throttle to zero first."); return; }
  motorArmed = true;
  lastThrottleCommandMs = millis();
  esc.writeMicroseconds(ESC_STOP_US);
  server.send(200, "text/plain", "ARMED");
}

void handleThrottle() {
  if (!motorArmed) { server.send(403, "text/plain", "Motor is disarmed."); return; }
  if (!server.hasArg("v")) { server.send(400, "text/plain", "Missing throttle."); return; }
  const int requested = constrain(server.arg("v").toInt(), 0, 100);
  throttlePercent = requested;
  const int pulse = map(throttlePercent, 0, 100, ESC_STOP_US, ESC_MAX_US);
  esc.writeMicroseconds(pulse);
  lastThrottleCommandMs = millis();
  server.send(200, "text/plain", "OK");
}

void setup() {
  for (int i = 0; i < 3; ++i) {
    servos[i].setPeriodHertz(50);
    servos[i].attach(servoPins[i], 500, 2400);
    servos[i].write(servoAngles[i]);
  }
  esc.setPeriodHertz(50);
  esc.attach(THROTTLE_PIN, 1000, 2000);
  stopMotor();
  WiFi.mode(WIFI_AP);
  WiFi.softAP(AP_NAME, AP_PASSWORD);
  server.on("/", HTTP_GET, [](){ server.send(200, "text/html", PAGE); });
  server.on("/servo", HTTP_GET, handleServo);
  server.on("/arm", HTTP_POST, handleArm);
  server.on("/throttle", HTTP_GET, handleThrottle);
  server.on("/stop", HTTP_POST, [](){ stopMotor(); server.send(200, "text/plain", "STOPPED"); });
  server.begin();
}

void loop() {
  server.handleClient();
  if (motorArmed && millis() - lastThrottleCommandMs > COMMAND_TIMEOUT_MS) stopMotor();
}
Remix this project
Make it yours in one click
Open a full copy of this project in your own Schematik workspace — diagram, code, parts, and assembly steps included. Swap the sensor, add features, or redesign the whole thing with AI. The author's original stays untouched.