Community project
Calculadora Básica con UNO
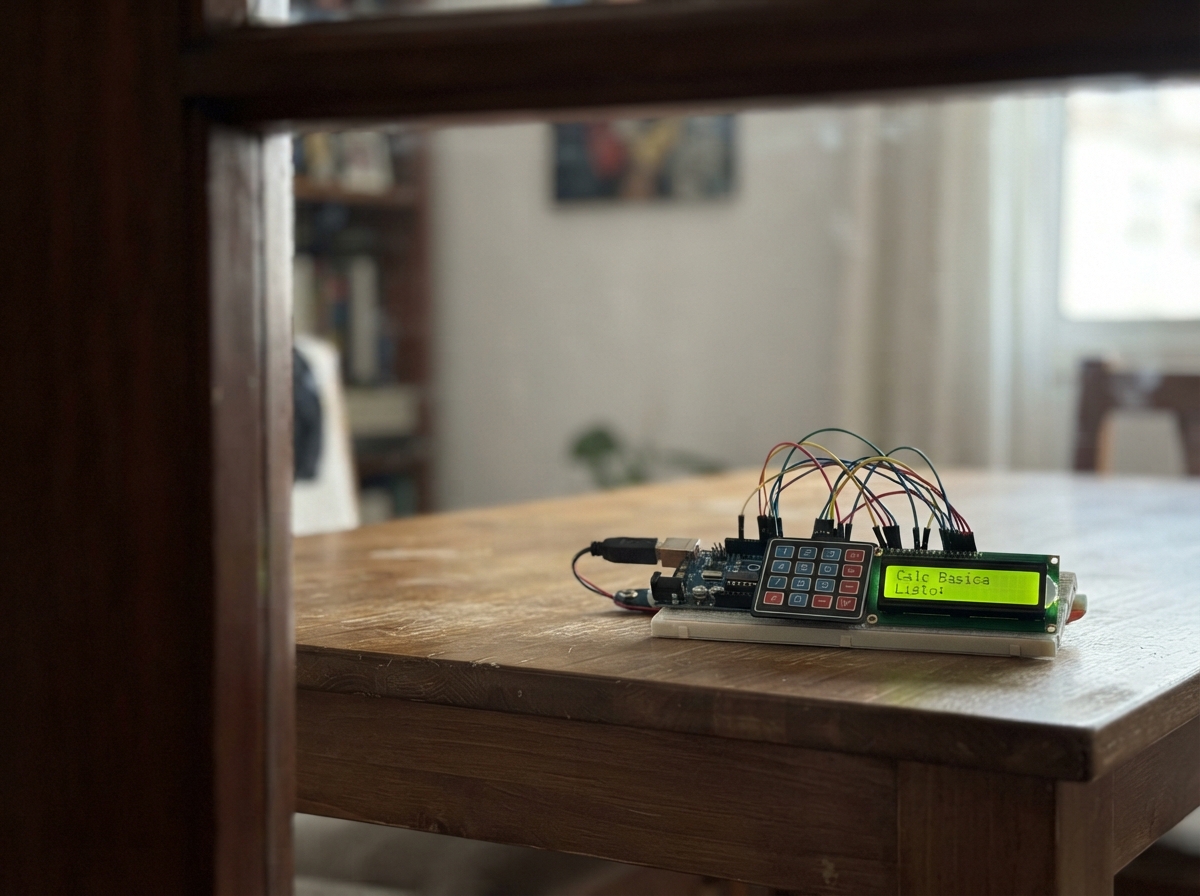
Build a basic calculator powered by an Arduino UNO that performs addition, subtraction, multiplication, and division. The 4x4 matrix keypad provides number and operator input, while the 16x2 LCD display shows the current expression and results in real time.
This guide includes a complete wiring diagram, parts list, and ready-to-upload firmware. Follow the assembly steps to connect the keypad and I2C LCD display, then test your calculator with simple arithmetic operations. The C button clears entries and the = button computes results.
Wiring diagram

Gather all the parts
Assemble it in 4 steps
1. Coloca la placa y los módulos
Deja la Arduino Uno sin alimentación sobre una mesa. Pon el teclado de membrana 4×4 y la pantalla LCD 16×2 con adaptador I2C a su lado, con los nombres de sus pines visibles.
- Usa cables macho-hembra para el teclado si su cinta termina en un conector hembra; para la pantalla, usa cables que coincidan con su conector.
- No conectes ni quites cables mientras la placa esté alimentada por USB; un cable puesto en el lugar equivocado puede causar un cortocircuito.
2. Conecta el teclado
Conecta los ocho pines del teclado, en el orden impreso en su conector: R1 → D2 (fila 1), R2 → D3 (fila 2), R3 → D4 (fila 3), R4 → D5 (fila 4), C1 → D6 (columna 1), C2 → D7 (columna 2), C3 → D8 (columna 3) y C4 → D9 (columna 4).
- Sigue el orden de etiquetas R1, R2, R3, R4, C1, C2, C3 y C4; en muchos teclados la cinta está etiquetada por la parte trasera.
- No uses D0 ni D1: esos dos agujeros son los que la placa usa para comunicarse por USB al cargar el programa.
3. Conecta la pantalla
Conecta VCC de la pantalla al pin 5V de la UNO (alimentación), GND a un pin GND (retorno), SDA a A4 (datos) y SCL a A5 (reloj de datos).
- La pantalla puede tener los cuatro pines en distinto orden según el fabricante: lee siempre las letras impresas junto a cada pin, no su posición física.
- Asegúrate de no intercambiar VCC y GND: alimentar la pantalla al revés puede dañarla.
4. Prueba la calculadora
Conecta la UNO al ordenador con USB y usa Deploy en Schematik. En la pantalla escribe el primer número, pulsa +, -, * o /, escribe el segundo número y pulsa =. Pulsa C para borrar y empezar de nuevo.
- Por ejemplo, pulsa 1, 2, +, 3, = para ver 15. La calculadora también impide dividir entre cero.
- Si la pantalla se ilumina pero no muestra texto, ajusta lentamente el pequeño tornillo de contraste del adaptador situado detrás de la pantalla, con la placa desconectada antes de tocar el cableado.
Review all connections
1. Connections between "keypad_4x4" and "Arduino"
2. Connections between "lcd_16x2" and "Arduino"
Deploy the firmware
#include <Wire.h>
#include <Keypad.h>
#include <LiquidCrystal_I2C.h>
#include <stdlib.h>
#include <string.h>

const byte ROWS = 4;
const byte COLS = 4;

const byte ROW1_PIN = 2;
const byte ROW2_PIN = 3;
const byte ROW3_PIN = 4;
const byte ROW4_PIN = 5;
const byte COL1_PIN = 6;
const byte COL2_PIN = 7;
const byte COL3_PIN = 8;
const byte COL4_PIN = 9;
const byte LCD_SDA_PIN = A4;
const byte LCD_SCL_PIN = A5;

char keys[ROWS][COLS] = {
  {'1', '2', '3', '+'},
  {'4', '5', '6', '-'},
  {'7', '8', '9', '*'},
  {'C', '0', '=', '/'}
};

byte rowPins[ROWS] = {ROW1_PIN, ROW2_PIN, ROW3_PIN, ROW4_PIN};
byte colPins[COLS] = {COL1_PIN, COL2_PIN, COL3_PIN, COL4_PIN};

Keypad keypad = Keypad(makeKeymap(keys), rowPins, colPins, ROWS, COLS);
LiquidCrystal_I2C lcd(0x27, 16, 2);

char numberText[13] = "";
float leftValue = 0.0;
char operation = 0;
bool haveLeftValue = false;
bool showingResult = false;

void showPrompt() {
  lcd.clear();
  lcd.setCursor(0, 0);
  lcd.print("Calculadora");
  lcd.setCursor(0, 1);
  lcd.print("Escribe un numero");
}

void showExpression() {
  lcd.clear();
  lcd.setCursor(0, 0);
  if (haveLeftValue) {
    lcd.print(leftValue, 4);
    lcd.print(' ');
    lcd.print(operation);
    lcd.print(' ');
  }
  lcd.setCursor(0, 1);
  lcd.print(numberText);
}

void clearCalculator() {
  numberText[0] = '\0';
  leftValue = 0.0;
  operation = 0;
  haveLeftValue = false;
  showingResult = false;
  showPrompt();
}

bool calculate(float rightValue, float &result) {
  switch (operation) {
    case '+': result = leftValue + rightValue; return true;
    case '-': result = leftValue - rightValue; return true;
    case '*': result = leftValue * rightValue; return true;
    case '/':
      if (rightValue == 0.0) return false;
      result = leftValue / rightValue;
      return true;
  }
  return false;
}

void setup() {
  Wire.begin();
  lcd.init();
  lcd.backlight();
  showPrompt();
}

void loop() {
  char key = keypad.getKey();
  if (!key) return;

  if (key == 'C') {
    clearCalculator();
    return;
  }

  if (key >= '0' && key <= '9') {
    if (showingResult) {
      clearCalculator();
    }
    size_t length = strlen(numberText);
    if (length < sizeof(numberText) - 1) {
      numberText[length] = key;
      numberText[length + 1] = '\0';
      showExpression();
    }
    return;
  }

  if (key == '+' || key == '-' || key == '*' || key == '/') {
    if (numberText[0] == '\0') return;

    float enteredValue = atof(numberText);
    if (haveLeftValue) {
      float interimResult;
      if (!calculate(enteredValue, interimResult)) {
        lcd.clear();
        lcd.print("No dividir entre");
        lcd.setCursor(0, 1);
        lcd.print("cero. Pulsa C");
        numberText[0] = '\0';
        haveLeftValue = false;
        showingResult = true;
        return;
      }
      leftValue = interimResult;
    } else {
      leftValue = enteredValue;
      haveLeftValue = true;
    }

    operation = key;
    numberText[0] = '\0';
    showingResult = false;
    showExpression();
    return;
  }

  if (key == '=' && haveLeftValue && numberText[0] != '\0') {
    float result;
    float rightValue = atof(numberText);
    if (!calculate(rightValue, result)) {
      lcd.clear();
      lcd.print("No dividir entre");
      lcd.setCursor(0, 1);
      lcd.print("cero. Pulsa C");
      numberText[0] = '\0';
      haveLeftValue = false;
      showingResult = true;
      return;
    }

    lcd.clear();
    lcd.setCursor(0, 0);
    lcd.print("Resultado:");
    lcd.setCursor(0, 1);
    lcd.print(result, 4);

    leftValue = result;
    numberText[0] = '\0';
    haveLeftValue = false;
    operation = 0;
    showingResult = true;
  }
}
Remix this project
Make it yours in one click
Open a full copy of this project in your own Schematik workspace — diagram, code, parts, and assembly steps included. Swap the sensor, add features, or redesign the whole thing with AI. The author's original stays untouched.