Community project
ESP32 AI Driven Thermal Printer
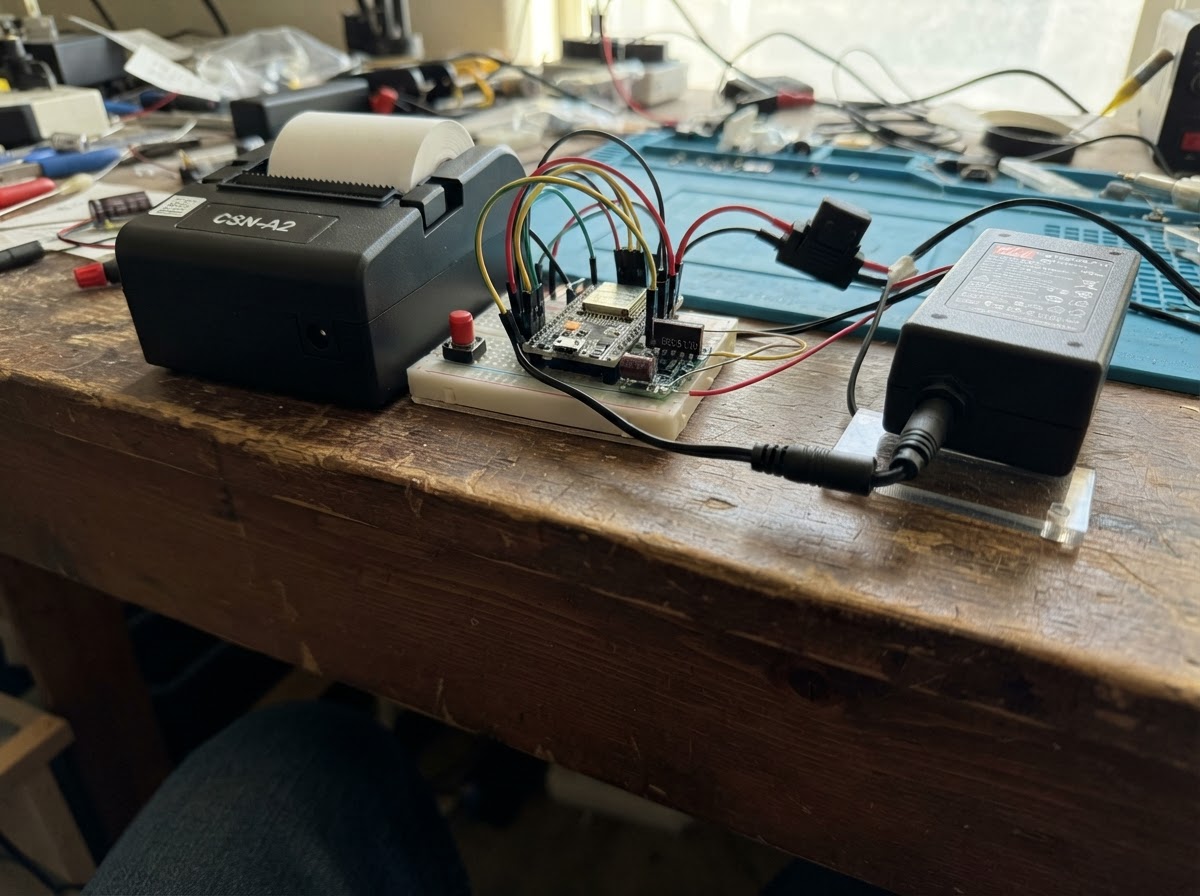
This project builds a networked thermal printer controlled by an ESP32 microcontroller and AI-driven print jobs delivered over MQTT. The printer receives formatted commands including text, QR codes, and bitmap images from a remote broker, making it suitable for label printing, receipt generation, and automated documentation in IoT applications.
The guide provides a complete wiring diagram, parts list, and step-by-step assembly instructions for integrating the CSN-A2 thermal printer with safe power delivery, logic level conversion, and diagnostic capabilities. Firmware is included with WiFi and MQTT connectivity, allowing the device to subscribe to print jobs and acknowledge completion. A push button enables local testing and diagnostics without network access.
Wiring diagram

Gather all the parts
Assemble it in 8 steps
1. Fit the female power socket
Cut the enclosure hole for the 5.5 × 2.1 mm female DC input jack and secure the jack so the adapter plug inserts from outside. Connect the adapter’s centre-positive barrel plug to the jack’s CENTER+ contact (power), and connect the outer barrel to the jack’s SHELL− contact (ground).
- Before soldering, use the jack’s markings or a continuity meter to identify the centre and outer contacts; switch contacts on three-terminal jacks are not used.
- Use a jack rated for at least 5 A. A smaller 2 A socket can overheat during printing even though the adapter itself is safe.
2. Add the fuse after the input jack
With the adapter unplugged, connect the DC jack CENTER+ contact to the fuse holder IN+ terminal (power). Connect the fuse holder OUT+ terminal to the protected 5 V distribution point (power). Connect the DC jack SHELL− contact directly to the common ground point (ground); do not put the fuse in this ground wire.
- Put the fuse holder where it can be reached after the case is closed and label the wire leaving it “protected 5 V.”
- Do not open the desktop adapter or bring wall-voltage wiring inside the enclosure; only its 5 V barrel-plug output connects to Paperbridge.
3. Mount the printer and load paper
Fix the 58 mm thermal printer inside a ventilated plastic enclosure with its paper slot facing outward. Load the paper roll so it feeds from under the roll and out through the slot. Leave room to change paper without pulling its wires.
- If a test slip is blank, turn the thermal-paper roll over before changing any wiring.
- Keep fingers, loose sleeves, and cables out of the moving paper path and cutter area, if your printer version has a cutter.
4. Mount the XIAO board
Screw or tape the Seeed XIAO ESP32-C3 to insulated plastic standoffs behind or beside the printer. Keep its small antenna end clear of the printer motor, print head, metal brackets, capacitor, and thick 5 V wires; place that end close to a plastic enclosure wall. Leave its USB-C connector reachable through a small service opening.
- The XIAO is the small board with a USB-C socket; keep its antenna end uncovered so it can receive Wi-Fi reliably.
- Do not power the XIAO through USB-C while the separate 5 V printer supply is connected; two competing 5 V sources can damage equipment.
5. Wire the protected printer power
Run short thicker wires from protected 5 V to printer VH (power). Connect printer POWER GND and TTL GND to the common ground point (ground). Place the capacitor close to the printer: capacitor + to protected 5 V (power), capacitor − to common ground (ground). Connect the XIAO 5V/VBUS pin to protected 5 V (power) and its GND pin to common ground (ground).
- Use roughly 22 AWG stranded wire for the printer power pair; the printer takes short strong current pulses while printing.
- Make sure the capacitor’s striped negative side goes to ground — reversing it can make it hot or burst. Do not route printer current through the XIAO’s 3.3 V regulator.
6. Wire the safe printer command line
Connect level shifter LV to the XIAO 3V3 pin (power), HV to protected 5 V (power), and GND to common ground (ground). Connect XIAO D5 / GPIO7 to level shifter LV2 (data), then level shifter HV2 to printer RX, the TTL-side receive pin (data). Leave printer TX disconnected; Paperbridge does not use printer status messages in this revision.
- Keep the small serial wires away from the printer’s thicker power pair. LV is the 3.3 V side of the level shifter and HV is the 5 V side.
- Do not connect the printer’s 5 V TX output directly to a XIAO pin; that can damage the 3.3 V controller.
7. Add the diagnostic button
Connect one TEST button terminal to XIAO D1 / GPIO3 (signal) and the other terminal to common ground (ground). Mount it through the enclosure and label it “TEST.” The firmware uses its internal pull-up resistor, so no separate resistor is needed.
- If the button has four legs, choose one leg from each opposite side; two legs on the same side are already joined.
- Keep the button wires away from the printer’s 5 V terminals so a loose wire cannot cause a short.
8. Inspect and perform the first print test
Before closing the enclosure, confirm that the DC jack SHELL−, XIAO GND, printer grounds, capacitor negative, level-shifter GND, and button ground all join at the common ground point. Inspect that no bare positive wire can touch ground. With the external 5 V supply disconnected, connect the XIAO by USB-C and press Deploy. Disconnect USB-C, plug the wall adapter into the new female DC jack, then press TEST once. It should print Wi-Fi and inbox status.
- If the board restarts while printing, unplug it and recheck the separate printer 5 V wires, capacitor polarity, ground joins, and adapter current rating.
- Unplug the adapter before moving wires. Do not leave an open unit powered unattended; close it in a non-flammable ventilated enclosure before continuous use.
Review all connections
1. Connections between "dc_fuse" and "ESP32"
2. Connections between "printer" and "ESP32"
3. Connections between "level_shifter" and "ESP32"
4. Connections between "diagnostic_button" and "ESP32"
5. Connections between "reservoir_capacitor" and "ESP32"
6. Connections between "power_adapter" and "ESP32"
7. Connections between "dc_input_jack" and "ESP32"
Deploy the firmware
#include <Arduino.h>
#include <WiFi.h>
#include <WiFiClientSecure.h>
#include <PubSubClient.h>
#include <ArduinoJson.h>
#include <Adafruit_Thermal.h>
#include <qrcode.h>
#include <Preferences.h>

// Provision these six values from the Paperbridge setup page before Deploy.
// Use a unique per-device topic and a least-privilege broker account.

// Forward declarations
void printHeader(const char *title);
void printDiagnostic();
bool alreadyPrinted(const char *jobId);
void printQr(const char *text);
int hexNibble(char c);
bool printHexBitmap(JsonObject job);
void publishAck(const char *jobId, const char *status);
void handleJob(char *payload, unsigned int length);
void mqttCallback(char *topic, byte *payload, unsigned int length);
void connectWifi();
void connectMqtt();

static const char *WIFI_SSID = "CHANGE_ME";
static const char *WIFI_PASSWORD = "CHANGE_ME";
static const char *MQTT_HOST = "CHANGE_ME";
static const uint16_t MQTT_PORT = 8883;
static const char *MQTT_USER = "paperbridge-device";
static const char *MQTT_PASSWORD = "CHANGE_ME";
static const char *DEVICE_ID = "paperbridge-01";
static const char *JOB_TOPIC = "paperbridge/paperbridge-01/jobs";
static const char *ACK_TOPIC = "paperbridge/paperbridge-01/ack";

// Seeed XIAO ESP32-C3: D5/GPIO7 is UART1 TX to the printer;
// D1/GPIO3 is the TEST button. GPIO18/19 remain dedicated to USB-C.
static const int PRINTER_TX_PIN = 7;
static const int DIAGNOSTIC_BUTTON_PIN = 3;
static const uint32_t PRINTER_BAUD = 19200;

HardwareSerial printerSerial(1);
Adafruit_Thermal printer(&printerSerial);
WiFiClientSecure tlsClient;
PubSubClient mqtt(tlsClient);
Preferences preferences;
uint32_t lastWifiAttempt = 0;
uint32_t lastMqttAttempt = 0;
bool lastButtonReading = HIGH;
bool stableButtonState = HIGH;
uint32_t lastButtonChange = 0;

void printHeader(const char *title) {
  printer.wake();
  printer.setDefault();
  printer.justify('C');
  printer.boldOn();
  printer.doubleHeightOn();
  printer.println(title);
  printer.doubleHeightOff();
  printer.boldOff();
  printer.justify('L');
}

void printDiagnostic() {
  printHeader("Paperbridge test");
  printer.print("Device: "); printer.println(DEVICE_ID);
  printer.print("Wi-Fi: "); printer.println(WiFi.status() == WL_CONNECTED ? "connected" : "not connected");
  if (WiFi.status() == WL_CONNECTED) {
    printer.print("IP: "); printer.println(WiFi.localIP());
    printer.print("Signal: "); printer.print(WiFi.RSSI()); printer.println(" dBm");
  }
  printer.print("Inbox: "); printer.println(mqtt.connected() ? "connected" : "reconnecting");
  printer.println("Remote jobs print automatically.");
  printer.feed(3);
  printer.sleep();
}

bool alreadyPrinted(const char *jobId) {
  return strlen(jobId) > 0 && preferences.getString("lastJob", "") == jobId;
}

void printQr(const char *text) {
  const uint8_t version = 6;
  QRCode qr;
  uint8_t *qrBuffer = (uint8_t *)malloc(qrcode_getBufferSize(version));
  if (!qrBuffer) { printer.println("QR memory error"); return; }
  qrcode_initText(&qr, qrBuffer, version, ECC_LOW, text);
  const int scale = 3, quiet = 4;
  const int width = (qr.size + quiet * 2) * scale;
  const int bytesPerRow = (width + 7) / 8;
  uint8_t *bitmap = (uint8_t *)calloc(bytesPerRow * width, 1);
  if (!bitmap) { free(qrBuffer); printer.println("QR bitmap error"); return; }
  for (int y = 0; y < width; y++) for (int x = 0; x < width; x++) {
    int mx = x / scale - quiet, my = y / scale - quiet;
    bool black = mx >= 0 && my >= 0 && mx < qr.size && my < qr.size && qrcode_getModule(&qr, mx, my);
    if (black) bitmap[y * bytesPerRow + x / 8] |= (0x80 >> (x & 7));
  }
  printer.justify('C');
  printer.printBitmap(width, width, bitmap, false);
  printer.justify('L');
  free(bitmap); free(qrBuffer);
}

int hexNibble(char c) {
  if (c >= '0' && c <= '9') return c - '0';
  if (c >= 'a' && c <= 'f') return c - 'a' + 10;
  if (c >= 'A' && c <= 'F') return c - 'A' + 10;
  return -1;
}

bool printHexBitmap(JsonObject job) {
  int width = job["width"] | 0, height = job["height"] | 0;
  const char *hex = job["imageBits"] | "";
  if (width < 8 || width > 384 || height < 1 || height > 384 || (width % 8) != 0) return false;
  size_t bytes = (size_t)(width / 8) * height;
  if (strlen(hex) != bytes * 2) return false;
  uint8_t *bitmap = (uint8_t *)malloc(bytes);
  if (!bitmap) return false;
  for (size_t i = 0; i < bytes; i++) {
    int high = hexNibble(hex[i * 2]), low = hexNibble(hex[i * 2 + 1]);
    if (high < 0 || low < 0) { free(bitmap); return false; }
    bitmap[i] = (high << 4) | low;
  }
  printer.justify('C'); printer.printBitmap(width, height, bitmap, false); printer.justify('L');
  free(bitmap);
  return true;
}

void publishAck(const char *jobId, const char *status) {
  StaticJsonDocument<256> ack;
  ack["id"] = jobId; ack["status"] = status; ack["device"] = DEVICE_ID;
  ack["uptimeSeconds"] = millis() / 1000;
  char payload[256];
  size_t n = serializeJson(ack, payload, sizeof(payload));
  mqtt.publish(ACK_TOPIC, payload, n, false);
}

void handleJob(char *payload, unsigned int length) {
  StaticJsonDocument<6144> doc;
  if (deserializeJson(doc, payload, length)) { Serial.println("Rejected malformed job"); return; }
  JsonObject job = doc.as<JsonObject>();
  const char *id = job["id"] | "";
  const char *kind = job["kind"] | "text";
  const char *title = job["title"] | "Paperbridge";
  const char *body = job["body"] | "";
  if (strlen(id) == 0 || alreadyPrinted(id)) { if (strlen(id)) publishAck(id, "duplicate"); return; }
  printHeader(title);
  if (strcmp(kind, "text") == 0) printer.println(body);
  else if (strcmp(kind, "qr") == 0) {
    if (strlen(body) == 0 || strlen(body) > 120) printer.println("Invalid QR job");
    else { printer.println(body); printQr(body); }
  } else if (strcmp(kind, "image") == 0) {
    if (!printHexBitmap(job)) printer.println("Invalid monochrome image job");
  } else printer.println("Unsupported job type");
  printer.feed(3); printer.sleep();
  preferences.putString("lastJob", id); // record before the acknowledgement prevents a reboot duplicate
  publishAck(id, "printed");
}

void mqttCallback(char *topic, byte *payload, unsigned int length) {
  if (strcmp(topic, JOB_TOPIC) != 0) return;
  char *copy = (char *)malloc(length + 1);
  if (!copy) return;
  memcpy(copy, payload, length); copy[length] = '\0';
  handleJob(copy, length); free(copy);
}

void connectWifi() {
  if (WiFi.status() == WL_CONNECTED || millis() - lastWifiAttempt < 10000) return;
  lastWifiAttempt = millis(); WiFi.mode(WIFI_STA); WiFi.begin(WIFI_SSID, WIFI_PASSWORD);
}

void connectMqtt() {
  if (WiFi.status() != WL_CONNECTED || mqtt.connected() || millis() - lastMqttAttempt < 5000) return;
  lastMqttAttempt = millis();
  String clientId = String("Paperbridge-") + DEVICE_ID;
  if (mqtt.connect(clientId.c_str(), MQTT_USER, MQTT_PASSWORD)) {
    mqtt.subscribe(JOB_TOPIC, 1); publishAck("", "online");
  }
}

void setup() {
  Serial.begin(115200);
  pinMode(DIAGNOSTIC_BUTTON_PIN, INPUT_PULLUP);
  printerSerial.begin(PRINTER_BAUD, SERIAL_8N1, -1, PRINTER_TX_PIN);
  printer.begin(); printer.sleep();
  preferences.begin("paperbridge", false);
  // Prototype TLS transport. Production provisioning must replace this with setCACert() and the broker root CA.
  tlsClient.setInsecure();
  mqtt.setServer(MQTT_HOST, MQTT_PORT); mqtt.setCallback(mqttCallback); mqtt.setBufferSize(8192);
  connectWifi();
}

void loop() {
  connectWifi(); connectMqtt();
  if (mqtt.connected()) mqtt.loop();
  bool reading = digitalRead(DIAGNOSTIC_BUTTON_PIN);
  if (reading != lastButtonReading) lastButtonChange = millis();
  if (millis() - lastButtonChange > 40 && reading != stableButtonState) {
    stableButtonState = reading;
    if (stableButtonState == LOW) printDiagnostic();
  }
  lastButtonReading = reading;
  delay(10);
}
Remix this project
Make it yours in one click
Open a full copy of this project in your own Schematik workspace — diagram, code, parts, and assembly steps included. Swap the sensor, add features, or redesign the whole thing with AI. The author's original stays untouched.