Community project
ESP32 Temperature Monitor
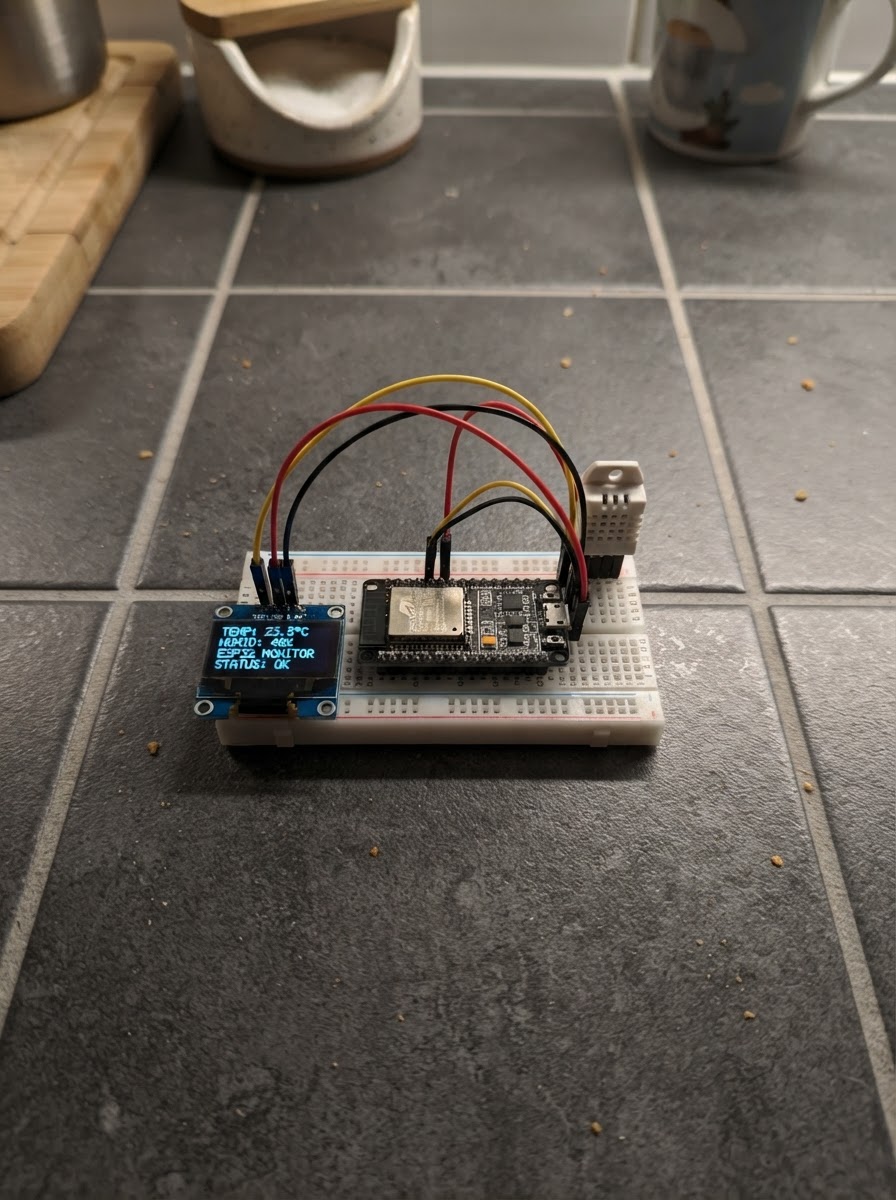
This project builds a real-time temperature and humidity monitor using an ESP32 microcontroller, DHT22 sensor, and SSD1306 OLED display. The DHT22 measures ambient conditions while the OLED screen shows live readings in both Celsius and Fahrenheit, with humidity displayed as relative percentage.
The guide provides a complete wiring diagram, parts list, and pre-written firmware ready to deploy. Assembly takes just a few minutes—connect the OLED power and I2C signal lines to the ESP32, attach the DHT22 sensor, then upload the code. Readings update every 2.5 seconds and are also logged to the serial monitor for debugging.
Wiring diagram

Gather all the parts
Assemble it in 4 steps
1. Disconnect USB before changing wiring
Unplug the ESP32 USB cable. Keep the existing DHT22 connections: VCC to 3V3, GND to GND, and DATA to GPIO 4.
- Work with the ESP32 unpowered to avoid accidental shorts.
- ESP32 GPIO and the DHT22 must use 3.3 V logic; do not connect sensor DATA to 5 V.
2. Connect OLED power
Connect the SSD1306 OLED VCC pin to the ESP32 3V3 pin and OLED GND to an ESP32 GND pin. The OLED and DHT22 share the same 3.3 V and ground rails.
- Use the labels printed on the OLED module; VCC and GND positions vary between modules.
- Power this OLED from 3.3 V, not VIN/5 V, to keep its I²C signals safely at ESP32 logic level.
3. Connect the I2C signal wires
Connect OLED SDA to ESP32 GPIO 21 and OLED SCL to ESP32 GPIO 22.
- SDA means data and SCL means clock. Keep these two wires short and do not swap them.
- Do not connect SDA or SCL to GPIO 4; GPIO 4 remains dedicated to the DHT22 data connection.
4. Power and deploy
Reconnect USB, then use Schematik’s Deploy button. The OLED shows temperature in °C and °F plus relative humidity, updating with each new DHT22 reading about every 2.5 seconds. Serial output remains available.
- Most SSD1306 modules use I2C address 0x3C, which this build uses.
- If the screen stays blank but serial readings work, disconnect USB and recheck VCC, GND, SDA/GPIO21, and SCL/GPIO22. Some visually similar OLEDs use a different controller or address.
Review all connections
1. Connections between "dht22_1" and "ESP32"
2. Connections between "oled_1" and "ESP32"
Deploy the firmware
#include <Arduino.h>
#include <Wire.h>
#include <DHT.h>
#include <Adafruit_GFX.h>
#include <Adafruit_SSD1306.h>

void showReading(float temperatureC, float humidity);
void showSensorError();

// ESP32 DevKit V1 printed pin labels: D4, D21, and D22.
constexpr uint8_t DHT_PIN = 4;
constexpr uint8_t DHT_TYPE = DHT22;
constexpr uint8_t OLED_SDA_PIN = 21;
constexpr uint8_t OLED_SCL_PIN = 22;
constexpr uint8_t OLED_ADDRESS = 0x3C;
constexpr int SCREEN_WIDTH = 128;
constexpr int SCREEN_HEIGHT = 64;
constexpr unsigned long SAMPLE_INTERVAL_MS = 2500;

DHT dht(DHT_PIN, DHT_TYPE);
Adafruit_SSD1306 display(SCREEN_WIDTH, SCREEN_HEIGHT, &Wire, -1);
unsigned long lastSampleMs = 0;
bool oledReady = false;

void showReading(float temperatureC, float humidity) {
  const float temperatureF = temperatureC * 9.0f / 5.0f + 32.0f;

  Serial.println();
  Serial.println("--- Temperature monitor ---");
  Serial.printf("Temperature: %.1f C (%.1f F)\n", temperatureC, temperatureF);
  Serial.printf("Humidity: %.1f %% RH\n", humidity);

  if (!oledReady) return;

  display.clearDisplay();
  display.setTextColor(SSD1306_WHITE);
  display.setTextSize(1);
  display.setCursor(0, 0);
  display.println("TEMPERATURE MONITOR");
  display.drawFastHLine(0, 11, SCREEN_WIDTH, SSD1306_WHITE);
  display.setTextSize(2);
  display.setCursor(0, 19);
  display.printf("%.1f C", temperatureC);
  display.setTextSize(1);
  display.setCursor(0, 43);
  display.printf("Humidity: %.1f %%", humidity);
  display.setCursor(0, 55);
  display.printf("%.1f F", temperatureF);
  display.display();
}

void showSensorError() {
  Serial.println("DHT22 read failed. Check VCC, GND, and DATA on D4 (GPIO 4).");
  if (!oledReady) return;

  display.clearDisplay();
  display.setTextColor(SSD1306_WHITE);
  display.setTextSize(1);
  display.setCursor(0, 0);
  display.println("DHT22 READ FAILED");
  display.setCursor(0, 18);
  display.println("Check wiring:");
  display.println("VCC -> 3V3");
  display.println("GND -> GND");
  display.println("DATA -> D4");
  display.display();
}

void setup() {
  Serial.begin(115200);
  delay(200);
  dht.begin();

  Wire.begin(OLED_SDA_PIN, OLED_SCL_PIN);
  oledReady = display.begin(SSD1306_SWITCHCAPVCC, OLED_ADDRESS);
  if (!oledReady) {
    Serial.println("OLED not found at I2C address 0x3C. Serial monitoring continues.");
  } else {
    display.clearDisplay();
    display.setTextColor(SSD1306_WHITE);
    display.setTextSize(1);
    display.setCursor(0, 0);
    display.println("Temperature monitor");
    display.println("Starting sensor...");
    display.display();
  }
  Serial.println("DHT22 temperature monitor started.");
}

void loop() {
  const unsigned long now = millis();
  if (now - lastSampleMs < SAMPLE_INTERVAL_MS) return;
  lastSampleMs = now;

  const float humidity = dht.readHumidity();
  const float temperatureC = dht.readTemperature();
  if (isnan(humidity) || isnan(temperatureC)) {
    showSensorError();
    return;
  }
  showReading(temperatureC, humidity);
}
Remix this project
Make it yours in one click
Open a full copy of this project in your own Schematik workspace — diagram, code, parts, and assembly steps included. Swap the sensor, add features, or redesign the whole thing with AI. The author's original stays untouched.
Related projects

Create A Complete Electrical Schematic Esp32 Sma
ESP32 · September 17, 2026Ayansh Agrawal
ESP32 Kare Ekran Projeleri
ESP32 · September 16, 2026Seref Ai
Component Qty --------------------------- ------
ESP32 · September 16, 2026Yathartha Chakrawal