Community project
IoT Balut Candling System
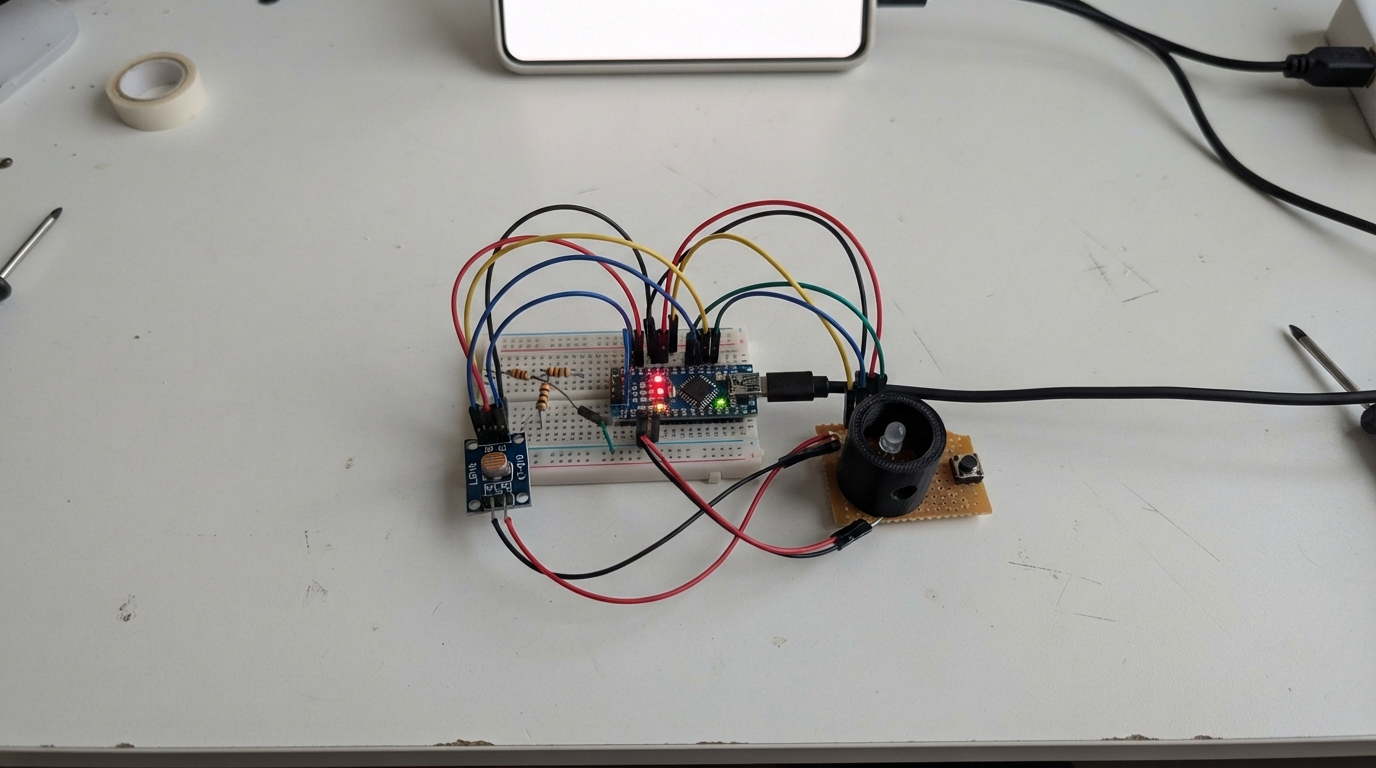
This IoT balut candling system automates egg viability assessment using light transmission analysis. The ESP32 controls a high-intensity LED that shines through each egg while an LDR photoresistor measures light penetration, classifying eggs as fertile, infertile, or spoiled based on opacity readings.
The guide provides a complete wiring diagram, parts list, and step-by-step assembly instructions for building the candling enclosure. Firmware is included with WiFi connectivity for remote monitoring via a web interface, plus a push-button trigger for manual scans and real-time classification results.
Wiring diagram

Gather all the parts
Assemble it in 5 steps
1. Place the parts in the candling enclosure
Mount the white candling LED below the egg opening and point the LDR module at the opposite side, so light has to pass through the egg before it reaches the sensor. Paint or line the inside of the enclosure black and keep outside light away from the sensor.
- Test the fit with an egg before making permanent holes. A soft dark ring around the opening helps block room light.
- Do not look directly into the bright LED at close range, and do not let the LED touch wood or plastic if it becomes hot.
2. Wire the light sensor
Connect the LDR module VCC pin to ESP32 3V3 (power), its GND pin to ESP32 GND (ground), and its AO pin to GPIO34 (light-reading signal).
- Use the pin labelled AO, not DO. The AO wire carries a changing light level to the ESP32.
- Do not connect the LDR module VCC to 5V: its AO output could then rise above the ESP32's safe 3.3 V input level.
3. Wire the candling light
Connect GPIO25 to one end of the 220 Ω resistor (LED current protection). Connect the resistor's other end to the LED anode, which is normally the longer leg (light control). Connect the LED cathode, normally the shorter leg and flat-edged side of the LED body, to ESP32 GND (ground).
- The resistor can go on either side of the LED as long as it remains in series. Keep the LED and sensor facing each other through the egg position.
- Make sure the LED long and short legs are not swapped — reversed polarity prevents it lighting, and leaving out the resistor can damage the LED or ESP32 pin.
4. Wire the Scan button
On the tactile button, use one leg from each opposite side. Connect one side to GPIO27 (scan signal) and the opposite side to ESP32 GND (ground).
- A four-leg tactile switch has two legs already joined on each side. Put it across the breadboard center gap, then use legs from opposite sides.
- Do not use two legs on the same side of the tactile switch; that makes the button appear permanently pressed.
5. Power and use the candler
Check that every GND wire meets an ESP32 GND pin, then power the ESP32 from its USB port. Place one egg over the light opening, block stray room light, and press Scan once. On a phone or computer, join Wi-Fi named Balut-Candler using password candling123, then open http://192.168.4.1 to see the latest reading and classification.
- The board measures a reference reading briefly at startup. Keep the enclosure in its normal dark, empty condition while power is first connected.
- USB power is only for the ESP32 and this small indicator-style LED. If you replace it with a high-power lamp, use a suitable transistor or MOSFET driver and separate rated power supply instead of connecting it directly to GPIO25.
Review all connections
1. Connections between "ldr_module_1" and "ESP32"
2. Connections between "led_resistor_1" and "ESP32"
3. Connections between "candling_led_1" and "ESP32"
4. Connections between "scan_button_1" and "ESP32"
Deploy the firmware
#include <Arduino.h>
#include <WiFi.h>
#include <WebServer.h>


// Forward declarations
String classifyEgg(int reading);
void takeScan();
String pageHtml();

constexpr int LDR_PIN = 34;
constexpr int CANDLING_LED_PIN = 25;
constexpr int BUTTON_PIN = 27;
constexpr float INFERTILE_THRESHOLD = 0.85f;
constexpr float FERTILE_THRESHOLD = 0.55f;
constexpr unsigned long LIGHT_STABILIZE_MS = 300;
constexpr unsigned long DEBOUNCE_MS = 300;

const char *AP_NAME = "Balut-Candler";
const char *AP_PASSWORD = "candling123";

WebServer server(80);
int baseline = 1;
int lastReading = 0;
String lastResult = "Waiting for a scan";
unsigned long lastPressMs = 0;

String classifyEgg(int reading) {
  float ratio = static_cast<float>(reading) / static_cast<float>(baseline);
  if (ratio >= INFERTILE_THRESHOLD) {
    return "Infertile";
  }
  if (ratio <= FERTILE_THRESHOLD) {
    return "Dead / Spoiled";
  }
  return "Fertile / Developing";
}

void takeScan() {
  digitalWrite(CANDLING_LED_PIN, HIGH);
  delay(LIGHT_STABILIZE_MS);
  lastReading = analogRead(LDR_PIN);
  lastResult = classifyEgg(lastReading);
  digitalWrite(CANDLING_LED_PIN, LOW);

  Serial.print("Reading: ");
  Serial.print(lastReading);
  Serial.print(" -> ");
  Serial.println(lastResult);
}

String pageHtml() {
  float ratio = static_cast<float>(lastReading) / static_cast<float>(baseline);
  String html = "<!doctype html><html><head><meta name='viewport' content='width=device-width,initial-scale=1'>";
  html += "<meta http-equiv='refresh' content='3'><style>body{font-family:Arial;background:#fff7e6;color:#3b2a1b;text-align:center;margin:30px}.card{max-width:460px;margin:auto;padding:24px;border-radius:16px;background:white;box-shadow:0 2px 12px #d8c8af}h1{color:#b45f06}.result{font-size:1.7em;font-weight:bold;color:#7f6000}p{font-size:1.05em}</style></head><body><div class='card'>";
  html += "<h1>Balut Candling System</h1><p>Latest result</p><p class='result'>" + lastResult + "</p>";
  html += "<p>Light reading: " + String(lastReading) + "</p><p>Reference reading: " + String(baseline) + "</p>";
  html += "<p>Reading ratio: " + String(ratio, 2) + "</p><p>Press the physical Scan button with one egg over the light.</p></div></body></html>";
  return html;
}

void setup() {
  Serial.begin(115200);
  pinMode(CANDLING_LED_PIN, OUTPUT);
  pinMode(BUTTON_PIN, INPUT_PULLUP);
  digitalWrite(CANDLING_LED_PIN, HIGH);
  delay(500);
  baseline = analogRead(LDR_PIN);
  if (baseline < 1) baseline = 1;
  digitalWrite(CANDLING_LED_PIN, LOW);

  Serial.print("Reference reading: ");
  Serial.println(baseline);

  WiFi.mode(WIFI_AP);
  WiFi.softAP(AP_NAME, AP_PASSWORD);
  Serial.print("Wi-Fi page: http://");
  Serial.println(WiFi.softAPIP());
  server.on("/", HTTP_GET, []() { server.send(200, "text/html", pageHtml()); });
  server.begin();
}

void loop() {
  server.handleClient();
  if (digitalRead(BUTTON_PIN) == LOW && millis() - lastPressMs >= DEBOUNCE_MS) {
    lastPressMs = millis();
    takeScan();
    while (digitalRead(BUTTON_PIN) == LOW) {
      server.handleClient();
      delay(5);
    }
  }
}
Remix this project
Make it yours in one click
Open a full copy of this project in your own Schematik workspace — diagram, code, parts, and assembly steps included. Swap the sensor, add features, or redesign the whole thing with AI. The author's original stays untouched.