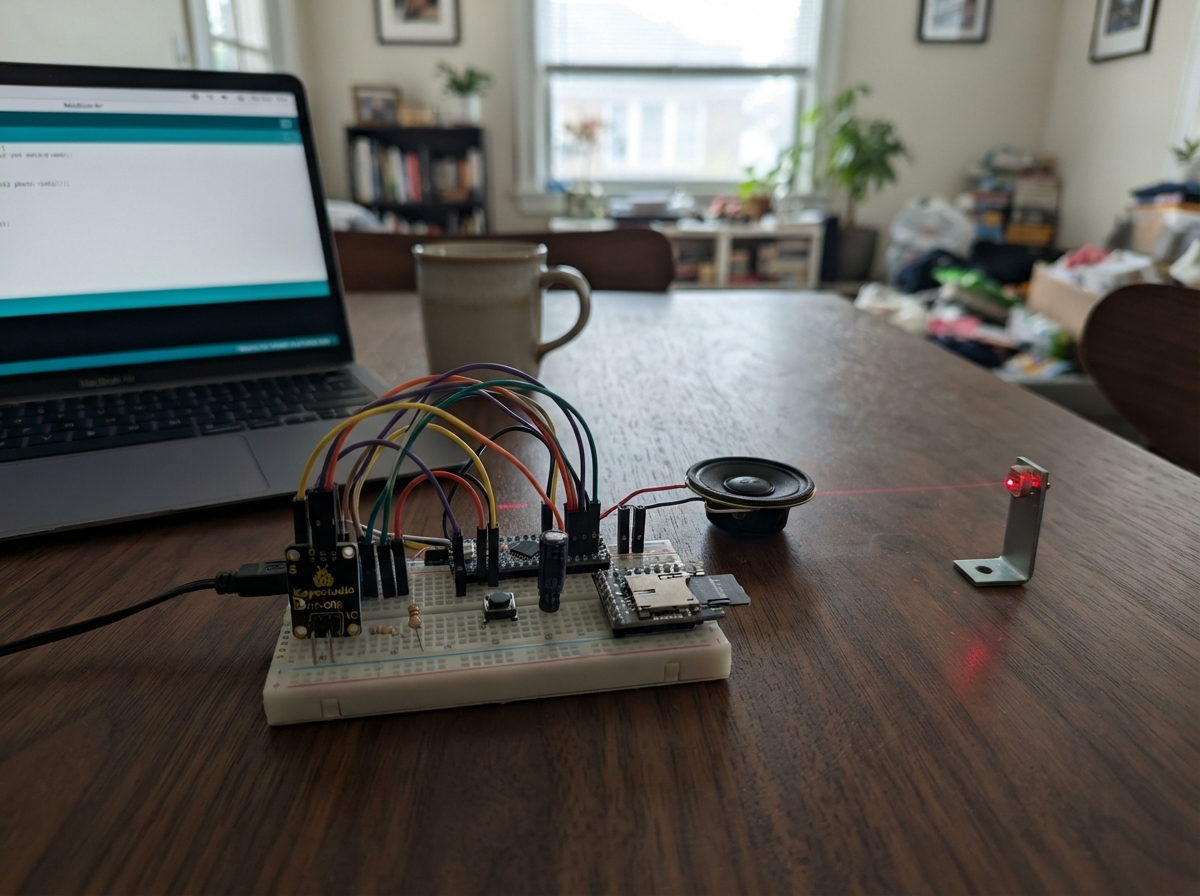
This project builds a laser-based timer that detects when a beam is broken and plays a sound signal to mark the event. Using an Arduino Uno, a laser module creates the start beam while a photoresistor detects when it's interrupted. The DFPlayer Mini audio module plays a customizable sound through an 8Ω speaker to announce the finish time.
The guide provides a complete wiring diagram, parts list, and step-by-step assembly instructions for mounting the laser safely and positioning the light detector. Firmware handles beam calibration, threshold tuning via serial commands, and audio playback, with all configuration options explained so makers can adapt the timer for races, experiments, or other timed events.
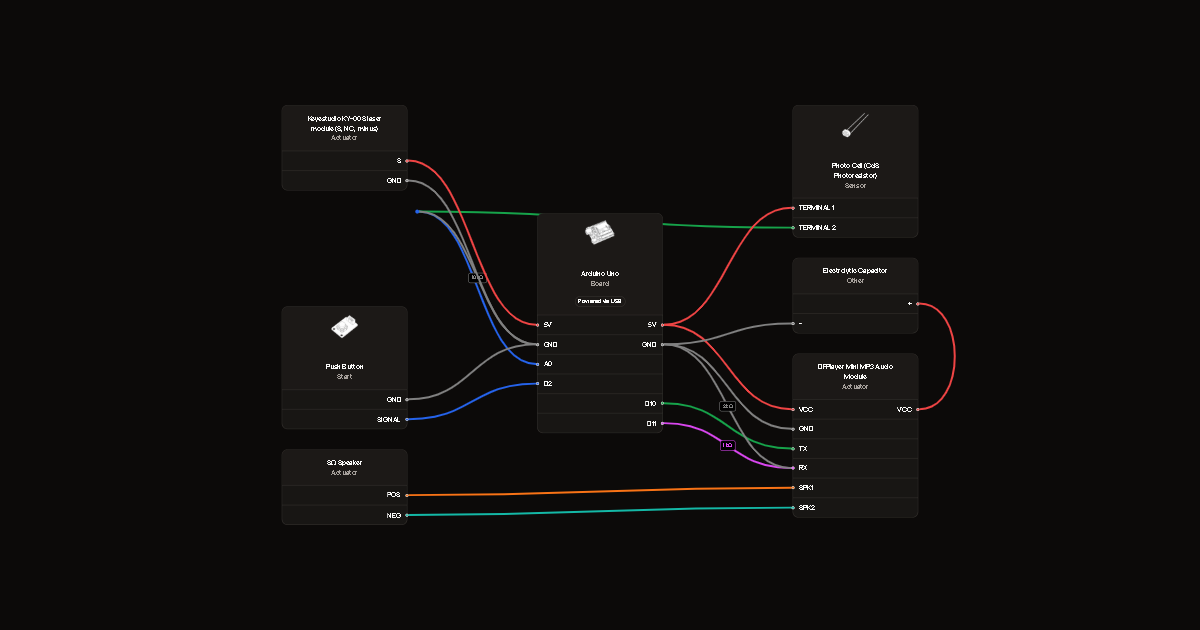
Wiring diagram
Gather all the parts
Assemble it in 5 steps
1. Build the light detector
With USB unplugged, connect one LDR leg to 5V. Connect its other leg to A0 and to the 10 kΩ resistor. Connect the other resistor leg to GND. Put the LDR inside a short dark tube to reduce room light.
2. Fit the start button
Connect the button between D2 and GND. The board uses its internal pull-up resistor. With a four-legged button, use legs on opposite switched sides.
3. Wire the sound module
Connect DFPlayer VCC to 5V and GND to GND. TX goes to D10. D11 goes through 1 kΩ to RX, with 2 kΩ from RX to GND. This reduces the 5V signal to about 3.3V. Connect the speaker only between SPK1 and SPK2. Fit the 470 µF capacitor across VCC and GND, with its stripe facing GND. Keep volume modest for USB power.
- Never connect either speaker lead to GND. Reversed capacitor polarity can damage it.
4. Prepare the starting sound
Format a microSD card up to 32 GB as FAT32. Make an mp3 folder and copy your starting sound as 0001.mp3. Insert the card into the DFPlayer with power unplugged. The card fits its built-in slot; no separate reader module is wired.
5. Mount the finish beam safely
Use the Keyestudio-style KY-008 with S as the power pin and minus as ground. Connect S directly to 5V, minus to GND, and leave the middle NC pin unused. Aim at the LDR across a short indoor lane. Fix both firmly, below eye level, with an opaque beam stop behind the LDR. The laser stays on whenever USB is connected.
- Never look into the beam or aim at people or reflective surfaces. A 5 mW laser can injure eyes. Do not use where children or spectators can enter the beam. Other KY-008 sellers can reverse pin labels; use the specified variant.
Review all connections
1. Connections between "laser" and "Arduino"
2. Connections between "ldr" and "Arduino"
3. Connections between "light_resistor" and "Arduino"
4. Connections between "start_button" and "Arduino"
5. Connections between "audio" and "Arduino"
6. Connections between "rx_top" and "Arduino"
7. Connections between "rx_bottom" and "Arduino"
8. Connections between "speaker" and "Arduino"
9. Connections between "audio_cap" and "Arduino"
Deploy the firmware
#include <Arduino.h>
#include <SoftwareSerial.h>
#include <DFRobotDFPlayerMini.h>
SoftwareSerial audioSerial(10,11);
DFRobotDFPlayerMini player;
const uint8_t BUTTON=2, LIGHT=A0;
bool running=false, calibrated=false, audioOK=false;
int darkValue=0, brightValue=1023, threshold=512, margin=20;
uint32_t started=0, lastStatus=0, changed=0;
bool previous=HIGH, stable=HIGH;
char command[48]; uint8_t used=0;
void handle(const char* c){
 if(!strcmp(c,"DARK") || !strcmp(c,"BRIGHT")){
  if(running)return;
  long sum=0; for(int i=0;i<50;i++){sum+=analogRead(LIGHT);delay(2);}
  if(!strcmp(c,"DARK")){darkValue=sum/50;Serial.println(F("CAL,DARK"));}
  else {brightValue=sum/50;calibrated=brightValue-darkValue>=80;threshold=(brightValue+darkValue)/2;Serial.println(calibrated?F("CAL,OK"):F("ERROR,Insufficient light contrast"));}
 }
 if(!strncmp(c,"SET,",4)){
  if(running){Serial.println(F("ERROR,Cancel the run before calibrating"));return;}
  int t,m; char extra;
  if(sscanf(c+4,"%d,%d%c",&t,&m,&extra)==2 && t>=1 && t<=1022 && m>=0 && m<=100 && t+m<=1023){
   threshold=t;margin=m;calibrated=true;
   Serial.print(F("CAL,MANUAL,"));Serial.print(threshold);Serial.print(',');Serial.println(margin);
  }else Serial.println(F("ERROR,Invalid threshold or margin"));
 }
 if(!strcmp(c,"RESET")){running=false;Serial.println(F("RESET"));}
}
void setup(){
 pinMode(BUTTON,INPUT_PULLUP);Serial.begin(115200);audioSerial.begin(9600);
 audioOK=player.begin(audioSerial,true,true);
 if(audioOK)player.volume(15);
 Serial.println(F("READY"));
 if(!audioOK)Serial.println(F("ERROR,Check DFPlayer and SD card; restart board"));
}
void loop(){
 while(Serial.available()){char c=Serial.read();if(c=='\n'){command[used]=0;handle(command);used=0;}else if(c!='\r' && used<sizeof(command)-1)command[used++]=c;}
 uint32_t now=millis();bool b=digitalRead(BUTTON);
 if(b!=previous){previous=b;changed=now;}
 if(now-changed>=25 && b!=stable){stable=b;if(!b && !running){
  if(!calibrated)Serial.println(F("ERROR,Calibrate first"));
  else if(!audioOK)Serial.println(F("ERROR,Audio unavailable"));
  else if(analogRead(LIGHT)<threshold+margin)Serial.println(F("ERROR,Beam blocked or misaligned"));
  else {started=micros();running=true;Serial.println(F("START"));player.playMp3Folder(1);}
 }}
 if(running && micros()-started>=3600000000UL){running=false;Serial.println(F("ERROR,Run exceeded one hour; cancelled"));}
 if(running && analogRead(LIGHT)<threshold){uint32_t elapsed=micros()-started;running=false;Serial.print(F("STOP_US,"));Serial.println(elapsed);}
 if(millis()-lastStatus>=100){lastStatus=millis();Serial.print(F("LIGHT,"));Serial.print(analogRead(LIGHT));Serial.print(',');Serial.print(threshold);Serial.print(',');Serial.println(margin);if(running){Serial.print(F("TIME_US,"));Serial.println(micros()-started);}}
}
Remix this project
Make it yours in one click
Open a full copy of this project in your own Schematik workspace, diagram, code, parts, and assembly steps included. Swap the sensor, add features, or redesign the whole thing with AI. The author's original stays untouched.