Community project
Rayman OLED Game Adaption
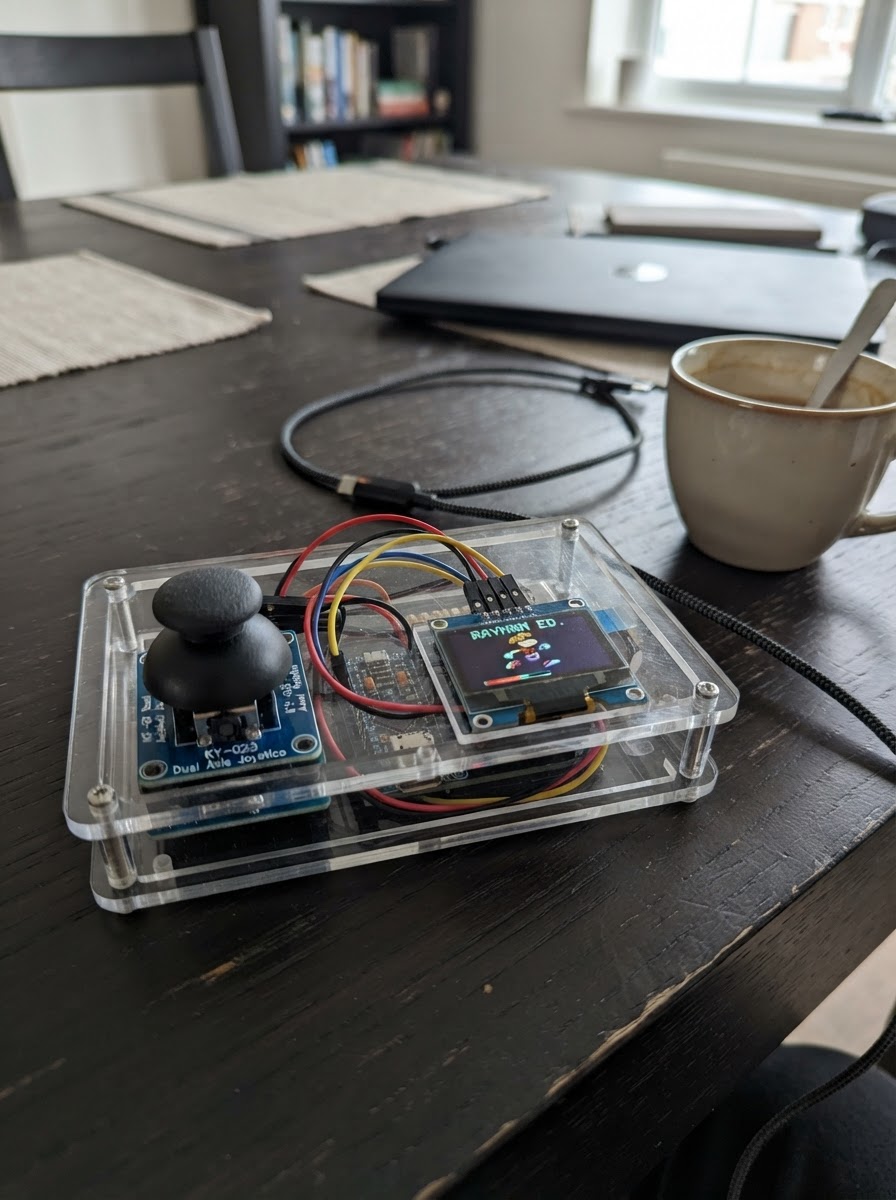
This project brings a Rayman-inspired platformer to life on an ESP32 microcontroller with a transparent OLED display. Players navigate a character across suspended platforms using a dual-axis joystick, with physics-based jumping and collision detection creating engaging gameplay on a compact 128x64 pixel screen.
The guide provides a complete wiring diagram for connecting the KY-023 joystick and OLED display to the ESP32, a full parts list, ready-to-upload firmware with platform layouts and game logic, and step-by-step assembly instructions. Builders will learn how to interface analog input devices with digital displays and implement real-time game mechanics on embedded hardware.
Wiring diagram

Gather all the parts
Assemble it in 4 steps
1. Keep the power wires at 3.3 volts
Place the ESP32-C6, joystick, and OLED where you can see the labels. Use a red jumper from the ESP32-C6 3V3 pin to the joystick VCC pin and another red jumper from 3V3 to the OLED VCC pin. Use black jumpers from an ESP32-C6 GND pin to each module's GND pin.
- The ESP32-C6 uses 3.3-volt signals. Powering the joystick from 3V3 keeps its two analog signals safe for the board.
- Do not connect either module VCC to 5V — a 5-volt joystick signal can damage an ESP32-C6 input, and swapped VCC/GND can damage the OLED.
2. Wire the joystick
Connect joystick VRx to ESP32-C6 GPIO0, VRy to GPIO1, and SW to GPIO2. VRx is the left/right reading; SW is the small switch that closes when you press the stick down.
- The printed labels may be on the underside of the joystick board. Pressing the stick starts a jump and restarts the game after a win or fall.
- Make sure VRx and VRy go to the numbered GPIO pins, not to the board's 3V3 or GND pin — those are the movement signals.
3. Wire the OLED screen
Connect OLED DIN (also sometimes printed MOSI or SDA) to ESP32-C6 GPIO20. Connect OLED CLK (also sometimes printed SCK or SCL) to GPIO18. Connect CS to GPIO21, DC to GPIO10, and RST or RES to GPIO11.
- Read the labels printed beside the OLED header one at a time. This project expects its SPI mode: DIN, CLK, CS, DC, and RST are all connected.
- Do not swap DIN and CLK — the screen will stay blank because it cannot receive its picture data. Do not leave the OLED GND disconnected.
4. Check the wires before powering up
Check that both modules share the ESP32-C6 GND pin, then trace each wire against the project wiring diagram. Plug the ESP32-C6 into USB only after the VCC and GND labels on both modules have been checked.
- A blank screen is most often a DIN/CLK mix-up, the wrong OLED mode, or a loose ground wire.
- If the OLED gets warm, unplug USB immediately — that indicates a likely power wiring mistake.
Review all connections
1. Connections between "joystick_1" and "ESP32"
2. Connections between "oled_1" and "ESP32"
Deploy the firmware
#include <Arduino.h>
#include <SPI.h>
#include <U8g2lib.h>


// Hoisted type definitions
struct Platform {
  int x;
  int y;
  int w;
};


// Forward declarations
bool overlapsPlatform(float x, float y, const Platform &p);
void resetGame();
void drawPlayer(int x, int y);
void drawWorld();
void updateGame();

constexpr uint8_t JOY_X_PIN = 0;
constexpr uint8_t JOY_Y_PIN = 1;
constexpr uint8_t JOY_BUTTON_PIN = 2;
constexpr uint8_t OLED_SCK_PIN = 18;
constexpr uint8_t OLED_MOSI_PIN = 20;
constexpr uint8_t OLED_CS_PIN = 21;
constexpr uint8_t OLED_DC_PIN = 10;
constexpr uint8_t OLED_RST_PIN = 11;

constexpr int SCREEN_W = 128;
constexpr int SCREEN_H = 64;
constexpr uint16_t FRAME_MS = 50;
constexpr int PLAYER_W = 9;
constexpr int PLAYER_H = 11;

U8G2_SSD1309_128X64_NONAME0_F_4W_HW_SPI display(U8G2_R0, OLED_CS_PIN, OLED_DC_PIN, OLED_RST_PIN);


const Platform platforms[] = {
  {0, 58, 128},
  {13, 47, 22},
  {51, 39, 23},
  {88, 48, 25},
  {99, 29, 20},
  {65, 20, 18}
};
constexpr size_t PLATFORM_COUNT = sizeof(platforms) / sizeof(platforms[0]);

float playerX = 6.0f;
float playerY = 40.0f;
float velocityY = 0.0f;
bool grounded = false;
bool gameWon = false;
bool gameOver = false;
bool previousButton = true;
uint32_t lastFrame = 0;
uint32_t score = 0;

bool overlapsPlatform(float x, float y, const Platform &p) {
  return x + PLAYER_W > p.x && x < p.x + p.w && y + PLAYER_H >= p.y && y + PLAYER_H <= p.y + 7;
}

void resetGame() {
  playerX = 6.0f;
  playerY = 40.0f;
  velocityY = 0.0f;
  grounded = false;
  gameWon = false;
  gameOver = false;
  score = 0;
}

void drawPlayer(int x, int y) {
  // Original round adventurer: head, body, feet, and a tiny hair tuft.
  display.drawDisc(x + 5, y + 3, 3, U8G2_DRAW_ALL);
  display.drawBox(x + 2, y + 6, 7, 3);
  display.drawBox(x + 1, y + 9, 3, 2);
  display.drawBox(x + 7, y + 9, 3, 2);
  display.drawLine(x + 4, y, x + 2, y - 2);
}

void drawWorld() {
  display.clearBuffer();
  display.setFont(u8g2_font_5x8_tf);
  display.drawStr(2, 7, "Sky Sprint");
  display.setCursor(92, 7);
  display.print(score);

  for (size_t i = 0; i < PLATFORM_COUNT; ++i) {
    display.drawHLine(platforms[i].x, platforms[i].y, platforms[i].w);
    display.drawHLine(platforms[i].x + 2, platforms[i].y + 2, platforms[i].w - 4);
  }

  // Finish beacon at the top-right platform.
  display.drawFrame(109, 14, 8, 15);
  display.drawLine(113, 14, 113, 10);
  display.drawTriangle(113, 10, 123, 13, 113, 16);

  drawPlayer(static_cast<int>(playerX), static_cast<int>(playerY));

  if (gameWon) {
    display.drawBox(16, 23, 96, 18);
    display.setDrawColor(0);
    display.drawStr(28, 35, "YOU MADE IT!");
    display.setDrawColor(1);
    display.drawStr(18, 53, "Press stick to replay");
  } else if (gameOver) {
    display.drawBox(17, 23, 94, 18);
    display.setDrawColor(0);
    display.drawStr(34, 35, "TRY AGAIN");
    display.setDrawColor(1);
    display.drawStr(18, 53, "Press stick to replay");
  } else {
    display.drawStr(2, 17, "X: run  Press: jump");
  }
  display.sendBuffer();
}

void updateGame() {
  const bool buttonReleased = digitalRead(JOY_BUTTON_PIN);
  const bool buttonPressed = !buttonReleased && previousButton;
  previousButton = buttonReleased;

  if (gameWon || gameOver) {
    if (buttonPressed) {
      resetGame();
    }
    return;
  }

  const int xReading = analogRead(JOY_X_PIN);
  float horizontal = 0.0f;
  if (xReading < 1400) {
    horizontal = -1.7f;
  } else if (xReading > 2700) {
    horizontal = 1.7f;
  }
  playerX += horizontal;
  if (playerX < 0) playerX = 0;
  if (playerX > SCREEN_W - PLAYER_W) playerX = SCREEN_W - PLAYER_W;

  if (buttonPressed && grounded) {
    velocityY = -5.1f;
    grounded = false;
  }

  const float oldY = playerY;
  velocityY += 0.34f;
  if (velocityY > 4.5f) velocityY = 4.5f;
  playerY += velocityY;
  grounded = false;

  if (velocityY >= 0) {
    for (size_t i = 0; i < PLATFORM_COUNT; ++i) {
      const Platform &p = platforms[i];
      const float oldBottom = oldY + PLAYER_H;
      const float newBottom = playerY + PLAYER_H;
      if (playerX + PLAYER_W > p.x && playerX < p.x + p.w && oldBottom <= p.y && newBottom >= p.y) {
        playerY = p.y - PLAYER_H;
        velocityY = 0;
        grounded = true;
        break;
      }
    }
  }

  if (playerY > SCREEN_H) {
    gameOver = true;
  }
  if (playerX + PLAYER_W > 109 && playerX < 119 && playerY < 21) {
    gameWon = true;
  }
  score++;
}

void setup() {
  pinMode(JOY_BUTTON_PIN, INPUT_PULLUP);
  analogReadResolution(12);
  SPI.begin(OLED_SCK_PIN, -1, OLED_MOSI_PIN, OLED_CS_PIN);
  display.begin();
  drawWorld();
}

void loop() {
  const uint32_t now = millis();
  if (now - lastFrame < FRAME_MS) {
    return;
  }
  lastFrame = now;
  updateGame();
  drawWorld();
}
Remix this project
Make it yours in one click
Open a full copy of this project in your own Schematik workspace — diagram, code, parts, and assembly steps included. Swap the sensor, add features, or redesign the whole thing with AI. The author's original stays untouched.