Community project
Six-Product Smart Refill Vending Machine
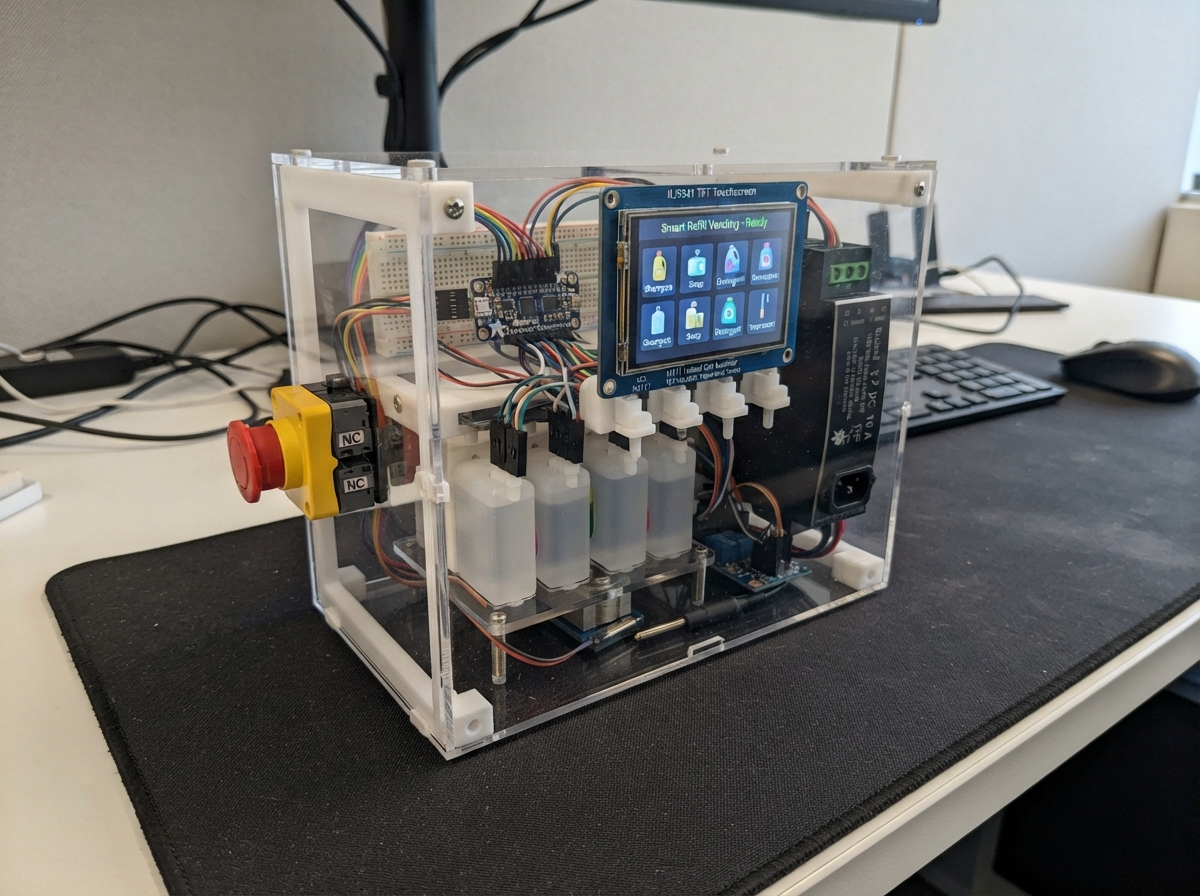
This smart refill vending machine dispenses six products—water, milk, oil, detergent, dish soap, and hand sanitizer—with weight-based portion control and real-time monitoring. Built around an ESP32-S3 microcontroller, the machine features a touchscreen interface, six independent load cells for accurate dispensing, temperature monitoring for refrigerated products, leak detection, and networked inventory tracking via a backend API.
The guide provides a complete wiring diagram, parts list, and step-by-step assembly instructions for building the control electronics, configuring the solenoid drivers, calibrating the load cells, and deploying the firmware. Makers will learn how to integrate safety systems including an emergency stop, refrigeration controls, and isolation relays while ensuring proper separation of electrical zones for safe operation.
Wiring diagram
Gather all the parts
Assemble it in 7 steps
1. Divide the cabinet into safe zones
Make three sealed physical areas: a refrigerated food area for tank_milk only, a separate food area for tank_water and tank_oil, and a lower chemical area for tank_detergent, tank_dishwash, and tank_handwash. Put a drip tray and leak_sensor_1 beneath every liquid area.
- Never place food tanks, food tubing, or food nozzles in the detergent compartment; a spill or shared hose can contaminate food.
2. Fit the dedicated liquid paths
For each product, make one uninterrupted path: its tank, its own pump, its own valve, its own labeled tube, then its own nozzle. Use food_tubing and food_nozzle only for water, milk, and oil; use chemical_tubing and chemical_nozzle only for the three cleaning liquids. Keep milk tubing inside the refrigerator until it reaches its own insulated exit.
- Do not use an ordinary aquarium pump, common hose, or common nozzle for milk, oil, or chemicals; the wetted material and cleaning method must be approved for that exact product.
3. Build the six weighing platforms
Mount the four load cells for each tank beneath a rigid platform, with the tank sitting only on that platform. Connect the four cells to its matching scale junction board, then connect E+, E-, A+, and A- to the matching HX711: water to hx_water, milk to hx_milk, oil to hx_oil, detergent to hx_detergent, dishwash to hx_dishwash, and handwash to hx_handwash.
- Leave a small service loop in each load-cell cable so it cannot pull on the platform and change the measured weight.
4. Wire the low-voltage control box
Mount psu_12v, main_fuse, estop_1, buck_5v, pump_driver_1, valve_driver_1, and the ESP32-S3 in a closed non-food control box. Wire the fused 12 V path in this order: PSU positive to fuse, fuse to the emergency-stop load contact, then emergency-stop output to every pump and valve positive lead and both driver V+ terminals. Each pump and valve negative lead goes only to its numbered driver output.
- The emergency-stop switch must physically remove 12 V from every pump and valve; software alone is not a safety device.
- Mains wiring, protective earth, and the enclosed power supply must be installed and checked by a qualified electrician.
5. Connect the ESP32-S3 signals
Connect touchscreen_1 as follows: VCC to 3V3 (power), GND to GND (ground), MOSI to GPIO11 (data), MISO to GPIO13 (data), SCK to GPIO12 (clock), TFT_CS to GPIO10 (screen select), TFT_DC to GPIO21 (screen command/data), TFT_RST to GPIO38 (screen reset), and TOUCH_CS to GPIO39 (touch select). Connect both driver boards SDA to GPIO8 (data) and SCL to GPIO9 (clock); set the pump board to address 0x20 and valve board to 0x21.
- Use only 3.3 V logic at the ESP32-S3 pins; 5 V on a GPIO can damage the board.
6. Connect safety and milk monitoring
Put milk_temp in a sealed food-safe thermowell in the milk reservoir or refrigerator air path. Wire its VCC to 3V3 (power), GND to GND (ground), DATA to GPIO14 (signal), and place onewire_pullup between 3V3 and that DATA wire. Wire the emergency-stop signal contact to GPIO15 and ground, and the leak detector contact to GPIO16 and ground. Connect fridge_interface only to the refrigerator manufacturer-approved external control terminals.
- Do not splice into a refrigerator compressor or mains thermostat circuit; a refrigeration technician must approve and make that connection.
7. Test and calibrate before filling
With all tanks empty and no mains connected to the refrigerator interface, power only the low-voltage system. Confirm the emergency stop and leak probe immediately turn all outputs off. Tare each empty platform, then place a known test weight on it and replace the matching calibration value in the firmware. Test one pump and valve at a time with water; measure delivered mass and set density-correct target grams for oil and cleaning liquids before live vending.
- Never test a chemical channel with a food nozzle or food collection vessel.
- Do not enable sales until the backend returns a verified payment and all scale, temperature, leak, and emergency-stop tests pass.
Review all connections
1. Connections between "touchscreen_1" and "ESP32"
2. Connections between "pump_driver_1" and "ESP32"
3. Connections between "valve_driver_1" and "ESP32"
4. Connections between "hx_water" and "ESP32"
5. Connections between "hx_milk" and "ESP32"
6. Connections between "hx_oil" and "ESP32"
7. Connections between "hx_detergent" and "ESP32"
8. Connections between "hx_dishwash" and "ESP32"
9. Connections between "hx_handwash" and "ESP32"
10. Connections between "milk_temp" and "ESP32"
11. Connections between "onewire_pullup" and "ESP32"
12. Connections between "estop_1" and "ESP32"
13. Connections between "leak_sensor_1" and "ESP32"
14. Connections between "fridge_interface" and "ESP32"
15. Connections between "psu_12v" and "ESP32"
16. Connections between "buck_5v" and "ESP32"
17. Connections between "scale_junctions" and "ESP32"
Deploy the firmware
#include <Arduino.h>
#include <Wire.h>
#include <SPI.h>
#include <WiFi.h>
#include <HTTPClient.h>
#include <WiFiClientSecure.h>
#include <Adafruit_GFX.h>
#include <Adafruit_ILI9341.h>
#include <XPT2046_Touchscreen.h>
#include <HX711.h>
#include <OneWire.h>
#include <DallasTemperature.h>

constexpr int I2C_SDA = 8, I2C_SCL = 9;
constexpr int TFT_CS = 10, TFT_DC = 21, TFT_RST = 38, TOUCH_CS = 39;
constexpr int HX_WATER_DT = 1, HX_MILK_DT = 2, HX_OIL_DT = 3, HX_DET_DT = 4, HX_DISH_DT = 5, HX_HAND_DT = 6;
constexpr int HX_WATER_SCK = 18, HX_MILK_SCK = 40, HX_OIL_SCK = 41, HX_DET_SCK = 42, HX_DISH_SCK = 47, HX_HAND_SCK = 18; // shared electrical clock net with water HX711
constexpr int MILK_TEMP_PIN = 14, ESTOP_PIN = 15, LEAK_PIN = 16, FRIDGE_ENABLE_PIN = 17;
constexpr uint8_t PUMP_DRIVER = 0x20, VALVE_DRIVER = 0x21;
constexpr float MILK_MAX_C = 4.0f, LOW_STOCK_G = 1000.0f;
constexpr char WIFI_SSID[] = "";          // provision during commissioning
constexpr char WIFI_PASSWORD[] = "";
constexpr char BACKEND_URL[] = "";        // e.g. https://your-server.example
constexpr char DEVICE_TOKEN[] = "";       // short-lived device credential, never an M-Pesa secret

Adafruit_ILI9341 tft(TFT_CS, TFT_DC, TFT_RST);
XPT2046_Touchscreen touch(TOUCH_CS);
OneWire oneWire(MILK_TEMP_PIN);
DallasTemperature milkThermometer(&oneWire);
HX711 scales[6];
const int dtPins[6] = {HX_WATER_DT,HX_MILK_DT,HX_OIL_DT,HX_DET_DT,HX_DISH_DT,HX_HAND_DT};
const int sckPins[6] = {HX_WATER_SCK,HX_MILK_SCK,HX_OIL_SCK,HX_DET_SCK,HX_DISH_SCK,HX_HAND_SCK};
const char *names[6] = {"Water","Milk","Cooking oil","Detergent","Dishwash","Handwash"};
// Replace each factor during the calibration procedure; units are grams per displayed value.
float calibration[6] = {1,1,1,1,1,1};
float stockG[6] = {0,0,0,0,0,0};
int selectedProduct = 0;
int selectedQtyMl = 500;
float milkC = NAN;
bool dispensing = false;
uint8_t pumpBits = 0, valveBits = 0;
uint32_t lastUiMs = 0, lastSensorMs = 0;

void mcpWrite(uint8_t address, uint8_t reg, uint8_t value) {
  Wire.beginTransmission(address); Wire.write(reg); Wire.write(value); Wire.endTransmission();
}
void setOutputs(uint8_t &bits, uint8_t address, uint8_t newBits) {
  bits = newBits; mcpWrite(address, 0x00, 0x00); mcpWrite(address, 0x14, bits);
}
void allOff() { setOutputs(pumpBits, PUMP_DRIVER, 0); setOutputs(valveBits, VALVE_DRIVER, 0); dispensing = false; }
bool emergencyActive() { return digitalRead(ESTOP_PIN) == HIGH; } // NC contact opens when pressed
bool leakActive() { return digitalRead(LEAK_PIN) == LOW; }       // dry contact closes when wet
bool milkSafe() { return !isnan(milkC) && milkC >= 0.0f && milkC <= MILK_MAX_C; }
bool safeToDispense(int product) {
  return !emergencyActive() && !leakActive() && (product != 1 || milkSafe()) && stockG[product] > LOW_STOCK_G;
}

void drawUi() {
  tft.fillScreen(ILI9341_BLACK);
  tft.setTextSize(2); tft.setTextColor(ILI9341_WHITE); tft.setCursor(8, 6); tft.print("Household Refill");
  tft.setTextSize(1); tft.setCursor(8, 28); tft.print("Milk: "); tft.print(milkC, 1); tft.print(" C  ");
  if (emergencyActive()) tft.setTextColor(ILI9341_RED); else if (leakActive()) tft.setTextColor(ILI9341_RED); else tft.setTextColor(ILI9341_GREEN);
  if (emergencyActive()) tft.print("EMERGENCY STOP"); else if (leakActive()) tft.print("LEAK LOCKOUT"); else tft.print("SAFE");
  for (int i=0;i<6;i++) {
    int y = 45 + i*28; uint16_t color = (i == selectedProduct) ? ILI9341_BLUE : ILI9341_DARKGREY;
    tft.fillRect(4,y,210,24,color); tft.setTextColor(ILI9341_WHITE); tft.setCursor(8,y+7); tft.print(names[i]);
    tft.setCursor(135,y+7); tft.print(stockG[i]/1000.0f,1); tft.print("kg");
  }
  tft.fillRect(220,45,96,38,ILI9341_DARKCYAN); tft.setTextColor(ILI9341_WHITE); tft.setCursor(228,55); tft.print("-100 ml");
  tft.fillRect(220,90,96,38,ILI9341_DARKCYAN); tft.setCursor(228,100); tft.print("+100 ml");
  tft.fillRect(220,140,96,42,ILI9341_GREEN); tft.setTextColor(ILI9341_BLACK); tft.setCursor(232,151); tft.print("PAY");
  tft.setTextColor(ILI9341_WHITE); tft.setCursor(224,195); tft.print(selectedQtyMl); tft.print(" ml");
  tft.setCursor(224,215); tft.print("Backend verifies"); tft.setCursor(224,226); tft.print("M-Pesa payment");
}

bool backendPaymentConfirmed(int product, int quantityMl) {
  // The backend owns M-Pesa consumer key, secret, OAuth token and STK callback verification.
  // An empty URL deliberately denies dispensing until commissioning has configured a backend.
  if (strlen(BACKEND_URL) == 0 || WiFi.status() != WL_CONNECTED) return false;
  WiFiClientSecure client; client.setInsecure(); // commissioning only: replace with backend CA validation before production
  HTTPClient http;
  String url = String(BACKEND_URL) + "/api/v1/vend/authorize";
  if (!http.begin(client, url)) return false;
  http.addHeader("Content-Type", "application/json"); http.addHeader("Authorization", String("Bearer ") + DEVICE_TOKEN);
  String body = String("{\"product\":\"") + names[product] + "\",\"quantity_ml\":" + quantityMl + "}";
  int status = http.POST(body); String reply = http.getString(); http.end();
  return status == 200 && reply.indexOf("\"verified\":true") >= 0;
}

void dispenseByMass(int product, int quantityMl) {
  // For this prototype 1 ml is treated as 1 g. During product calibration, use density-correct target grams for oil/detergents.
  float targetG = (float)quantityMl;
  float startG = stockG[product];
  if (!safeToDispense(product)) return;
  setOutputs(valveBits, VALVE_DRIVER, valveBits | (1 << product));
  setOutputs(pumpBits, PUMP_DRIVER, pumpBits | (1 << product));
  dispensing = true; uint32_t started = millis();
  while (dispensing && millis() - started < 120000UL) {
    if (!safeToDispense(product)) break;
    if (scales[product].is_ready()) stockG[product] = scales[product].get_units(3);
    if (startG - stockG[product] >= targetG) break;
    delay(20);
  }
  allOff();
}

void readSensors() {
  milkThermometer.requestTemperatures(); milkC = milkThermometer.getTempCByIndex(0);
  for (int i=0;i<6;i++) if (scales[i].is_ready()) stockG[i] = scales[i].get_units(3);
  // Closed contact requests refrigeration only while milk is too warm; technician must connect only to approved appliance input.
  digitalWrite(FRIDGE_ENABLE_PIN, (!isnan(milkC) && milkC > 3.0f) ? HIGH : LOW);
  if (emergencyActive() || leakActive() || !milkSafe()) allOff();
}

void handleTouch() {
  if (!touch.touched()) return;
  TS_Point p = touch.getPoint();
  // Calibrate these raw ranges after fitting the physical display.
  int x = map(p.x, 200, 3800, 0, 320); int y = map(p.y, 200, 3800, 0, 240);
  if (x < 215 && y >= 45 && y < 213) selectedProduct = constrain((y - 45) / 28, 0, 5);
  else if (x >= 220 && y >= 45 && y < 83) selectedQtyMl = max(100, selectedQtyMl - 100);
  else if (x >= 220 && y >= 90 && y < 128) selectedQtyMl = min(5000, selectedQtyMl + 100);
  else if (x >= 220 && y >= 140 && y < 182) {
    if (backendPaymentConfirmed(selectedProduct, selectedQtyMl)) dispenseByMass(selectedProduct, selectedQtyMl);
  }
  delay(180); drawUi();
}

void setup() {
  pinMode(ESTOP_PIN, INPUT_PULLUP); pinMode(LEAK_PIN, INPUT_PULLUP); pinMode(FRIDGE_ENABLE_PIN, OUTPUT); digitalWrite(FRIDGE_ENABLE_PIN, LOW);
  Wire.begin(I2C_SDA, I2C_SCL); allOff();
  for (int i=0;i<6;i++) { scales[i].begin(dtPins[i], sckPins[i]); scales[i].set_scale(calibration[i]); scales[i].tare(); }
  milkThermometer.begin();
  SPI.begin(12,13,11,10); tft.begin(); tft.setRotation(1); touch.begin(); touch.setRotation(1);
  if (strlen(WIFI_SSID)) { WiFi.mode(WIFI_STA); WiFi.begin(WIFI_SSID, WIFI_PASSWORD); }
  readSensors(); drawUi();
}
void loop() {
  uint32_t now = millis();
  if (now - lastSensorMs >= 1000) { lastSensorMs = now; readSensors(); }
  if (now - lastUiMs >= 1000) { lastUiMs = now; drawUi(); }
  handleTouch();
  delay(10);
}
Remix this project
Make it yours in one click
Open a full copy of this project in your own Schematik workspace, diagram, code, parts, and assembly steps included. Swap the sensor, add features, or redesign the whole thing with AI. The author's original stays untouched.