Community project
ESP32 Servo Security Camera
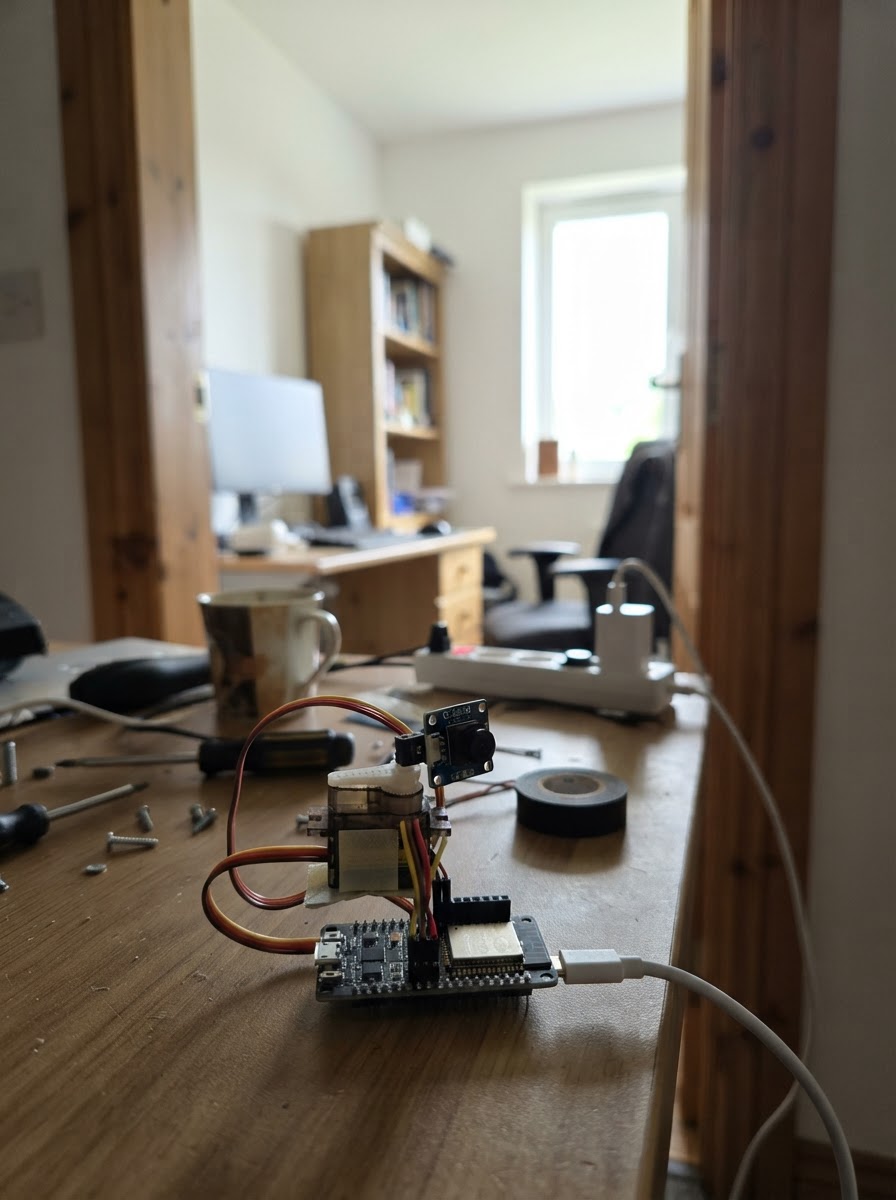
Build a pan-and-tilt security camera powered by an ESP32 microcontroller and two SG90 servos. This project combines live video streaming with remote directional control, allowing users to monitor and adjust the camera view from a web interface. The guide includes a complete wiring diagram, parts list, and step-by-step assembly instructions for mounting the servos in a pan-tilt bracket.
The firmware runs a local web server on the ESP32, enabling real-time video feed and servo position commands over WiFi. Readers will learn how to configure the camera module, wire the servo control signals, and deploy the control interface—all powered by a standard USB-C 5V adapter.
Wiring diagram

Gather all the parts
Assemble it in 4 steps
1. Assemble the pan/tilt bracket
Mount the pan SG90 servo to the base and the tilt SG90 servo to the pan bracket. Attach the ESP32-CAM securely to the tilt platform with the camera lens facing outward. Center both servos mechanically before fastening the servo horns.
- Avoid forcing a servo horn onto a servo that is not near its centre position.
- Ensure neither bracket nor wires can contact the camera lens.
- Do not let the tilt bracket drive the camera beyond its physical travel; this can strip an SG90 gear.
2. Wire the servo control leads
Connect the pan-servo signal lead to ESP32-CAM GPIO 16 and the tilt-servo signal lead to GPIO 17. GPIO 12 and GPIO 15 are intentionally not used: they are microSD lines and boot-configuration pins on this board.
- SG90 signal is normally orange or yellow; verify your servo's wire colours before connecting.
- Keep the signal wires short and away from the camera ribbon cable.
- Do not move either servo signal to GPIO 12 or GPIO 15: external servo circuitry can stop the ESP32-CAM from booting.
3. Connect regulated 5 V power and common ground
Connect the regulated adapter 5 V output to the ESP32-CAM 5V pin and to each servo VCC lead. Connect the adapter ground to ESP32-CAM GND and to both servo ground leads, making one shared ground network.
- Place a 470–1000 uF electrolytic capacitor across 5 V and GND near the two servos; capacitor positive goes to 5 V.
- Use a regulated supply capable of at least 2 A.
- Never power either servo from the ESP32-CAM 3.3 V pin.
- Disconnect power before changing wiring.
4. Use the local camera controls
After deployment, join the ESP32-CAM-Security Wi-Fi network and open http://192.168.4.1. Use the manual buttons to confirm motion is in the expected direction, then select Face follow. The viewing browser detects the face locally and sends small servo adjustments to keep it centred.
- Face follow needs a current Chrome or Edge browser with FaceDetector support.
- Use even front lighting and keep one face in view for smoother tracking.
- This is face detection and camera aiming, not identity recognition or access control.
- Change the default access-point password in the firmware before leaving the camera in service.
Review all connections
1. Connections between "pan_servo" and "ESP32"
2. Connections between "tilt_servo" and "ESP32"
3. Connections between "power_supply" and "ESP32"
Deploy the firmware
#include <Arduino.h>
#include <WiFi.h>
#include <esp_camera.h>
#include <esp_http_server.h>
#include <ESP32Servo.h>
#define PWDN_GPIO_NUM 32
#define RESET_GPIO_NUM -1
#define XCLK_GPIO_NUM 0
#define SIOD_GPIO_NUM 26
#define SIOC_GPIO_NUM 27
#define Y9_GPIO_NUM 35
#define Y8_GPIO_NUM 34
#define Y7_GPIO_NUM 39
#define Y6_GPIO_NUM 36
#define Y5_GPIO_NUM 21
#define Y4_GPIO_NUM 19
#define Y3_GPIO_NUM 18
#define Y2_GPIO_NUM 5
#define VSYNC_GPIO_NUM 25
#define HREF_GPIO_NUM 23
#define PCLK_GPIO_NUM 22
#define PAN_SERVO_PIN 16
#define TILT_SERVO_PIN 17
// Forward declarations
void applyServoPosition();
static esp_err_t controlHandler(httpd_req_t *req);
static esp_err_t trackHandler(httpd_req_t *req);
static esp_err_t streamHandler(httpd_req_t *req);
void startCameraServer();
static esp_err_t indexHandler(httpd_req_t *req); static esp_err_t controlHandler(httpd_req_t *req); static esp_err_t trackHandler(httpd_req_t *req); static esp_err_t streamHandler(httpd_req_t *req);
const char *AP_SSID="ESP32-CAM-Security",*AP_PASSWORD="camera123";
Servo panServo,tiltServo; int panAngle=90,tiltAngle=90; httpd_handle_t cameraServer=nullptr;
void applyServoPosition(){panAngle=constrain(panAngle,10,170);tiltAngle=constrain(tiltAngle,20,160);panServo.write(panAngle);tiltServo.write(tiltAngle);}
const char INDEX_HTML[] PROGMEM=R"HTML(<!doctype html><html><head><meta name="viewport" content="width=device-width,initial-scale=1"><title>ESP32 Security Camera</title><style>body{margin:0;background:#111;color:#eee;font-family:Arial;text-align:center}main{max-width:640px;margin:auto;padding:14px}img{width:100%;background:#000;border-radius:8px}.row{display:flex;justify-content:center;gap:10px;margin:12px}button{min-width:82px;height:48px;font-size:16px;border:0;border-radius:7px;background:#2878c7;color:white}.on{background:#198754}p{color:#bbb;font-size:14px}#status{min-height:20px}</style></head><body><main><h2>ESP32 Security Camera</h2><img id="stream" src="/stream" alt="Live camera stream"><div class="row"><button onclick="move(0,-10)">Tilt +</button><button id="track" onclick="toggleTracking()">Face follow: off</button></div><div class="row"><button onclick="move(-10,0)">Pan ←</button><button onclick="move(0,0)">Center</button><button onclick="move(10,0)">Pan →</button></div><div class="row"><button onclick="move(0,10)">Tilt -</button></div><p id="status">Manual control. Face follow requires Chrome or Edge.</p><canvas id="analysis" hidden></canvas></main><script>let p=90,t=90,tracking=false,detector,busy=false;const stream=document.getElementById('stream'),status=document.getElementById('status'),trackButton=document.getElementById('track'),canvas=document.getElementById('analysis'),ctx=canvas.getContext('2d');function move(dp,dt){tracking=false;trackButton.className='';trackButton.textContent='Face follow: off';p=dp===0&&dt===0?90:Math.max(10,Math.min(170,p+dp));t=dp===0&&dt===0?90:Math.max(20,Math.min(160,t+dt));fetch('/control?pan='+p+'&tilt='+t)}function toggleTracking(){if(!tracking){if(!('FaceDetector'in window)){status.textContent='Face follow needs a current Chrome or Edge browser.';return}detector=new FaceDetector({fastMode:true,maxDetectedFaces:1});tracking=true;trackButton.className='on';trackButton.textContent='Face follow: on';status.textContent='Looking for one face…';scan()}else{tracking=false;trackButton.className='';trackButton.textContent='Face follow: off';status.textContent='Manual control.'}}async function scan(){if(!tracking)return;try{if(!busy&&stream.naturalWidth>0){busy=true;const w=320,h=Math.max(1,Math.round(320*stream.naturalHeight/stream.naturalWidth));canvas.width=w;canvas.height=h;ctx.drawImage(stream,0,0,w,h);const faces=await detector.detect(canvas);if(faces.length){const b=faces[0].boundingBox,cx=(b.x+b.width/2)/w,cy=(b.y+b.height/2)/h;let dx=0,dy=0;if(cx<.42)dx=-2;else if(cx>.58)dx=2;if(cy<.42)dy=-2;else if(cy>.58)dy=2;if(dx||dy)fetch('/track?dx='+dx+'&dy='+dy);status.textContent='Following face.'}else status.textContent='Looking for one face…';busy=false}}catch(e){busy=false;tracking=false;trackButton.className='';trackButton.textContent='Face follow: off';status.textContent='Face detector unavailable; use manual controls.'}setTimeout(scan,250)}</script></body></html>)HTML";
static esp_err_t indexHandler(httpd_req_t *req){httpd_resp_set_type(req,"text/html");return httpd_resp_send(req,INDEX_HTML,HTTPD_RESP_USE_STRLEN);}
static esp_err_t controlHandler(httpd_req_t *req){char q[80]={0},v[12]={0};if(httpd_req_get_url_query_str(req,q,sizeof(q))==ESP_OK){if(httpd_query_key_value(q,"pan",v,sizeof(v))==ESP_OK)panAngle=atoi(v);if(httpd_query_key_value(q,"tilt",v,sizeof(v))==ESP_OK)tiltAngle=atoi(v);applyServoPosition();}httpd_resp_set_type(req,"application/json");return httpd_resp_send(req,"{\"ok\":true}",HTTPD_RESP_USE_STRLEN);}
static esp_err_t trackHandler(httpd_req_t *req){char q[48]={0},v[12]={0};if(httpd_req_get_url_query_str(req,q,sizeof(q))==ESP_OK){if(httpd_query_key_value(q,"dx",v,sizeof(v))==ESP_OK)panAngle+=constrain(atoi(v),-3,3);if(httpd_query_key_value(q,"dy",v,sizeof(v))==ESP_OK)tiltAngle+=constrain(atoi(v),-3,3);applyServoPosition();}httpd_resp_set_type(req,"application/json");return httpd_resp_send(req,"{\"ok\":true}",HTTPD_RESP_USE_STRLEN);}
static esp_err_t streamHandler(httpd_req_t *req){httpd_resp_set_type(req,"multipart/x-mixed-replace;boundary=frame");while(true){camera_fb_t *fb=esp_camera_fb_get();if(!fb)return ESP_FAIL;char h[64];size_t n=snprintf(h,sizeof(h),"\r\n--frame\r\nContent-Type: image/jpeg\r\nContent-Length: %u\r\n\r\n",fb->len);esp_err_t r=httpd_resp_send_chunk(req,h,n);if(r==ESP_OK)r=httpd_resp_send_chunk(req,(const char*)fb->buf,fb->len);esp_camera_fb_return(fb);if(r!=ESP_OK)return r;}}
void startCameraServer(){httpd_config_t c=HTTPD_DEFAULT_CONFIG();if(httpd_start(&cameraServer,&c)!=ESP_OK)return;httpd_uri_t a={.uri="/",.method=HTTP_GET,.handler=indexHandler,.user_ctx=nullptr},b={.uri="/control",.method=HTTP_GET,.handler=controlHandler,.user_ctx=nullptr},d={.uri="/track",.method=HTTP_GET,.handler=trackHandler,.user_ctx=nullptr},e={.uri="/stream",.method=HTTP_GET,.handler=streamHandler,.user_ctx=nullptr};httpd_register_uri_handler(cameraServer,&a);httpd_register_uri_handler(cameraServer,&b);httpd_register_uri_handler(cameraServer,&d);httpd_register_uri_handler(cameraServer,&e);}
void setup(){Serial.begin(115200);panServo.setPeriodHertz(50);tiltServo.setPeriodHertz(50);panServo.attach(PAN_SERVO_PIN,500,2400);tiltServo.attach(TILT_SERVO_PIN,500,2400);applyServoPosition();camera_config_t c={};c.ledc_channel=LEDC_CHANNEL_0;c.ledc_timer=LEDC_TIMER_0;c.pin_d0=Y2_GPIO_NUM;c.pin_d1=Y3_GPIO_NUM;c.pin_d2=Y4_GPIO_NUM;c.pin_d3=Y5_GPIO_NUM;c.pin_d4=Y6_GPIO_NUM;c.pin_d5=Y7_GPIO_NUM;c.pin_d6=Y8_GPIO_NUM;c.pin_d7=Y9_GPIO_NUM;c.pin_xclk=XCLK_GPIO_NUM;c.pin_pclk=PCLK_GPIO_NUM;c.pin_vsync=VSYNC_GPIO_NUM;c.pin_href=HREF_GPIO_NUM;c.pin_sscb_sda=SIOD_GPIO_NUM;c.pin_sscb_scl=SIOC_GPIO_NUM;c.pin_pwdn=PWDN_GPIO_NUM;c.pin_reset=RESET_GPIO_NUM;c.xclk_freq_hz=20000000;c.pixel_format=PIXFORMAT_JPEG;c.frame_size=FRAMESIZE_VGA;c.jpeg_quality=12;c.fb_count=1;if(esp_camera_init(&c)!=ESP_OK){Serial.println("Camera initialization failed");return;}WiFi.mode(WIFI_AP);WiFi.softAP(AP_SSID,AP_PASSWORD);Serial.print("Open http://");Serial.println(WiFi.softAPIP());startCameraServer();}
void loop(){delay(1000);}Remix this project
Make it yours in one click
Open a full copy of this project in your own Schematik workspace — diagram, code, parts, and assembly steps included. Swap the sensor, add features, or redesign the whole thing with AI. The author's original stays untouched.