Schematik build
Generative Art Pendant
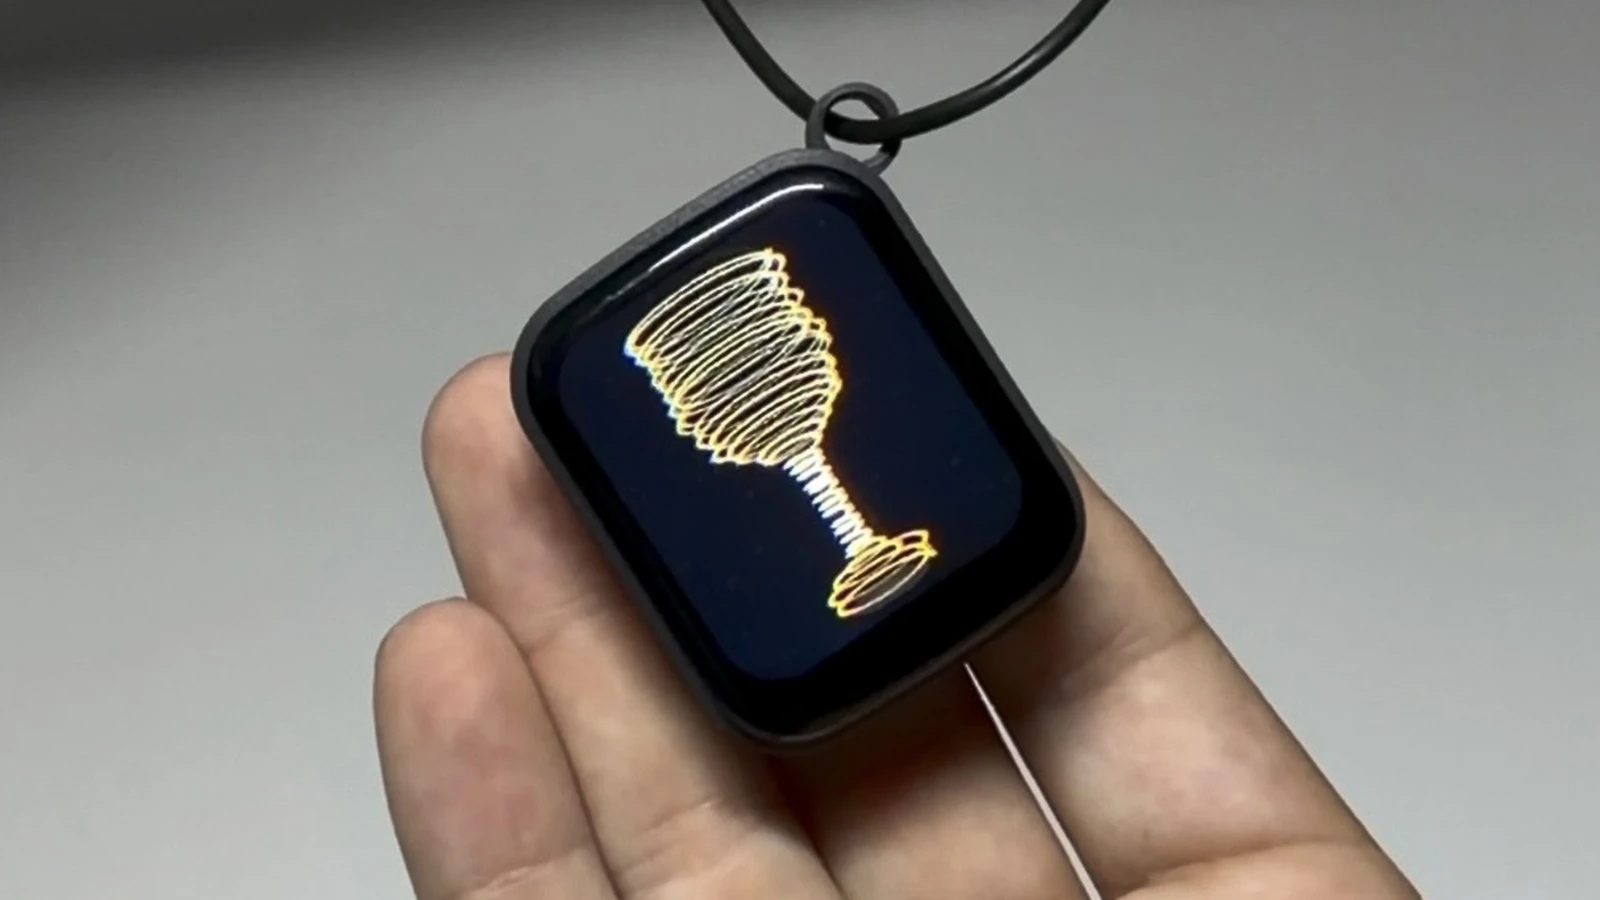
This wearable pendant displays mesmerizing generative art patterns on a small color screen, powered by an ESP32 microcontroller. The animations respond to touch input, letting the wearer pause and shift through color variations by tapping the pendant.
The guide includes a complete parts list, wiring diagram for connecting the display and touch sensor to the ESP32, and ready-to-flash firmware that generates smooth, colorful animations. Assembly takes just minutes: verify the pendant board, insert the lightweight lithium battery, fit everything into a non-metal case, charge via USB, and wear as a unique conversation piece.
Wiring diagram
Gather all the parts
Assemble it in 4 steps
1. Check the pendant board
Place the Waveshare ESP32-S3-Touch-LCD-1.69 V2 on a clean table with the screen facing up. Leave the screen’s clear protective film in place until the case is ready, because scratches are very noticeable on a pendant.
- The display and touch surface are already wired inside this board, so do not add jumper wires to their labeled connections.
- Do not rest the powered board on metal, coins, or foil; they can touch two contacts together and damage it.
2. Plug in the thin battery
With the board unplugged, line up the battery’s tiny two-pin plug with the matching battery socket on the Waveshare board. Push it in gently by the plastic plug, not by pulling its wires. The LiPo battery in lipo_400mah powers the pendant.
- The plug should slide in without force. If it does not, stop and turn it around rather than forcing it.
- Make sure the battery plug matches the board socket’s positive and negative contacts — reversed battery wiring can damage the board or battery. Never use a swollen, punctured, or hot LiPo battery.
3. Fit it into a non-metal pendant case
Put the board and lipo_400mah into a roomy plastic, wood, or 3D-printed pendant case. Keep the battery flat and untwisted, keep the screen window clear, and add a small strain-relief loop so the battery wires cannot be pulled from their plug.
- Leave a small opening for the USB-C connector so you can charge the pendant without opening the case.
- Use thin foam tape only around the battery edges; do not press hard on the soft battery pouch.
- Do not enclose the LiPo in a sealed case while charging. It needs to stay cool, and a damaged battery can swell. Avoid a metal necklace chain touching the board contacts.
4. Charge and wear it
Use a USB-C cable to power the board and charge lipo_400mah through the board’s built-in charging circuit. After disconnecting the cable, the animated artwork should keep running from the battery; tap the screen once to pause or resume it.
- A 400 mAh battery is expected to run this bright animated pendant for roughly four hours; lowering screen brightness later can make it last longer.
- Charge the pendant where you can keep an eye on it, on a non-flammable surface. Stop charging immediately if the battery or case becomes unusually hot.
Review all connections
1. Connections between "lipo_400mah" and "ESP32"
Deploy the firmware
#include <Arduino.h>
#include <SPI.h>
#include <Wire.h>
#include <Arduino_GFX_Library.h>


// Forward declarations
uint16_t colorWheel(uint8_t wheel);
bool touchWasTapped();
void drawFrame(uint32_t t);

constexpr int LCD_DC = 4;
constexpr int LCD_CS = 5;
constexpr int LCD_SCK = 6;
constexpr int LCD_MOSI = 7;
constexpr int LCD_RST = 8;
constexpr int LCD_BL = 15;
constexpr int TOUCH_SCL = 10;
constexpr int TOUCH_SDA = 11;
constexpr int TOUCH_RST = 13;
constexpr int TOUCH_INT = 14;

constexpr int SCREEN_W = 240;
constexpr int SCREEN_H = 280;
constexpr uint32_t FRAME_INTERVAL_MS = 50;
constexpr uint8_t CST816T_ADDRESS = 0x15;

Arduino_DataBus *bus = new Arduino_ESP32SPI(LCD_DC, LCD_CS, LCD_SCK, LCD_MOSI, GFX_NOT_DEFINED);
Arduino_GFX *display = new Arduino_ST7789(bus, LCD_RST, 1, true, SCREEN_W, SCREEN_H, 0, 20, 0, 0);

uint32_t lastFrameMs = 0;
uint32_t hueOffset = 0;
bool paused = false;

uint16_t colorWheel(uint8_t wheel) {
  wheel = 255 - wheel;
  if (wheel < 85) return display->color565(255 - wheel * 3, 0, wheel * 3);
  if (wheel < 170) {
    wheel -= 85;
    return display->color565(0, wheel * 3, 255 - wheel * 3);
  }
  wheel -= 170;
  return display->color565(wheel * 3, 255 - wheel * 3, 0);
}

bool touchWasTapped() {
  if (digitalRead(TOUCH_INT) == HIGH) return false;
  Wire.beginTransmission(CST816T_ADDRESS);
  Wire.write(0x02); // finger count register
  if (Wire.endTransmission(false) != 0) return false;
  if (Wire.requestFrom(CST816T_ADDRESS, static_cast<uint8_t>(1)) != 1) return false;
  return Wire.read() > 0;
}

void drawFrame(uint32_t t) {
  const int cx = SCREEN_W / 2;
  const int cy = SCREEN_H / 2;
  const float time = t * 0.001f;

  display->fillScreen(BLACK);
  for (int i = 0; i < 74; ++i) {
    float a = (i * 0.255f) + time * 0.72f;
    float b = (i * 0.137f) - time * 0.41f;
    float radius = 18.0f + (i % 19) * 5.2f + sinf(time * 1.5f + i * 0.31f) * 11.0f;
    int x1 = cx + static_cast<int>(cosf(a) * radius);
    int y1 = cy + static_cast<int>(sinf(b) * radius * 1.18f);
    int x2 = cx + static_cast<int>(cosf(a + 1.75f + sinf(time + i) * 0.35f) * (radius + 37));
    int y2 = cy + static_cast<int>(sinf(b + 1.75f) * (radius + 37) * 1.18f);
    display->drawLine(x1, y1, x2, y2, colorWheel((i * 9 + hueOffset) & 0xFF));
  }

  for (int ring = 0; ring < 7; ++ring) {
    int r = 25 + ring * 16 + static_cast<int>(sinf(time * 1.8f + ring) * 6.0f);
    display->drawCircle(cx, cy, r, colorWheel((ring * 31 + hueOffset + 80) & 0xFF));
  }

  display->fillCircle(cx, cy, 11 + static_cast<int>(sinf(time * 3.0f) * 3.0f), WHITE);
}

void setup() {
  pinMode(LCD_BL, OUTPUT);
  digitalWrite(LCD_BL, HIGH);
  pinMode(TOUCH_RST, OUTPUT);
  digitalWrite(TOUCH_RST, LOW);
  delay(10);
  digitalWrite(TOUCH_RST, HIGH);
  pinMode(TOUCH_INT, INPUT_PULLUP);
  Wire.begin(TOUCH_SDA, TOUCH_SCL);

  display->begin();
  display->fillScreen(BLACK);
  display->setTextColor(WHITE);
  display->setTextSize(2);
  display->setCursor(44, 126);
  display->println("Pocket bloom");
  display->setTextSize(1);
  display->setCursor(46, 154);
  display->println("tap to pause or play");
  delay(900);
}

void loop() {
  static bool touchHeld = false;
  bool touching = touchWasTapped();
  if (touching && !touchHeld) paused = !paused;
  touchHeld = touching;

  uint32_t now = millis();
  if (!paused && now - lastFrameMs >= FRAME_INTERVAL_MS) {
    lastFrameMs = now;
    hueOffset = (hueOffset + 2) & 0xFF;
    drawFrame(now);
  }
}
Download project files
Remix this project
Make it yours in one click
Open a full copy of this project in your own Schematik workspace — diagram, code, parts, and assembly steps included. Swap the sensor, add features, or redesign the whole thing with AI. The author's original stays untouched.
Related projects
How to Build a Tiny ESP DeskBuddy with ESP32-C6
ESP32 · Intermediate · 45 minutes · June 12, 2026Schematik
Portable RGB Animation Display
ESP32 · Intermediate · 90 minutes · July 26, 2026Schematik
How to Build a Fitness Wristband Prototype with ESP32
ESP32 · Intermediate · 50 minutes · June 12, 2026Schematik