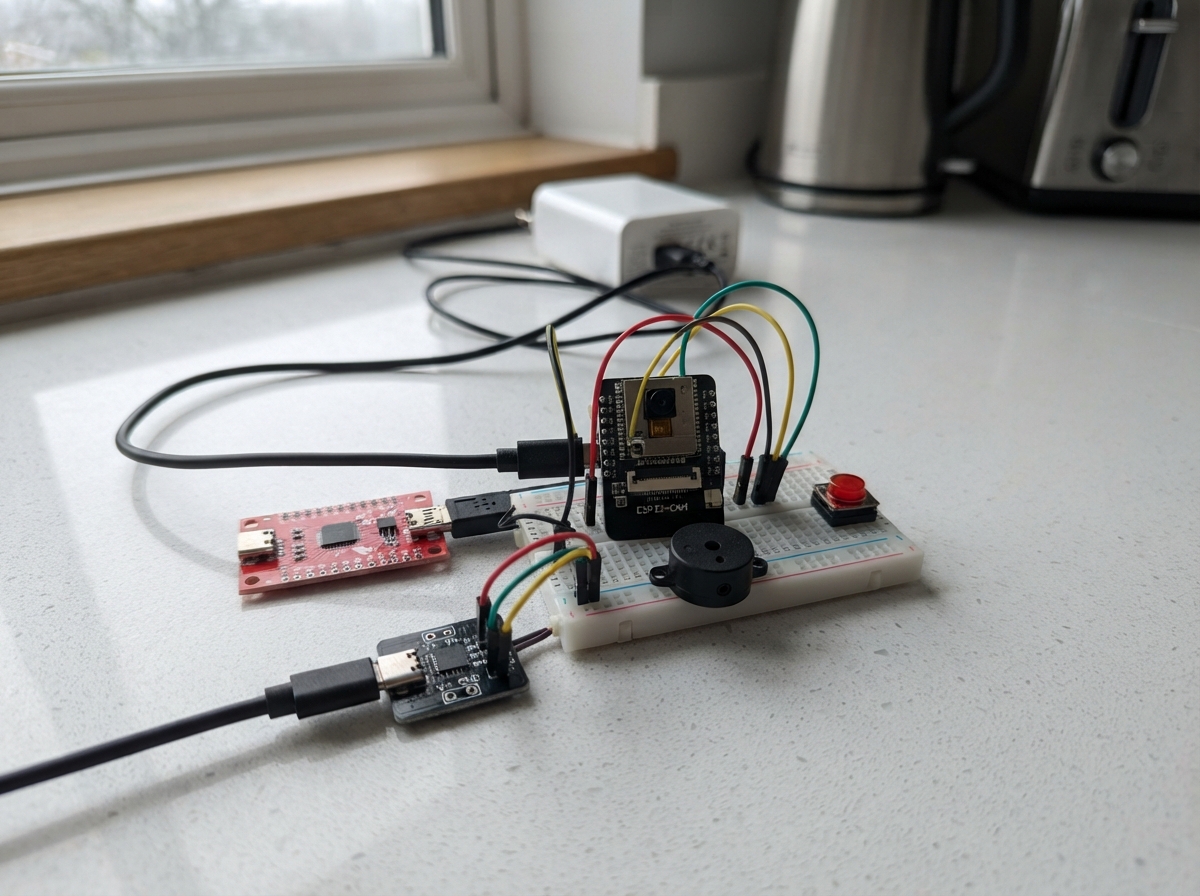
This project turns an ESP32-CAM into a private Wi-Fi video doorbell that streams live video to a local web page without relying on cloud services. When someone presses the doorbell button, the ESP32 triggers a piezo buzzer chime and logs the event, while the camera feed remains accessible only on the home network.
The guide provides a complete wiring diagram, parts list, and Arduino firmware to get the camera and button working together. Builders will learn how to program the ESP32-CAM, set up local Wi-Fi connectivity, handle button interrupts, and mount the prototype in a doorbell enclosure.
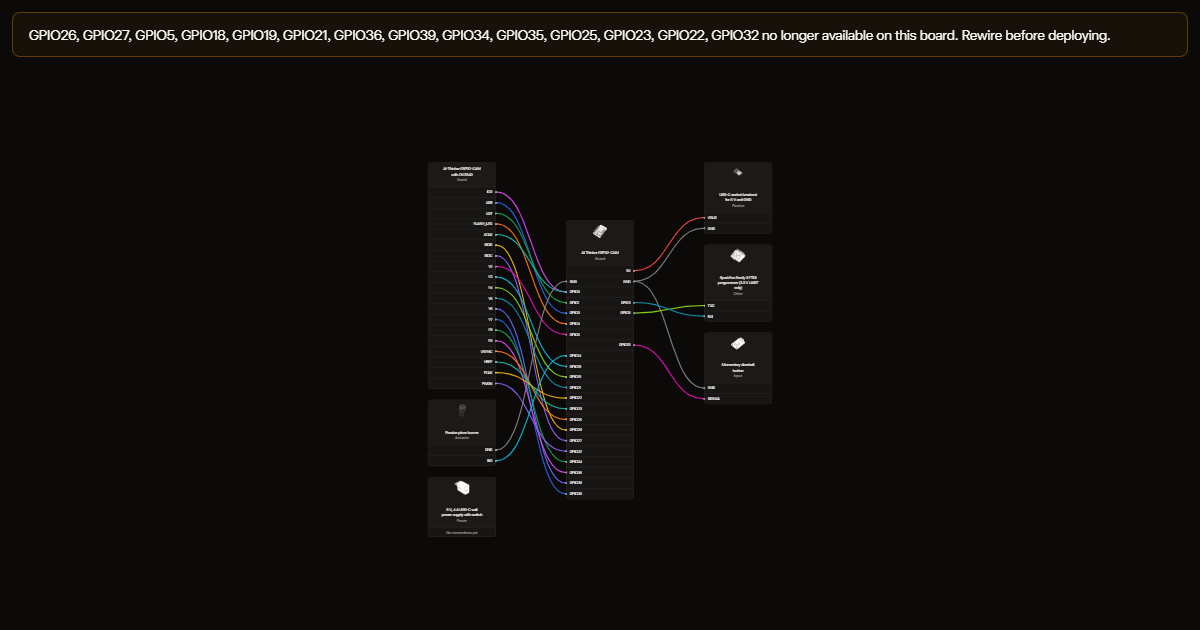
Wiring diagram
Gather all the parts
Assemble it in 5 steps
1. Prepare the ESP32-CAM
Seat the ESP32-CAM on its USB programmer adapter, connect it to your computer, and select the AI Thinker ESP32-CAM style board profile.
- Keep the camera ribbon fully seated before upload.
- Open the serial monitor at 115200 baud so you can read the local IP address.
- Unplug USB before reseating the ESP32-CAM. Offset headers can short 5V into the wrong pin.
2. Wire the doorbell button
Connect one side of the momentary button to GPIO13 and the other side to GND. The sketch uses the ESP32 internal pull-up, so no external resistor is needed for the basic build.
- Use short wires for the first test, then extend them once the enclosure layout is clear.
- Avoid GPIO0 for the doorbell button; it affects boot mode on many ESP32-CAM boards.
3. Add the local chime
Connect the passive buzzer signal pin to GPIO14 and its ground pin to GND. The onboard flash LED on GPIO4 is used as a short visual blink during each ring.
- If the chime is too quiet, use a small transistor driver or an active buzzer module instead of drawing extra current from the GPIO.
- Do not power a large speaker directly from an ESP32 GPIO pin.
4. Upload Wi-Fi details and test the feed
Replace the Wi-Fi placeholders, upload the sketch, then open the IP address printed in Serial Monitor from a browser on the same 2.4 GHz network. Press the button and confirm the ring count, chime, LED blink, and camera refresh all work.
- If the feed is slow, change FRAMESIZE_VGA to FRAMESIZE_QVGA.
- Keep this prototype on your private LAN unless you add authentication and HTTPS.
- Do not expose the camera page directly to the public internet.
5. Mount the prototype
Place the ESP32-CAM behind a faceplate or small enclosure so the lens has a clear view and the button is easy to press. Leave USB accessible while you are still tuning the sketch.
- A temporary cardboard faceplate is enough for testing camera angle before printing or drilling a permanent case.
- Weatherproofing and mains-powered doorbell transformer integration are outside this low-voltage prototype.
Review all connections
1. Connections between "esp32-cam-doorbell-1" and "ESP32"
2. Connections between "doorbell-button-1" and "ESP32"
3. Connections between "doorbell-chime-1" and "ESP32"
4. Connections between "esp32-video-doorbell-beefy3-programmer-1" and "ESP32"
5. Connections between "esp32-video-doorbell-regulated-5v-supply-1" and "ESP32"
6. Connections between "esp32-video-doorbell-usb-c-power-breakout-1" and "ESP32"
Deploy the firmware
#include "esp_camera.h"
#include <WiFi.h>
#include <WebServer.h>

const char* ssid = "YOUR_WIFI_SSID";
const char* password = "YOUR_WIFI_PASSWORD";

#define PWDN_GPIO_NUM     32
#define RESET_GPIO_NUM    -1
#define XCLK_GPIO_NUM      0
#define SIOD_GPIO_NUM     26
#define SIOC_GPIO_NUM     27
#define Y9_GPIO_NUM       35
#define Y8_GPIO_NUM       34
#define Y7_GPIO_NUM       39
#define Y6_GPIO_NUM       36
#define Y5_GPIO_NUM       21
#define Y4_GPIO_NUM       19
#define Y3_GPIO_NUM       18
#define Y2_GPIO_NUM        5
#define VSYNC_GPIO_NUM    25
#define HREF_GPIO_NUM     23
#define PCLK_GPIO_NUM     22

#define DOORBELL_BUTTON_PIN 13
#define CHIME_PIN 14
#define FLASH_LED_PIN 4

WebServer server(80);
volatile bool buttonPressed = false;
unsigned long lastRingMs = 0;
unsigned long ringCount = 0;

void IRAM_ATTR onDoorbellPress() {
  buttonPressed = true;
}

String htmlPage() {
  String ringState = ringCount == 0 ? "Waiting for the first press" : "Last press " + String((millis() - lastRingMs) / 1000) + " seconds ago";
  String page = "<!doctype html><html><head><meta name='viewport' content='width=device-width, initial-scale=1'>";
  page += "<title>ESP32 Video Doorbell</title><style>body{font-family:sans-serif;background:#111;color:#fff;margin:0;padding:24px;text-align:center}";
  page += "img{width:100%;max-width:640px;border-radius:18px;border:1px solid #333}.card{max-width:680px;margin:auto}.badge{display:inline-block;background:#0f766e;padding:8px 12px;border-radius:999px;margin:12px}</style></head>";
  page += "<body><div class='card'><h1>ESP32 Video Doorbell</h1><div class='badge'>Rings: " + String(ringCount) + "</div><p>" + ringState + "</p>";
  page += "<img src='/capture' id='cam'><p><button onclick=\"fetch('/test-ring')\">Test chime</button></p>";
  page += "<script>setInterval(()=>{document.getElementById('cam').src='/capture?t='+Date.now()},800);setInterval(()=>location.reload(),10000)</script>";
  page += "</div></body></html>";
  return page;
}

void playChime() {
  digitalWrite(FLASH_LED_PIN, HIGH);
  tone(CHIME_PIN, 988, 120);
  delay(160);
  tone(CHIME_PIN, 1319, 180);
  delay(220);
  noTone(CHIME_PIN);
  digitalWrite(FLASH_LED_PIN, LOW);
}

void handleRoot() {
  server.send(200, "text/html", htmlPage());
}

void handleCapture() {
  camera_fb_t *fb = esp_camera_fb_get();
  if (!fb) {
    server.send(500, "text/plain", "Camera capture failed");
    return;
  }
  server.sendHeader("Cache-Control", "no-store");
  server.send_P(200, "image/jpeg", (const char *)fb->buf, fb->len);
  esp_camera_fb_return(fb);
}

void handleTestRing() {
  lastRingMs = millis();
  ringCount++;
  playChime();
  server.send(200, "text/plain", "Doorbell test ring recorded");
}

void setupCamera() {
  camera_config_t config;
  config.ledc_channel = LEDC_CHANNEL_0;
  config.ledc_timer = LEDC_TIMER_0;
  config.pin_d0 = Y2_GPIO_NUM;
  config.pin_d1 = Y3_GPIO_NUM;
  config.pin_d2 = Y4_GPIO_NUM;
  config.pin_d3 = Y5_GPIO_NUM;
  config.pin_d4 = Y6_GPIO_NUM;
  config.pin_d5 = Y7_GPIO_NUM;
  config.pin_d6 = Y8_GPIO_NUM;
  config.pin_d7 = Y9_GPIO_NUM;
  config.pin_xclk = XCLK_GPIO_NUM;
  config.pin_pclk = PCLK_GPIO_NUM;
  config.pin_vsync = VSYNC_GPIO_NUM;
  config.pin_href = HREF_GPIO_NUM;
  config.pin_sccb_sda = SIOD_GPIO_NUM;
  config.pin_sccb_scl = SIOC_GPIO_NUM;
  config.pin_pwdn = PWDN_GPIO_NUM;
  config.pin_reset = RESET_GPIO_NUM;
  config.xclk_freq_hz = 20000000;
  config.pixel_format = PIXFORMAT_JPEG;
  config.frame_size = FRAMESIZE_VGA;
  config.jpeg_quality = 12;
  config.fb_count = 1;

  if (esp_camera_init(&config) != ESP_OK) {
    Serial.println("Camera init failed. Check board type and ribbon cable.");
    while (true) delay(1000);
  }
}

void setup() {
  Serial.begin(115200);
  Serial.setDebugOutput(false);
  delay(300);

  pinMode(DOORBELL_BUTTON_PIN, INPUT_PULLUP);
  pinMode(CHIME_PIN, OUTPUT);
  pinMode(FLASH_LED_PIN, OUTPUT);
  digitalWrite(FLASH_LED_PIN, LOW);
  attachInterrupt(digitalPinToInterrupt(DOORBELL_BUTTON_PIN), onDoorbellPress, FALLING);

  setupCamera();

  WiFi.begin(ssid, password);
  Serial.print("Connecting to Wi-Fi");
  while (WiFi.status() != WL_CONNECTED) {
    delay(500);
    Serial.print(".");
  }

  server.on("/", handleRoot);
  server.on("/capture", handleCapture);
  server.on("/test-ring", handleTestRing);
  server.begin();

  Serial.println();
  Serial.println("Video doorbell ready");
  Serial.print("Open http://");
  Serial.println(WiFi.localIP());
}

void loop() {
  server.handleClient();

  if (buttonPressed && millis() - lastRingMs > 500) {
    buttonPressed = false;
    lastRingMs = millis();
    ringCount++;
    Serial.print("Doorbell pressed. Ring count: ");
    Serial.println(ringCount);
    playChime();
  }
}
Remix this project
Make it yours in one click
Open a full copy of this project in your own Schematik workspace, diagram, code, parts, and assembly steps included. Swap the sensor, add features, or redesign the whole thing with AI. The author's original stays untouched.