This project demonstrates how to read and write data to a microSD card using an ESP32 microcontroller. The Adafruit MicroSD breakout board connects via SPI, allowing the ESP32 to store and retrieve files on standard microSD cards. This guide provides a wiring diagram, parts list, and step-by-step assembly instructions to get the hardware connected and ready for use.
The included firmware performs a complete write and read test, appending a message to a text file on the card and then displaying its contents over the serial monitor. Builders will learn how to initialize the SD card, handle file operations, and troubleshoot common connection issues. This foundation supports data logging, configuration storage, and other applications requiring persistent storage on an ESP32 project.
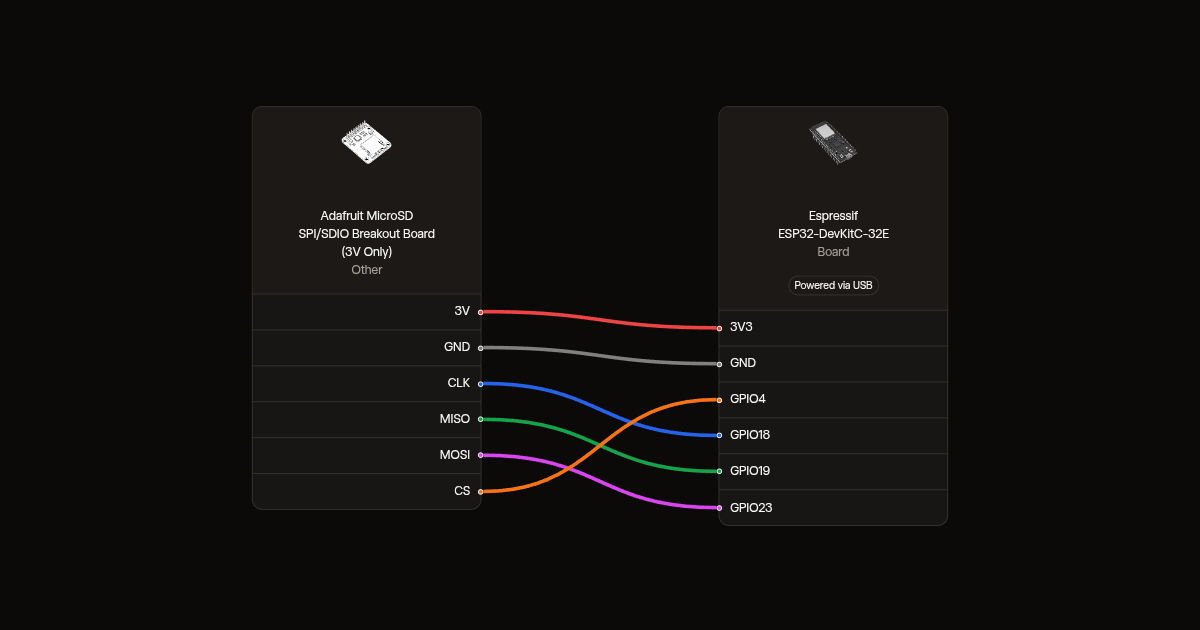
Wiring diagram
Gather all the parts
Assemble it in 4 steps
1. Prepare the microSD breakout
Use an Adafruit 4682 3V-only microSD breakout with soldered headers and an ESP32-DevKitC-32E board. Keep USB unplugged while wiring. Use a spare 4–32 GB microSD card formatted FAT32; formatting erases its contents.
2. Connect power
Connect the breakout 3V pin to ESP32 3V3 and GND to GND.
- Never connect this breakout to 5V: it has no regulator or level shifter and 5V can damage the card.
3. Connect the four signal wires
Connect CLK to GPIO18 (clock), SO/MISO to GPIO19 (data from the card), SI/MOSI to GPIO23 (data to the card), and CS to GPIO4 (card selection). Leave the other breakout pins disconnected. Use short jumper wires.
4. Insert the card and inspect
Insert the microSD card. Check power polarity and all six wires before connecting USB. The test appends one greeting to demo.txt each time the board starts, then reads the file back.
- Serial messages use 115200 baud.
- Wait for the test-finished message, then unplug USB before removing the card to avoid damaged files.
Review all connections
1. Connections between "sd1" and "ESP32"
Deploy the firmware
#include <Arduino.h>
#include <SPI.h>
#include <SD.h>
constexpr int SD_CS = 4;
void setup() {
  Serial.begin(115200);
  delay(1000);
  pinMode(SD_CS, OUTPUT);
  digitalWrite(SD_CS, HIGH);
  SPI.begin(18, 19, 23, SD_CS);
  Serial.println("microSD write/read test");
  if (!SD.begin(SD_CS)) {
    Serial.println("Card failed: check wiring and insert a FAT32 card, then press EN.");
    return;
  }
  if (SD.cardType() == CARD_NONE) {
    Serial.println("No card detected.");
    return;
  }
  // Append rather than overwrite existing data.
  File file = SD.open("/demo.txt", FILE_APPEND);
  if (!file) {
    Serial.println("Cannot open demo.txt for writing.");
    return;
  }
  const char *message = "Hello from ESP32!\n";
  size_t written = file.print(message);
  file.close();
  if (written != strlen(message)) {
    Serial.println("Write failed or incomplete; card may be full.");
    return;
  }
  file = SD.open("/demo.txt");
  if (!file) {
    Serial.println("Cannot read demo.txt.");
    return;
  }
  Serial.println("Contents of demo.txt:");
  while (file.available()) Serial.write(file.read());
  file.close();
  SD.end();
  Serial.println("Test finished. Files closed; switch off USB before removing card.");
}
void loop() { delay(100); }
Remix this project
Make it yours in one click
Open a full copy of this project in your own Schematik workspace, diagram, code, parts, and assembly steps included. Swap the sensor, add features, or redesign the whole thing with AI. The author's original stays untouched.