Community project
Animated Indian Flag Display
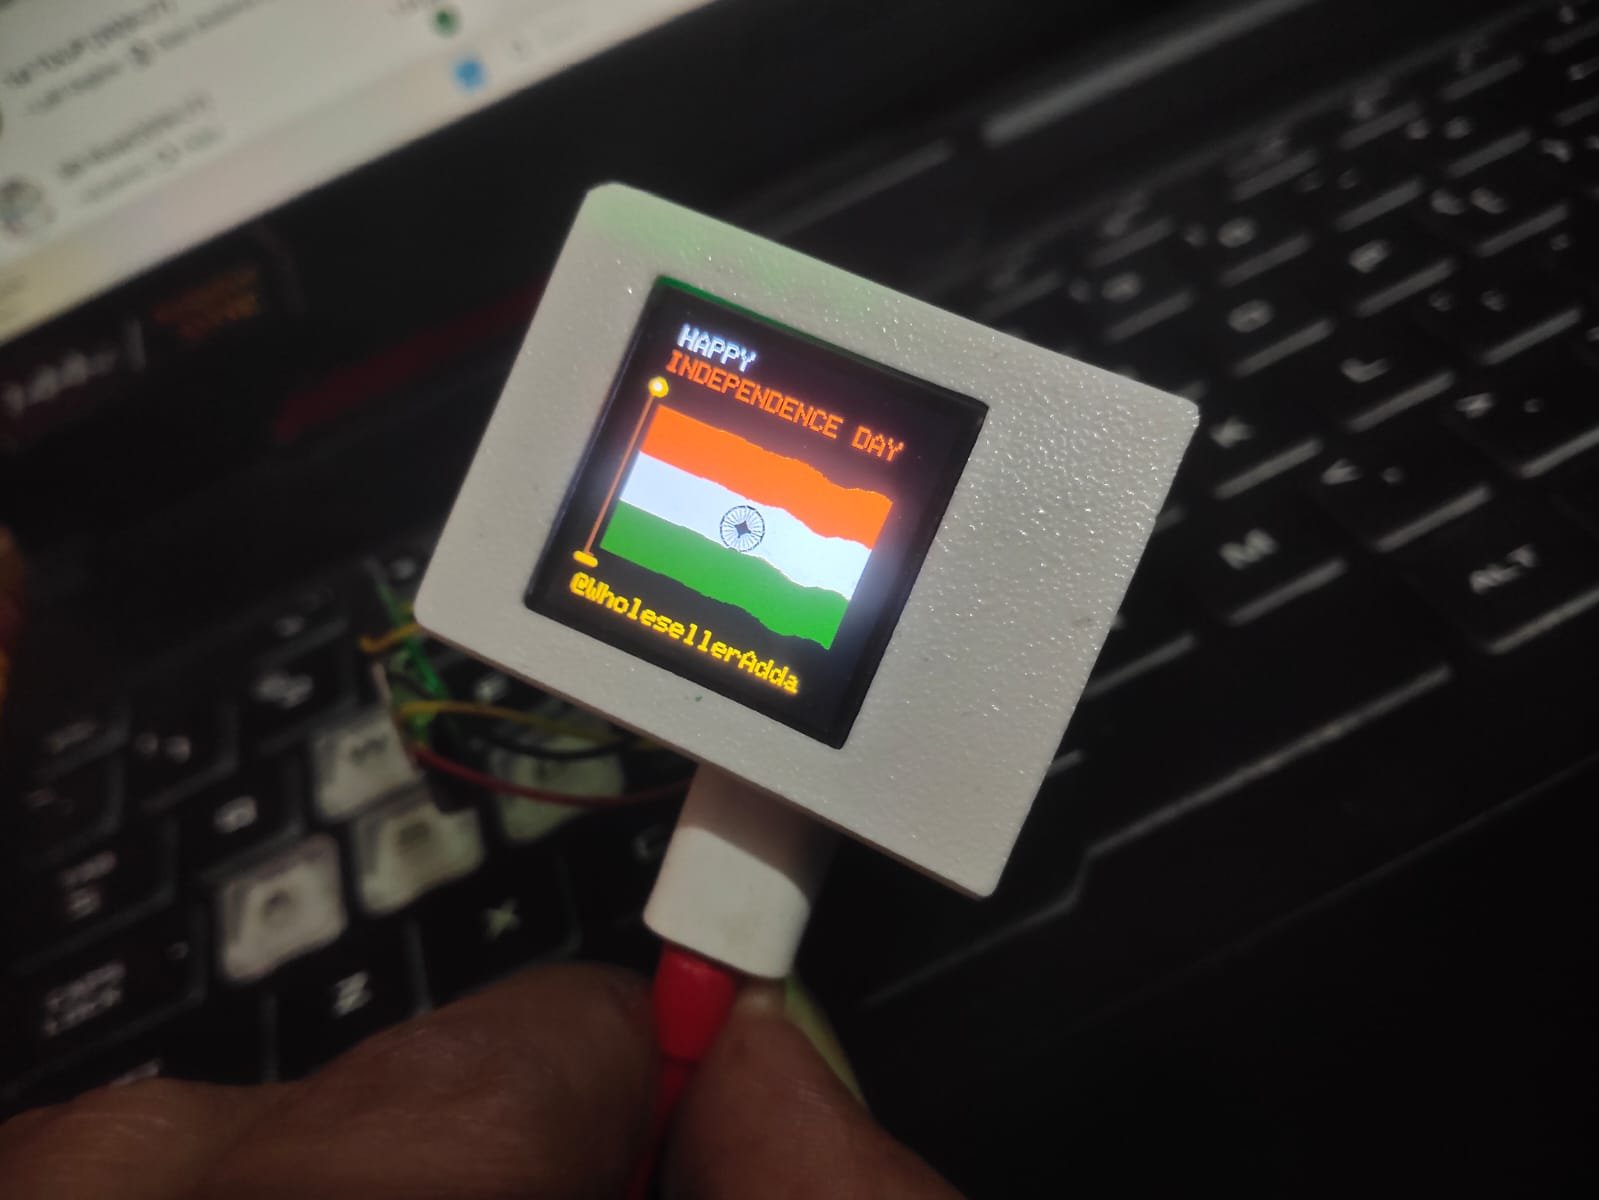
This project displays an animated Indian flag on a compact 2.0-inch TFT screen powered by an ESP32 microcontroller. The flag features the characteristic saffron, white, and green horizontal stripes with a blue Ashoka Chakra, all rendered with smooth wave animations that bring the design to life.
The guide provides a complete parts list, wiring diagram showing all connections between the ESP32 and ST7789 display, and ready-to-flash firmware built with the LovyanGFX graphics library. Assembly takes just minutes: connect power and signal wires to the display, upload the code, and watch the flag animate on your screen.
Wiring diagram

Gather all the parts
Assemble it in 4 steps
1. Keep the board unplugged while wiring
Place the ESP32-C3 DevKit and ST7789 screen beside each other. Leave the USB cable unplugged until all wires are connected, so a loose wire cannot accidentally touch the wrong place.
- Use short jumper wires where possible; they make the moving picture more reliable.
- Do not use the board's 5V pin for this screen — 5 V can damage a 3.3 V display.
2. Connect the power wires
Connect display VCC to the ESP32-C3 3V3 pin (power). Connect display GND to an ESP32-C3 GND pin (ground). Make sure the two labels are not swapped.
- Read the tiny labels beside the display header pins before pushing in each wire.
- Swapping VCC and GND can damage the screen.
3. Connect the screen signal wires
Connect display SCK or CLK to GPIO4 (clock), MOSI or DIN to GPIO6 (picture data), DC or A0 to GPIO3 (command/data), RST or RES to GPIO10 (reset), and BL or LED to GPIO7 (screen light). Connect display CS directly to GND (screen select); this matches the supplied code where CS is always selected. Leave any display MISO or SDO pin unconnected.
- GPIO4 can act as the clock wire because the ESP32-C3 can route its signal functions through available GPIO pins.
- If the backlight pin is labelled LED rather than BL, it is the same connection here.
- Do not connect the display's CS pin to GPIO10; GPIO10 is the reset wire in this design.
4. Power and run the project
Check for loose wire strands and check every display label one final time. Plug the ESP32-C3 into your computer by USB, then press Deploy in Schematik. The display should show the 79th Independence Day message and a waving tricolour.
- If the screen stays dark, first check that BL or LED goes to GPIO7 and that VCC goes to 3V3.
- Unplug USB before moving a jumper wire; moving powered wires can short pins together.
Review all connections
1. Connections between "tft_1" and "ESP32"
Deploy the firmware
#include <Arduino.h>
#include <LovyanGFX.hpp>


// Forward declarations
int waveOffset(int y);
void drawChakra(int cx, int cy);
void drawFlag();
void drawFlagPole();
void drawStaticText();

constexpr uint8_t TFT_SCK = 4;
constexpr uint8_t TFT_MOSI = 6;
constexpr uint8_t TFT_DC = 3;
constexpr uint8_t TFT_RST = 10;
constexpr int8_t TFT_CS = -1;  // CS is permanently selected on this display.
constexpr uint8_t TFT_BL = 7;
constexpr uint8_t DISPLAY_ROTATION = 0;

class IndiaDisplay : public lgfx::LGFX_Device {
  lgfx::Panel_ST7789 panel;
  lgfx::Bus_SPI bus;

public:
  IndiaDisplay() {
    auto busConfig = bus.config();
    busConfig.spi_host = SPI2_HOST;
    busConfig.spi_mode = 3;
    // A faster SPI transfer lets each flag frame finish before the next one starts.
    busConfig.freq_write = 40000000;
    busConfig.freq_read = 8000000;
    busConfig.spi_3wire = true;
    busConfig.use_lock = true;
#if defined(ESP_PLATFORM)
    // ESP32-C3 hardware uses automatic SPI DMA.
    busConfig.dma_channel = SPI_DMA_CH_AUTO;
#else
    // The browser simulator has no DMA engine.
    busConfig.dma_channel = 0;
#endif
    busConfig.pin_sclk = TFT_SCK;
    busConfig.pin_mosi = TFT_MOSI;
    busConfig.pin_miso = -1;
    busConfig.pin_dc = TFT_DC;
    bus.config(busConfig);
    panel.setBus(&bus);

    auto panelConfig = panel.config();
    panelConfig.pin_cs = TFT_CS;
    panelConfig.pin_rst = TFT_RST;
    panelConfig.pin_busy = -1;
    panelConfig.memory_width = 240;
    panelConfig.memory_height = 240;
    panelConfig.panel_width = 240;
    panelConfig.panel_height = 240;
    panelConfig.offset_x = 0;
    panelConfig.offset_y = 0;
    panelConfig.offset_rotation = 0;
    panelConfig.readable = false;
    panelConfig.invert = true;
    panelConfig.rgb_order = false;
    panelConfig.dlen_16bit = false;
    panelConfig.bus_shared = false;
    panel.config(panelConfig);
    setPanel(&panel);
  }
};

IndiaDisplay tft;

constexpr int FLAG_X = 24;
constexpr int FLAG_Y = 65;
constexpr int FLAG_W = 192;
constexpr int FLAG_H = 128;
constexpr uint16_t SAFFRON = 0xFBE0;
constexpr uint16_t INDIA_GREEN = 0x03E0;
// The Ashoka Chakra is deliberately black, including its rim, 24 spokes, and hub.
constexpr uint16_t NAVY_BLUE = TFT_BLACK;
constexpr uint16_t SKY = 0x867D;

unsigned long lastFrame = 0;
float wavePhase = 0.0f;

int waveOffset(int x) {
  // The minus sign makes each crest travel from the left edge toward the right.
  const float travellingWave = sinf(wavePhase - x * 0.105f) * 5.0f;
  const float smallFlutter = sinf(wavePhase * 1.7f - x * 0.040f) * 2.0f;
  return static_cast<int>(travellingWave + smallFlutter);
}

// This off-screen image prevents the display showing the individual drawing lines.
constexpr int FLAG_MARGIN = 8;
lgfx::LGFX_Sprite flagSprite(&tft);

void drawChakra(int cx, int cy) {
  constexpr int radius = 17;
  flagSprite.drawCircle(cx, cy, radius, NAVY_BLUE);
  flagSprite.drawCircle(cx, cy, radius - 1, NAVY_BLUE);
  flagSprite.fillCircle(cx, cy, 2, NAVY_BLUE);
  for (int spoke = 0; spoke < 24; ++spoke) {
    const float angle = (2.0f * PI * spoke) / 24.0f;
    const int x = cx + static_cast<int>(cosf(angle) * (radius - 2));
    const int y = cy + static_cast<int>(sinf(angle) * (radius - 2));
    flagSprite.drawLine(cx, cy, x, y, NAVY_BLUE);
  }
}

void drawFlag() {
  // Build the complete cloth shape in RAM. The black area around it lets the
  // top, bottom, and loose right-hand edge look like a real waving flag.
  flagSprite.fillSprite(TFT_BLACK);
  for (int column = 0; column < FLAG_W; ++column) {
    // Keep the attached left edge nearly straight, while the free end has a
    // larger ripple. The wave itself travels from left to right.
    const float looseEnd = static_cast<float>(column) / (FLAG_W - 1);
    const int clothShift = static_cast<int>(waveOffset(column) * looseEnd);
    const int top = 6 + clothShift;
    const int bottom = FLAG_H - 7 + clothShift;
    const int clothHeight = bottom - top;
    const int saffronHeight = clothHeight / 3;
    const int whiteHeight = clothHeight / 3;
    const int x = FLAG_MARGIN + column;

    flagSprite.drawFastVLine(x, top, saffronHeight, SAFFRON);
    flagSprite.drawFastVLine(x, top + saffronHeight, whiteHeight, TFT_WHITE);
    flagSprite.drawFastVLine(x, top + saffronHeight + whiteHeight,
                             clothHeight - saffronHeight - whiteHeight, INDIA_GREEN);
  }

  const int centreWave = static_cast<int>(waveOffset(FLAG_W / 2) * 0.5f);
  drawChakra(FLAG_MARGIN + FLAG_W / 2, FLAG_H / 2 + centreWave);
  flagSprite.pushSprite(FLAG_X - FLAG_MARGIN, FLAG_Y);
}

void drawFlagPole() {
  // A fixed wooden pole sits behind the attached left edge of the cloth.
  constexpr uint16_t POLE_BROWN = 0x9A60;
  constexpr uint16_t POLE_HIGHLIGHT = 0xD4A3;
  constexpr uint16_t POLE_GOLD = 0xFEA0;
  const int poleX = FLAG_X - 10;
  const int poleTop = FLAG_Y - 8;
  const int poleBottom = FLAG_Y + FLAG_H + 5;

  tft.fillRoundRect(poleX, poleTop, 7, poleBottom - poleTop, 3, POLE_BROWN);
  tft.drawFastVLine(poleX + 2, poleTop + 5, poleBottom - poleTop - 9, POLE_HIGHLIGHT);
  tft.fillCircle(poleX + 3, poleTop + 2, 6, POLE_GOLD);
  tft.fillCircle(poleX + 2, poleTop + 1, 2, TFT_WHITE);
  tft.fillRoundRect(poleX - 5, poleBottom - 2, 17, 5, 2, POLE_GOLD);
}

void drawStaticText() {
  tft.fillScreen(TFT_BLACK);
  tft.setTextWrap(false);
  tft.setTextColor(TFT_WHITE);
  tft.setTextSize(2);
  tft.setCursor(19, 10);
  tft.print("HAPPY");
  tft.setTextColor(SAFFRON);
  tft.setCursor(16, 30);
  tft.print("INDEPENDENCE DAY");

  drawFlagPole();

  // Pink brand name at the bottom of the screen.
  tft.setTextColor(0xF81F);
  tft.setTextSize(2);
  tft.setCursor(16, 210);
  tft.print("WholesellerAdda");
}

void setup() {
  pinMode(TFT_BL, OUTPUT);
  digitalWrite(TFT_BL, HIGH);
  tft.init();
  tft.setRotation(DISPLAY_ROTATION);
  // 208 x 128 pixels is about 53 KB, well within the ESP32-C3's RAM.
  flagSprite.setColorDepth(16);
  flagSprite.createSprite(FLAG_W + FLAG_MARGIN * 2, FLAG_H);
  drawStaticText();
  drawFlag();
}

void loop() {
  const unsigned long now = millis();
  if (now - lastFrame >= 40) {
    lastFrame = now;
    // Slow, small movements make the fabric appear to flow gently.
    wavePhase += 0.035f;
    if (wavePhase > 2.0f * PI) wavePhase -= 2.0f * PI;
    drawFlag();
  }
}
Remix this project
Make it yours in one click
Open a full copy of this project in your own Schematik workspace — diagram, code, parts, and assembly steps included. Swap the sensor, add features, or redesign the whole thing with AI. The author's original stays untouched.
Related projects
Smart NFC Attendance Terminal
ESP32 · October 1, 2026นายชัยบูรณ์ บัวศิริ
Crea El Esquema De Conexiones Pin Pin Para
ESP32 · October 1, 2026Samuel Roa
ESP32 Metal Detector
ESP32 · September 30, 2026Oscar Luis Bustamante Valdivia