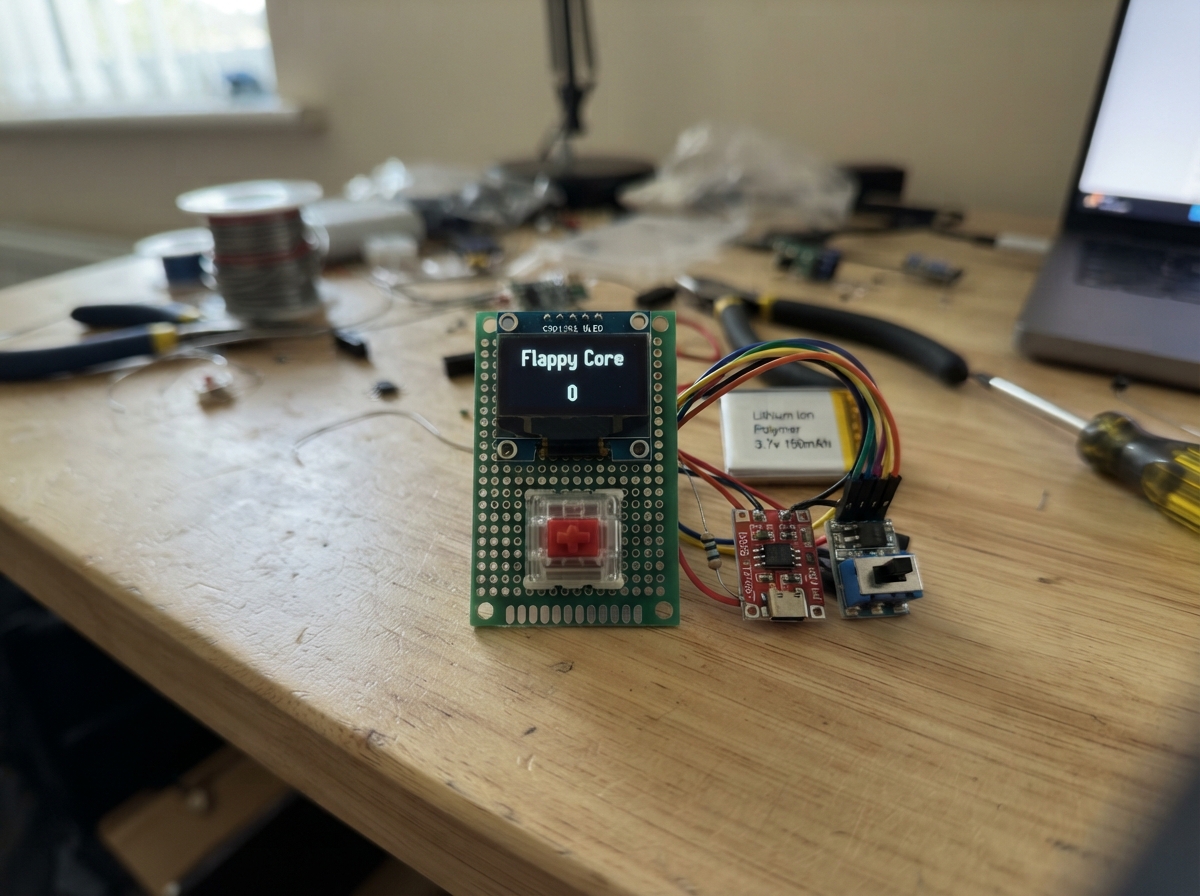
Flappy Core is a compact handheld version of the classic Flappy Bird game, built around an ESP32 microcontroller with a 128x64 OLED display and a single mechanical keyboard switch for gameplay. The bird automatically falls due to gravity, and players tap the switch to make it flap and navigate through scrolling pipes, with the goal of achieving the highest score before collision.
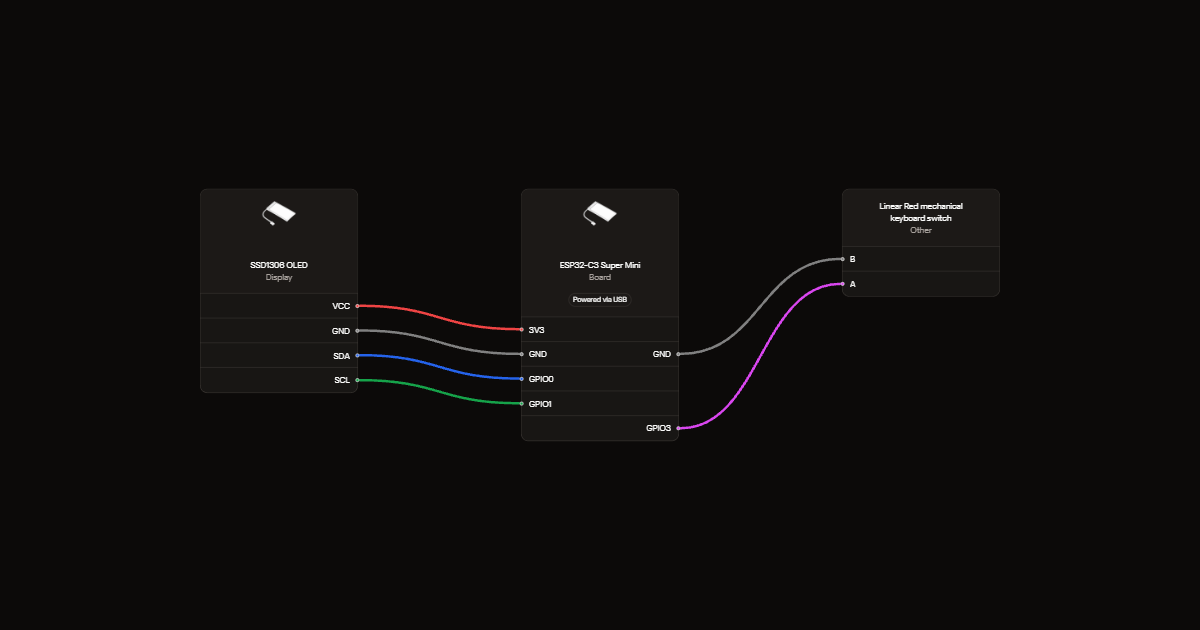
This guide provides everything needed to assemble and play the game: a wiring diagram showing how to connect the display and switch to the ESP32, a complete parts list, the Arduino firmware with game logic and high-score storage, and step-by-step assembly instructions including display verification and USB connection checks.
Wiring diagram
Gather all the parts
Assemble it in 4 steps
1. Check display labels before connecting
This prototype targets the common 0.96-inch 128x64 SSD1306 I2C white OLED. Find the printed GND, VCC, SDA and SCL labels on your module. Follow the labels, not the physical header order. If the labels differ or the controller is different, leave it disconnected until identified.
- Reversing VCC and GND can damage the display.
2. Connect the display with USB unplugged
Connect OLED VCC to board 3V3 (power), GND to GND (ground), SDA to GPIO0 (data), and SCL to GPIO1 (clock). GPIO8 and GPIO9 are not used because of their startup functions.
3. Connect one gameplay switch
Connect one mechanical switch's two metal electrical contacts to GPIO3 and GND. The firmware uses the board's internal pull-up, so no extra resistor is needed. This one switch starts, flaps, restarts and opens the high-score screen. Leave your other two switches unconnected for V0.1.
4. Check the USB prototype
Check that bare contacts cannot touch each other and that OLED power labels match the wiring. Power the board only through its USB socket. No battery, charger, converter, buzzer or external resistors are used.
Review all connections
1. Connections between "oled" and "ESP32"
2. Connections between "key" and "ESP32"
Deploy the firmware
#include <Arduino.h>
#include <Wire.h>
#include <Adafruit_GFX.h>
#include <Adafruit_SSD1306.h>
#include <Preferences.h>
#include <esp_system.h>
constexpr int SDA_PIN=0, SCL_PIN=1, KEY_PIN=3;
Adafruit_SSD1306 screen(128,64,&Wire,-1);
Preferences prefs;
enum State {BOOT,MENU,READY,PLAY,DYING,OVER,BEST_SCREEN};
State state=BOOT;
uint32_t entered=0, frame=0, changed=0, pressedAt=0;
bool raw=false, stable=false, dirty=true, holdUsed=false, storage=false, displayOK=false;
uint32_t best=0,score=0;
float birdY=30,velocity=0;
struct Pipe {float x; int gap; bool passed;};
Pipe pipes[2];
void enter(State s){state=s;entered=millis();dirty=true;}
void resetGame(){birdY=30;velocity=0;score=0;for(int i=0;i<2;i++)pipes[i]={float(145+i*76),int(random(19,43)),false};}
void text(int x,int y,const char* s){screen.setCursor(x,y);screen.print(s);}
void bird(){int y=int(birdY);screen.fillRect(25,y-3,7,6,WHITE);screen.fillRect(31,y-1,3,2,WHITE);screen.drawPixel(30,y-2,BLACK);screen.drawFastHLine(25,y+1,4,BLACK);}
void world(){for(auto &p:pipes){int x=int(p.x),top=p.gap-13,bottom=p.gap+13;screen.drawRect(x,10,12,top-10,WHITE);screen.fillRect(x-1,top-3,14,3,WHITE);screen.drawRect(x,bottom,12,60-bottom,WHITE);screen.fillRect(x-1,bottom,14,3,WHITE);}screen.drawFastHLine(0,60,128,WHITE);bird();screen.setCursor(0,0);screen.print("SC:");screen.print(score);screen.setCursor(72,0);screen.print("HI:");screen.print(best);}
void render(){screen.clearDisplay();screen.setTextSize(1);screen.setTextColor(WHITE);
 switch(state){
 case BOOT:text(28,16,"FLAPPY//CORE");text(28,32,"SYSTEM ONLINE");screen.drawRect(15,49,98,5,WHITE);screen.fillRect(17,51,min(94,int((millis()-entered)*94/1200)),1,WHITE);break;
 case MENU:screen.drawRect(0,0,128,64,WHITE);text(28,10,"FLAPPY//CORE");text(22,29,"TAP   > START");text(22,41,"HOLD  > BEST");text(28,53,"[ C3 V0.1 ]");break;
 case READY:world();screen.fillRect(35,22,90,25,BLACK);text(42,24,"READY?");text(42,38,"TAP TO FLY");break;
 case PLAY:world();break;
 case DYING:world();screen.drawCircle(29,int(birdY),int((millis()-entered)/40)+4,WHITE);break;
 case OVER:text(34,8,"CORE CRASH");screen.setCursor(25,24);screen.print("SCORE ");screen.print(score);screen.setCursor(25,35);screen.print("BEST  ");screen.print(best);text(19,53,"TAP > RESTART");break;
 case BEST_SCREEN:text(25,10,"// HIGH SCORE");screen.setTextSize(2);screen.setCursor(42,28);screen.print(best);screen.setTextSize(1);text(25,53,"TAP > MENU");break;
 }screen.display();dirty=false;}
void crash(){if(score>best){best=score;if(storage)prefs.putUInt("best",best);}enter(DYING);}
void step(){velocity+=0.16f;birdY+=velocity;for(auto &p:pipes){p.x-=1.15f;if(p.x<-15){p.x+=152;p.gap=random(19,43);p.passed=false;}if(!p.passed && p.x+13<25){p.passed=true;score++;}if(p.x-1<34 && p.x+13>25 && (birdY-3<p.gap-13 || birdY+3>=p.gap+13)){crash();return;}}if(birdY-3<10 || birdY+3>=60)crash();dirty=true;}
void setup(){Serial.begin(115200);pinMode(KEY_PIN,INPUT_PULLUP);Wire.begin(SDA_PIN,SCL_PIN);Wire.setClock(400000);Wire.beginTransmission(0x3C);uint8_t address=0x3C;if(Wire.endTransmission()!=0){Wire.beginTransmission(0x3D);if(Wire.endTransmission()!=0){Serial.println("OLED missing: check 3V3, GND, SDA 0, SCL 1");return;}address=0x3D;}displayOK=screen.begin(SSD1306_SWITCHCAPVCC,address,true,false);if(!displayOK){Serial.println("OLED allocation failed");return;}screen.setTextWrap(false);storage=prefs.begin("flappycore",false);if(storage)best=prefs.getUInt("best",0);randomSeed(esp_random());entered=millis();frame=entered;Serial.println("FLAPPY//CORE V0.1 ready - SSD1306 128x64 assumed");}
void loop(){if(!displayOK){delay(100);return;}uint32_t now=millis();bool sample=digitalRead(KEY_PIN)==LOW;bool down=false,up=false;if(sample!=raw){raw=sample;changed=now;}if(now-changed>=18 && stable!=raw){stable=raw;if(stable){down=true;pressedAt=now;holdUsed=false;}else up=true;}
 if(state==MENU){if(stable && !holdUsed && now-pressedAt>=700){holdUsed=true;enter(BEST_SCREEN);}else if(up && !holdUsed){resetGame();enter(READY);}}
 else if(down){switch(state){case READY:velocity=-1.85f;enter(PLAY);frame=now;break;case PLAY:velocity=-1.85f;break;case OVER:resetGame();enter(READY);break;case BEST_SCREEN:enter(MENU);break;default:break;}}
 if(state==BOOT && now-entered>=1200)enter(MENU);
 if(state==DYING && now-entered>=500)enter(OVER);
 if(now-frame>=33){frame=now;if(state==PLAY)step();else if(state==BOOT || state==DYING)dirty=true;if(dirty)render();}delay(1);
}
Remix this project
Make it yours in one click
Open a full copy of this project in your own Schematik workspace, diagram, code, parts, and assembly steps included. Swap the sensor, add features, or redesign the whole thing with AI. The author's original stays untouched.