Community project
How To Upi Reader In School Id Card
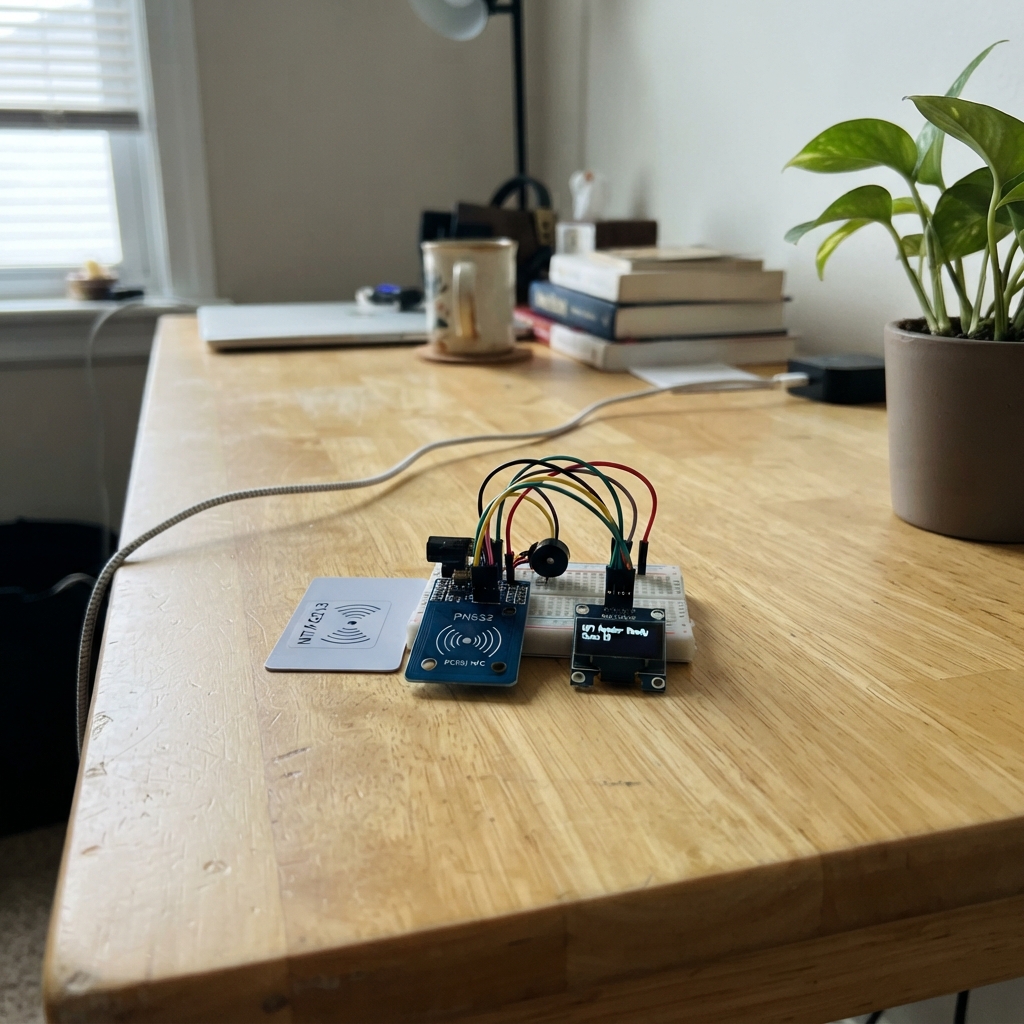
Build an NFC-based school ID card reader that displays student information and meal account balances on a small screen. This project uses an ESP32 microcontroller with a PN532 NFC reader to tap NTAG213 stickers embedded in student ID cards, making it ideal for cafeteria payment systems or attendance tracking in educational settings.
This guide provides a complete wiring diagram, parts list, and Arduino firmware to get the reader up and running. Follow the assembly steps to connect the NFC module, OLED display, and buzzer to the ESP32, then upload the provided code to recognize student cards and manage account balances with audio and visual feedback.
Wiring diagram

Gather all the parts
Assemble it in 6 steps
1. Attach the tap sticker to the ID card
Stick one NTAG213 NFC sticker flat on the back of the plain school ID card, away from any metal clip or foil. This makes the otherwise plain card readable when it is held close to the reader.
- Keep the sticker dry and do not bend it sharply.
- The sticker needs no battery and has no wires.
- Do not store a UPI PIN, bank password, or parent payment information on the sticker; it only acts as a card identifier.
2. Set the NFC reader mode
On the PN532 module, set both small mode switches to ON for I2C mode before connecting power. This lets it share the two data wires with the screen.
- Read the labels next to the switches; some boards mark this as I2C or IIC.
- Changing the switches while power is connected can make the reader stop responding.
3. Connect the NFC reader
Use jumper wires to connect PN532 VCC → ESP32 3V3 (power), PN532 GND → ESP32 GND (ground), PN532 SDA → GPIO21 (data), and PN532 SCL → GPIO22 (clock).
- The ESP32 uses 3.3 V logic, so use the PN532 module's 3.3 V supply connection.
- GPIO21 and GPIO22 are the shared wires used by both the reader and screen.
- Do not connect the PN532 VCC pin to 5 V; 5 V on this reader connection can damage it.
4. Connect the small screen
Connect OLED VCC → ESP32 3V3 (power), OLED GND → ESP32 GND (ground), OLED SDA → GPIO21 (data), and OLED SCL → GPIO22 (clock). These join the matching PN532 data wires.
- The screen and reader can share GPIO21 and GPIO22 because each has its own address.
- If the screen stays blank, check that its pins are labeled VCC, GND, SDA, and SCL in that order; clone modules sometimes arrange them differently.
- Make sure VCC and GND are not swapped — swapped power can damage the screen.
5. Connect the sounder
Connect the buzzer SIGNAL pin → ESP32 GPIO25 (signal) and buzzer GND → ESP32 GND (ground). The buzzer gives one short beep for an approved demo purchase and two longer beeps for a refusal.
- Use an active buzzer module with a pin labeled SIGNAL or S; a bare passive piezo may sound much quieter.
- Do not connect the buzzer signal pin directly to 5 V; GPIO25 only provides a 3.3 V control signal.
6. Power and test the reader
Check all connections once more, then plug the ESP32 into your computer with USB. Press Deploy in Schematik. Hold the stickered card within about 2 to 4 cm of the PN532 antenna and watch the screen.
- The first tap shows the card ID in the deployment log if it has not yet been added to the sample account list.
- Edit the two sample card-ID lines in the firmware to match each sticker before using the demo accounts.
- This prototype does not move real money and does not send UPI confirmation. A live school payment system needs an approved payment provider and secure server.
Review all connections
1. Connections between "pn532_1" and "ESP32"
2. Connections between "oled_1" and "ESP32"
3. Connections between "buzzer_1" and "ESP32"
Deploy the firmware
#include <Arduino.h>
#include <Wire.h>
#include <Adafruit_GFX.h>
#include <Adafruit_SSD1306.h>
#include <Adafruit_PN532.h>


struct StudentAccount {
  const char *uid;
  const char *name;
  int balanceRupees;
};


// Forward declarations
void showLines(const String &line1, const String &line2, const String &line3);
void beep(bool approved);
String uidToHex(const uint8_t *uid, uint8_t uidLength);
void processTap(const String &uid);

constexpr int I2C_SDA_PIN = 21;
constexpr int I2C_SCL_PIN = 22;
constexpr int BUZZER_PIN = 25;
constexpr uint8_t OLED_ADDRESS = 0x3C;
constexpr uint8_t SCREEN_WIDTH = 128;
constexpr uint8_t SCREEN_HEIGHT = 64;
constexpr int MEAL_PRICE_RUPEES = 40;

Adafruit_SSD1306 display(SCREEN_WIDTH, SCREEN_HEIGHT, &Wire, -1);
Adafruit_PN532 nfc(&Wire);


// Replace these sample NFC IDs with the IDs printed on Serial Monitor after a card is tapped.
StudentAccount accounts[] = {
  {"04A1B2C3D4E5F6", "Demo student", 200},
  {"04112233445566", "Test student", 100}
};
constexpr size_t ACCOUNT_COUNT = sizeof(accounts) / sizeof(accounts[0]);

String lastUid = "";
unsigned long lastTapTime = 0;

void showLines(const String &line1, const String &line2, const String &line3 = "") {
  display.clearDisplay();
  display.setTextColor(SSD1306_WHITE);
  display.setTextSize(1);
  display.setCursor(0, 0);
  display.println(line1);
  display.println();
  display.println(line2);
  if (line3.length() > 0) {
    display.println();
    display.println(line3);
  }
  display.display();
}

void beep(bool approved) {
  digitalWrite(BUZZER_PIN, HIGH);
  delay(approved ? 100 : 350);
  digitalWrite(BUZZER_PIN, LOW);
  if (!approved) {
    delay(120);
    digitalWrite(BUZZER_PIN, HIGH);
    delay(350);
    digitalWrite(BUZZER_PIN, LOW);
  }
}

String uidToHex(const uint8_t *uid, uint8_t uidLength) {
  String result;
  for (uint8_t i = 0; i < uidLength; i++) {
    if (uid[i] < 0x10) result += "0";
    result += String(uid[i], HEX);
  }
  result.toUpperCase();
  return result;
}

StudentAccount *findAccount(const String &uid) {
  for (size_t i = 0; i < ACCOUNT_COUNT; i++) {
    if (uid == accounts[i].uid) return &accounts[i];
  }
  return nullptr;
}

void processTap(const String &uid) {
  StudentAccount *account = findAccount(uid);
  Serial.print("Tapped NFC ID: ");
  Serial.println(uid);

  if (account == nullptr) {
    showLines("CARD NOT REGISTERED", "Ask the school office", "ID: " + uid);
    beep(false);
    return;
  }

  if (account->balanceRupees < MEAL_PRICE_RUPEES) {
    showLines("PAYMENT DECLINED", String(account->name), "Balance: Rs " + String(account->balanceRupees));
    beep(false);
    return;
  }

  account->balanceRupees -= MEAL_PRICE_RUPEES;
  showLines("MEAL PAID", String(account->name), "Left: Rs " + String(account->balanceRupees));
  beep(true);
  Serial.print("Approved. Demo balance left: Rs ");
  Serial.println(account->balanceRupees);
}

void setup() {
  Serial.begin(115200);
  pinMode(BUZZER_PIN, OUTPUT);
  digitalWrite(BUZZER_PIN, LOW);

  Wire.begin(I2C_SDA_PIN, I2C_SCL_PIN);
  if (!display.begin(SSD1306_SWITCHCAPVCC, OLED_ADDRESS)) {
    Serial.println("OLED not found at 0x3C");
    while (true) delay(100);
  }

  nfc.begin();
  uint32_t version = nfc.getFirmwareVersion();
  if (!version) {
    showLines("PN532 NOT FOUND", "Set both PN532", "switches to I2C");
    Serial.println("PN532 not found. Check power, SDA/SCL, and I2C DIP switches.");
    while (true) delay(100);
  }

  nfc.SAMConfig();
  showLines("CAFETERIA READER", "Tap school card", "Meal: Rs 40");
  Serial.println("Reader ready. Tap an NFC sticker/card.");
}

void loop() {
  uint8_t uid[7];
  uint8_t uidLength = 0;

  if (!nfc.readPassiveTargetID(PN532_MIFARE_ISO14443A, uid, &uidLength, 80)) {
    return;
  }

  String cardUid = uidToHex(uid, uidLength);
  unsigned long now = millis();
  if (cardUid == lastUid && now - lastTapTime < 2500) {
    return;
  }

  lastUid = cardUid;
  lastTapTime = now;
  processTap(cardUid);
}
Remix this project
Make it yours in one click
Open a full copy of this project in your own Schematik workspace — diagram, code, parts, and assembly steps included. Swap the sensor, add features, or redesign the whole thing with AI. The author's original stays untouched.