Community project
Offline Choice Communicator
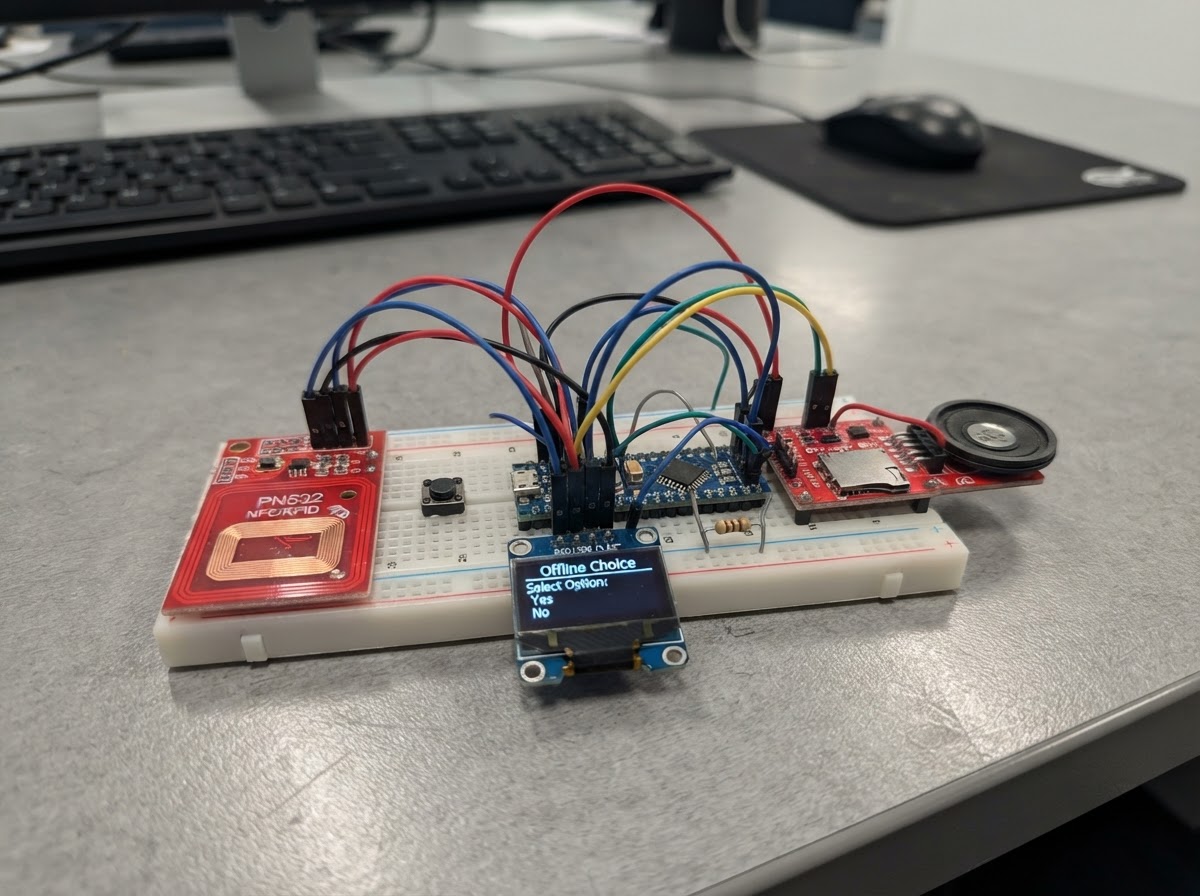
The Offline Choice Communicator is a tactile communication device that pairs NFC tiles with spoken audio feedback, enabling users to express choices without requiring internet connectivity. Built around an ESP32 microcontroller, the device reads NFC-tagged tiles, displays the selected choice on an OLED screen, and plays corresponding audio through a speaker—making it ideal for AAC (augmentative and alternative communication) applications, accessible interfaces, or offline voting systems.
This guide provides a complete wiring diagram, parts list, and step-by-step assembly instructions to build a working communicator from scratch. The included firmware handles NFC scanning, button debouncing, audio playback, and choice confirmation, with straightforward configuration for custom tiles and audio tracks stored on a microSD card.
Wiring diagram

Gather all the parts
Assemble it in 5 steps
1. Set up the quiet tile area
Place the PN532 reader flat behind a thin plastic, cardboard, or acrylic front panel. Put a magnetic sheet or magnetic strips on the front so picture tiles stay in a predictable place. Stick one NTAG213, NTAG215, or MIFARE-compatible NFC tag behind each picture tile; the tag must sit directly over the reader area when the tile is placed down.
- Keep the front panel non-metallic and no thicker than about 3 mm over the reader, so tiles are recognized reliably.
- Use clear photos or symbols chosen with the person who will use the board; the tile can be changed without altering the electronics.
- Do not put metal sheet, foil, or a battery directly between the NFC reader and the tile — it can prevent the tile from being read.
2. Wire the reader and screen
With the ESP32 unplugged, set both small PN532 mode switches to ON for I2C mode. Connect PN532 VCC to ESP32 3V3 (power), PN532 GND to ESP32 GND (ground), PN532 SDA to GPIO21 (shared data), and PN532 SCL to GPIO22 (shared clock). Connect the OLED VCC to ESP32 3V3 (power), OLED GND to ESP32 GND (ground), OLED SDA to GPIO21 (shared data), and OLED SCL to GPIO22 (shared clock).
- Several parts can share the same 3V3, GND, GPIO21, and GPIO22 rows on a breadboard because these are shared wires.
- Mount the OLED where it can be read without being the focus of the board; it is deliberately set to a low brightness in the firmware.
- Make sure VCC and GND are not swapped — swapped power can damage the reader or screen.
- The PN532 must use 3V3, not the ESP32 5V/VIN pin.
3. Add the spoken-output parts
Connect DFPlayer VCC to the ESP32 VIN/5V pin (power) and DFPlayer GND to ESP32 GND (ground). Connect DFPlayer TX to ESP32 GPIO16 (speech-module signal). Connect ESP32 GPIO17 to one end of the 1 kΩ resistor, then connect the other resistor end to DFPlayer RX (speech-module signal). Connect DFPlayer SPK1 to the speaker POS terminal (audio), and DFPlayer SPK2 to the speaker NEG terminal (audio).
- Put a microSD card in the DFPlayer before powering up. Make an mp3 folder on the card and name the recordings 0001.mp3 through 0005.mp3.
- Record the spoken words in a familiar, calm voice. Keep clips short and avoid loud start sounds.
- Do not connect either speaker terminal to ESP32 GND — both speaker wires must go only to SPK1 and SPK2.
- The 1 kΩ resistor must stay between GPIO17 and DFPlayer RX; it protects that connection.
4. Fit the two large buttons
For the Confirm button, connect one button leg to ESP32 GND (ground) and the other leg to GPIO32 (signal). For the Repeat button, connect one button leg to ESP32 GND (ground) and the other leg to GPIO33 (signal). Use large, clearly labelled buttons or matching symbols so they are easy to find by touch.
- The board uses its built-in pull-up setting, so no extra resistor is needed for either button.
- Confirm stores a choice; Repeat says the current choice again without saving another count.
- If using four-leg tactile switches, use two legs from opposite sides of the switch; two legs on the same side are already connected together.
5. Finish the enclosure and prepare the tiles
Secure the ESP32, reader, screen, audio module, speaker, and wires inside a sturdy non-metallic enclosure. Leave the NFC tile area clear. Add strain relief so pulling the USB lead does not tug wires loose. Start with the five sample tiles: Snack, Music, Jacket, Calm, and Outside. After first power-up, place each tile on the reader and copy the printed UID into the matching line in the firmware if it differs from the sample UID.
- Keep the power switch or USB cable easy for a supporter to reach, but keep the user-facing controls simple: tile, Confirm, and Repeat.
- A soft enclosure edge and recessed screen reduce accidental knocks and visual distraction.
- Only make wiring changes while the USB cable is unplugged.
- The five UID examples in the firmware are placeholders; tiles will be recognized as unassigned until their real UID values are entered.
Review all connections
1. Connections between "nfc_reader" and "ESP32"
2. Connections between "choice_display" and "ESP32"
3. Connections between "audio_player" and "ESP32"
4. Connections between "dfplayer_rx_resistor" and "ESP32"
5. Connections between "confirm_button" and "ESP32"
6. Connections between "repeat_button" and "ESP32"
Deploy the firmware
#include <Arduino.h>
#include <Wire.h>
#include <Adafruit_GFX.h>
#include <Adafruit_SSD1306.h>
#include <Adafruit_PN532.h>
#include <DFRobotDFPlayerMini.h>
#include <Preferences.h>


// Hoisted type definitions
struct Choice {
  const char *uid;
  const char *category;
  const char *label;
  uint8_t audioTrack;
  const char *key;
};


// Forward declarations
bool stableButtonPressed(uint8_t pin);
String uidToString(const uint8_t *uid, uint8_t uidLength);
void drawMessage(const String &top, const String &bottom, const String &hint);
void showWelcome();
void playCurrentChoice();
void showCurrentChoice();
void confirmCurrentChoice();
void scanForTile();

constexpr uint8_t I2C_SDA_PIN = 21;
constexpr uint8_t I2C_SCL_PIN = 22;
constexpr uint8_t DFPLAYER_RX_PIN = 16; // ESP32 receives from DFPlayer TX
constexpr uint8_t DFPLAYER_TX_PIN = 17; // ESP32 sends through 1 kOhm resistor to DFPlayer RX
constexpr uint8_t CONFIRM_BUTTON_PIN = 32;
constexpr uint8_t REPEAT_BUTTON_PIN = 33;
constexpr int OLED_WIDTH = 128;
constexpr int OLED_HEIGHT = 64;
constexpr uint32_t BUTTON_DEBOUNCE_MS = 40;
constexpr uint32_t TAG_CLEAR_MS = 900;

Adafruit_SSD1306 display(OLED_WIDTH, OLED_HEIGHT, &Wire, -1);
Adafruit_PN532 nfc(I2C_SDA_PIN, I2C_SCL_PIN);
HardwareSerial dfSerial(2);
DFRobotDFPlayerMini player;
Preferences preferences;


// Replace the UID text below with the UID printed in the serial log for each tile.
// Keep audio tracks on the DFPlayer microSD as /mp3/0001.mp3 through /mp3/0005.mp3.
const Choice choices[] = {
  {"04A1B2C3D4E5", "Food", "Snack", 1, "food"},
  {"04B1C2D3E4F5", "Activity", "Music", 2, "activity"},
  {"04C1D2E3F4A5", "Clothing", "Jacket", 3, "clothing"},
  {"04D1E2F3A4B5", "Feeling", "Calm", 4, "feeling"},
  {"04E1F2A3B4C5", "Place", "Outside", 5, "place"}
};
constexpr size_t CHOICE_COUNT = sizeof(choices) / sizeof(choices[0]);

const Choice *currentChoice = nullptr;
String lastSeenUid;
uint32_t lastTagSeenAt = 0;
bool audioReady = false;
bool nfcReady = false;

bool stableButtonPressed(uint8_t pin) {
  if (digitalRead(pin) != LOW) return false;
  delay(BUTTON_DEBOUNCE_MS);
  if (digitalRead(pin) != LOW) return false;
  while (digitalRead(pin) == LOW) delay(5);
  return true;
}

String uidToString(const uint8_t *uid, uint8_t uidLength) {
  String result;
  for (uint8_t i = 0; i < uidLength; ++i) {
    if (uid[i] < 0x10) result += '0';
    result += String(uid[i], HEX);
  }
  result.toUpperCase();
  return result;
}

const Choice *findChoice(const String &uid) {
  for (size_t i = 0; i < CHOICE_COUNT; ++i) {
    if (uid.equalsIgnoreCase(choices[i].uid)) return &choices[i];
  }
  return nullptr;
}

void drawMessage(const String &top, const String &bottom, const String &hint) {
  display.clearDisplay();
  display.setTextColor(SSD1306_WHITE);
  display.setTextSize(1);
  display.setCursor(0, 0);
  display.println(top);
  display.setTextSize(2);
  display.setCursor(0, 16);
  display.println(bottom);
  display.setTextSize(1);
  display.setCursor(0, 48);
  display.println(hint);
  display.display();
}

void showWelcome() {
  drawMessage("Choice board", "Ready", "Place a picture tile here");
}

void playCurrentChoice() {
  if (currentChoice != nullptr && audioReady) {
    player.playMp3Folder(currentChoice->audioTrack);
  }
}

void showCurrentChoice() {
  if (currentChoice == nullptr) return;
  drawMessage(currentChoice->category, currentChoice->label, "Confirm or press Repeat");
  playCurrentChoice();
}

void confirmCurrentChoice() {
  if (currentChoice == nullptr) {
    drawMessage("No tile selected", "", "Place a picture tile here");
    return;
  }
  uint32_t count = preferences.getUInt(currentChoice->key, 0) + 1;
  preferences.putUInt(currentChoice->key, count);
  String message = String("Saved: ") + String(count) + " times";
  drawMessage(currentChoice->category, currentChoice->label, message);
  playCurrentChoice();
}

void scanForTile() {
  if (!nfcReady) return;
  uint8_t uid[7];
  uint8_t uidLength = 0;
  if (!nfc.readPassiveTargetID(PN532_MIFARE_ISO14443A, uid, &uidLength, 40)) {
    if (lastSeenUid.length() > 0 && millis() - lastTagSeenAt > TAG_CLEAR_MS) {
      lastSeenUid = "";
    }
    return;
  }

  String uidText = uidToString(uid, uidLength);
  lastTagSeenAt = millis();
  if (uidText == lastSeenUid) return;
  lastSeenUid = uidText;

  currentChoice = findChoice(uidText);
  Serial.print("NFC tile UID: ");
  Serial.println(uidText);
  if (currentChoice == nullptr) {
    drawMessage("New picture tile", "Not set up", "Copy its UID from serial log");
    return;
  }
  showCurrentChoice();
}

void setup() {
  Serial.begin(115200);
  pinMode(CONFIRM_BUTTON_PIN, INPUT_PULLUP);
  pinMode(REPEAT_BUTTON_PIN, INPUT_PULLUP);
  preferences.begin("choiceboard", false);

  Wire.begin(I2C_SDA_PIN, I2C_SCL_PIN);
  if (!display.begin(SSD1306_SWITCHCAPVCC, 0x3C)) {
    Serial.println("OLED not found at 0x3C");
  } else {
    display.dim(true);
    showWelcome();
  }

  nfc.begin();
  uint32_t version = nfc.getFirmwareVersion();
  if (version != 0) {
    nfc.SAMConfig();
    nfcReady = true;
  } else {
    drawMessage("Reader needs check", "NFC offline", "Check 3V3, SDA, and SCL");
  }

  dfSerial.begin(9600, SERIAL_8N1, DFPLAYER_RX_PIN, DFPLAYER_TX_PIN);
  audioReady = player.begin(dfSerial, true, true);
  if (audioReady) {
    player.volume(16); // deliberately moderate volume: range is 0 to 30
  } else {
    Serial.println("DFPlayer not found; visual choice board still works.");
  }
}

void loop() {
  scanForTile();
  if (stableButtonPressed(CONFIRM_BUTTON_PIN)) confirmCurrentChoice();
  if (stableButtonPressed(REPEAT_BUTTON_PIN) && currentChoice != nullptr) showCurrentChoice();
}
Remix this project
Make it yours in one click
Open a full copy of this project in your own Schematik workspace — diagram, code, parts, and assembly steps included. Swap the sensor, add features, or redesign the whole thing with AI. The author's original stays untouched.