Community project
Reloj Digital Con Temporizador
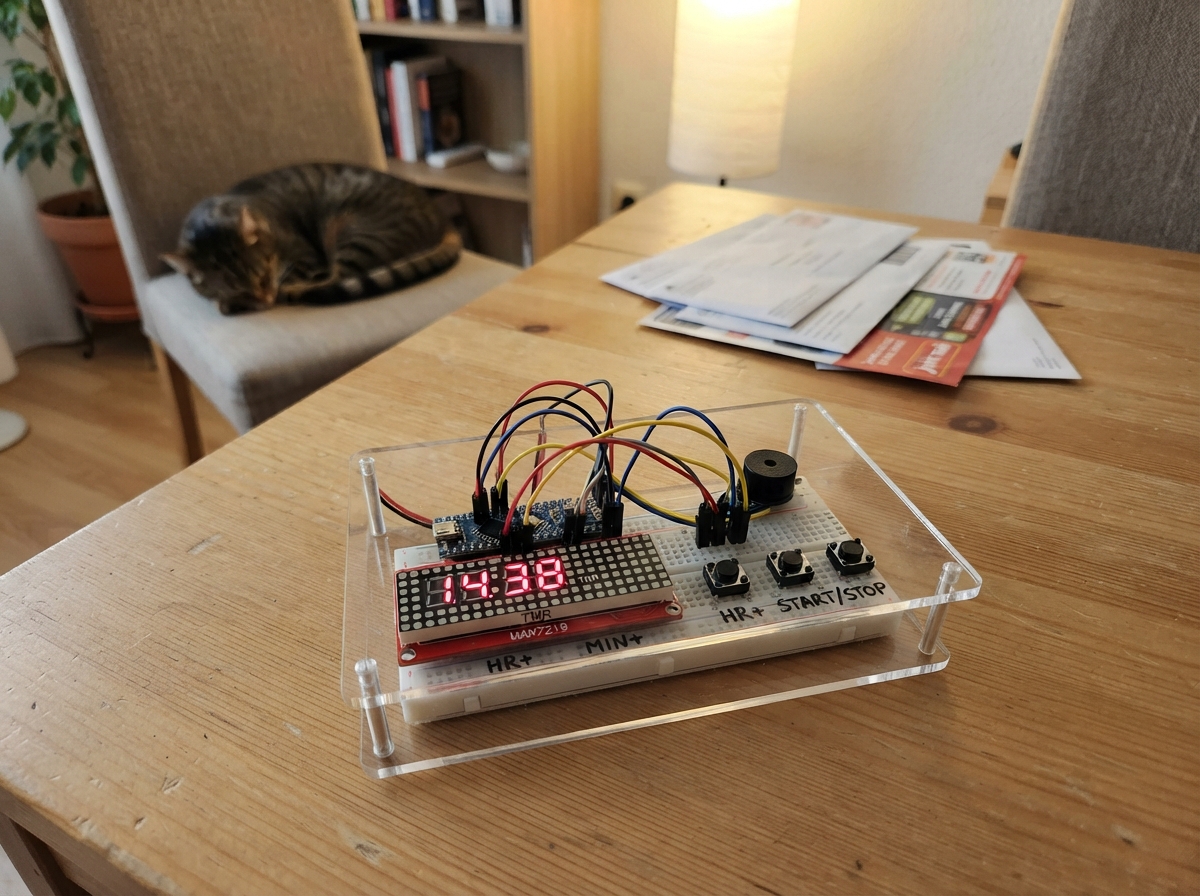
This project builds a digital clock with timer functionality using an Arduino Uno and a MAX7219 LED dot matrix display. The clock shows the current time on an 8x32 LED matrix and includes a countdown timer that can be set and triggered with momentary pushbuttons. A buzzer sounds when the timer reaches zero.
This guide provides a complete wiring diagram, parts list, and step-by-step assembly instructions. The included Arduino firmware handles button debouncing, time display rendering, and timer logic. Builders will learn how to interface with LED matrix modules, manage multiple button inputs, and create a practical timekeeping device.
Wiring diagram

Gather all the parts
Assemble it in 7 steps
1. Deja las piezas sin alimentar
Pon el Arduino Uno, la matriz MAX7219 8×32, los tres pulsadores y la chicharra sobre la mesa sin conectar todavía el cable USB. En la matriz busca VCC, GND, DIN o Data, CS y CLK; en la chicharra busca GND y SIGNAL.
- DIN y Data son el mismo pin en muchas matrices.
- No conectes la matriz al revés: intercambiar VCC y GND puede dañarla.
2. Alimenta la matriz
Conecta VCC de matrix_8x32 al pin 5V del Arduino y GND de matrix_8x32 a un pin GND del Arduino. VCC → 5V (alimentación), GND → GND (tierra).
- La matriz y el Arduino deben compartir GND para que los datos funcionen.
- Antes de enchufar el USB, confirma que VCC está en 5V y que GND está en GND.
3. Conecta los datos de la matriz
Conecta DIN o Data de matrix_8x32 a D11, CS a D10 y CLK a D13 del Arduino. DIN/Data → D11 (datos), CS → D10 (selección), CLK → D13 (reloj de datos).
- Estos tres cables envían los números a los LEDs.
4. Conecta los botones de ajuste
Coloca cada pulsador atravesando la ranura central de la protoboard. En button_hour conecta una pata a D3 y una pata del lado opuesto a GND; cada toque suma una hora. En button_minute conecta una pata a D4 y la opuesta a GND; cada toque suma un minuto. button_hour: terminal 1 → D3 (señal), terminal 2 → GND (tierra). button_minute: terminal 1 → D4 (señal), terminal 2 → GND (tierra).
- No necesitas resistencias para estos botones porque el Arduino usa resistencias internas.
- Si el pulsador tiene cuatro patas, usa una pata de cada lado; dos patas del mismo lado ya están unidas y el botón no funcionará como esperas.
5. Conecta el botón del temporizador
En button_timer conecta una pata a D2 y la pata del lado opuesto a GND. Terminal 1 → D2 (señal), terminal 2 → GND (tierra). Cada pulsación inicia el temporizador con un minuto o añade otro minuto si ya está contando.
- Usa una pata de cada lado del pulsador de cuatro patas.
6. Conecta la chicharra de aviso
Conecta SIGNAL de buzzer_timer a D5 del Arduino y GND de buzzer_timer a cualquier pin GND del Arduino. SIGNAL → D5 (señal), GND → GND (tierra). La chicharra hará un pitido corto por cada segundo desde 10 hasta 1 mientras el temporizador está activo.
- Una chicharra activa de dos pines funciona directamente con esta conexión.
- No conectes SIGNAL al pin 5V: debe ir a D5 para que el Arduino pueda encender y apagar el sonido.
7. Enciende y prueba el reloj
Revisa todos los cables, conecta el Arduino por USB y pulsa Deploy en Schematik. El reloj comienza en 00:00:00: ajusta la hora con button_hour y los minutos con button_minute. Pulsa button_timer para iniciar o añadir un minuto; al quedar 10 segundos, la chicharra avisará cada segundo.
- Mientras el temporizador está activo, la matriz muestra el tiempo restante; al terminar vuelve a mostrar el reloj.
Review all connections
1. Connections between "matrix_8x32" and "Arduino"
2. Connections between "button_timer" and "Arduino"
3. Connections between "button_hour" and "Arduino"
4. Connections between "button_minute" and "Arduino"
5. Connections between "buzzer_timer" and "Arduino"
Deploy the firmware
#include <Arduino.h>
#include <SPI.h>
#include <MD_MAX72xx.h>


struct Button {
  uint8_t pin;
  bool lastReading;
  bool stableState;
  unsigned long changedAt;
};


// Forward declarations
void drawGlyph(uint8_t x, uint8_t glyphIndex);
void showTime(unsigned long totalSeconds);
bool wasPressed(Button &button, unsigned long now);

const uint8_t MATRIX_DATA_PIN = 11;
const uint8_t MATRIX_CS_PIN = 10;
const uint8_t MATRIX_CLK_PIN = 13;
const uint8_t MATRIX_MODULES = 4;

const uint8_t TIMER_BUTTON_PIN = 2;
const uint8_t HOUR_BUTTON_PIN = 3;
const uint8_t MINUTE_BUTTON_PIN = 4;
const uint8_t BUZZER_PIN = 5;
const unsigned long DEBOUNCE_MS = 30;
const unsigned long ONE_MINUTE_MS = 60000UL;
const unsigned long ONE_HOUR_SECONDS = 3600UL;

MD_MAX72XX matrix(MD_MAX72XX::FC16_HW, MATRIX_CS_PIN, MATRIX_MODULES);

const uint8_t glyphs[11][5] = {
  {0b111, 0b101, 0b101, 0b101, 0b111},
  {0b010, 0b110, 0b010, 0b010, 0b111},
  {0b111, 0b001, 0b111, 0b100, 0b111},
  {0b111, 0b001, 0b111, 0b001, 0b111},
  {0b101, 0b101, 0b111, 0b001, 0b001},
  {0b111, 0b100, 0b111, 0b001, 0b111},
  {0b111, 0b100, 0b111, 0b101, 0b111},
  {0b111, 0b001, 0b010, 0b010, 0b010},
  {0b111, 0b101, 0b111, 0b101, 0b111},
  {0b111, 0b101, 0b111, 0b001, 0b111},
  {0b000, 0b010, 0b000, 0b010, 0b000}
};


Button timerButton = {TIMER_BUTTON_PIN, HIGH, HIGH, 0};
Button hourButton = {HOUR_BUTTON_PIN, HIGH, HIGH, 0};
Button minuteButton = {MINUTE_BUTTON_PIN, HIGH, HIGH, 0};

unsigned long clockStartedAt = 0;
unsigned long clockOffsetSeconds = 0;
unsigned long timerEndsAt = 0;
unsigned long lastDrawnSecond = 0xFFFFFFFFUL;
unsigned long lastBuzzedSecond = 0xFFFFFFFFUL;

void drawGlyph(uint8_t x, uint8_t glyphIndex) {
  for (uint8_t row = 0; row < 5; row++) {
    uint8_t bits = glyphs[glyphIndex][row];
    for (uint8_t col = 0; col < 3; col++) {
      matrix.setPoint(row + 1, x + col, (bits & (1 << (2 - col))) != 0);
    }
  }
}

void showTime(unsigned long totalSeconds) {
  uint8_t seconds = totalSeconds % 60UL;
  uint8_t minutes = (totalSeconds / 60UL) % 60UL;
  uint8_t hours = (totalSeconds / ONE_HOUR_SECONDS) % 24UL;
  uint8_t characters[8] = {
    (uint8_t)(hours / 10), (uint8_t)(hours % 10), 10,
    (uint8_t)(minutes / 10), (uint8_t)(minutes % 10), 10,
    (uint8_t)(seconds / 10), (uint8_t)(seconds % 10)
  };

  matrix.clear();
  for (uint8_t i = 0; i < 8; i++) {
    drawGlyph(i * 4, characters[i]);
  }
  matrix.update();
}

bool wasPressed(Button &button, unsigned long now) {
  bool reading = digitalRead(button.pin);
  if (reading != button.lastReading) {
    button.changedAt = now;
    button.lastReading = reading;
  }

  if ((now - button.changedAt) >= DEBOUNCE_MS && reading != button.stableState) {
    button.stableState = reading;
    return button.stableState == LOW;
  }
  return false;
}

void setup() {
  pinMode(TIMER_BUTTON_PIN, INPUT_PULLUP);
  pinMode(HOUR_BUTTON_PIN, INPUT_PULLUP);
  pinMode(MINUTE_BUTTON_PIN, INPUT_PULLUP);
  pinMode(BUZZER_PIN, OUTPUT);
  digitalWrite(BUZZER_PIN, LOW);

  matrix.begin();
  matrix.control(MD_MAX72XX::INTENSITY, 2);
  matrix.clear();
  matrix.update();
  clockStartedAt = millis();
}

void loop() {
  unsigned long now = millis();

  if (wasPressed(hourButton, now)) {
    clockOffsetSeconds = (clockOffsetSeconds + ONE_HOUR_SECONDS) % 86400UL;
    lastDrawnSecond = 0xFFFFFFFFUL;
  }

  if (wasPressed(minuteButton, now)) {
    clockOffsetSeconds = (clockOffsetSeconds + 60UL) % 86400UL;
    lastDrawnSecond = 0xFFFFFFFFUL;
  }

  if (wasPressed(timerButton, now)) {
    if (timerEndsAt == 0 || (long)(now - timerEndsAt) >= 0) {
      timerEndsAt = now + ONE_MINUTE_MS;
    } else {
      timerEndsAt += ONE_MINUTE_MS;
    }
    lastDrawnSecond = 0xFFFFFFFFUL;
  }

  unsigned long secondsToShow;
  bool timerRunning = timerEndsAt != 0 && (long)(now - timerEndsAt) < 0;
  if (timerRunning) {
    secondsToShow = (timerEndsAt - now + 999UL) / 1000UL;

    // La chicharra activa pita una vez por segundo durante los últimos 10 segundos.
    if (secondsToShow <= 10UL && secondsToShow != lastBuzzedSecond) {
      digitalWrite(BUZZER_PIN, HIGH);
      delay(80);
      digitalWrite(BUZZER_PIN, LOW);
      lastBuzzedSecond = secondsToShow;
    }
  } else {
    timerEndsAt = 0;
    lastBuzzedSecond = 0xFFFFFFFFUL;
    digitalWrite(BUZZER_PIN, LOW);
    secondsToShow = ((now - clockStartedAt) / 1000UL + clockOffsetSeconds) % 86400UL;
  }

  if (secondsToShow != lastDrawnSecond) {
    showTime(secondsToShow);
    lastDrawnSecond = secondsToShow;
  }
}
Remix this project
Make it yours in one click
Open a full copy of this project in your own Schematik workspace — diagram, code, parts, and assembly steps included. Swap the sensor, add features, or redesign the whole thing with AI. The author's original stays untouched.
Related projects
I M Building Test-phase Prototype Of Capstone Co
Arduino · September 27, 2026Fritz Blue Gadaza
Ultrasonic Distance Alarm
Arduino · September 26, 2026Djimini3 Normal
Necesito Hacer Un Circuito De Un Oxiometro Con
Arduino · September 25, 2026MARIA PAULA LAMBOGLIA VARGAS